Updated for 0.9.0 |
||
|---|---|---|
| .. | ||
| demos | ||
| images | ||
| .gitignore | ||
| README.md | ||
README.md
Twitter Sentiment Processor
Note: this demo uses Dapr v0.7.1 and may break if different Dapr versions are used
Sample info
| Attribute | Details |
|---|---|
| Dapr runtime version | v0.7.1 |
| Language | Go, C# (.NET Core), Node.js |
| Environment | Local or Kubernetes |
Recordings
View the recorded session and the demo recordings
Overview
This demo illustrates the simplicity of Dapr on Day 1 and it's flexibility of Dapr to adopt to complex of complex use-cases Day 2 by walking through 3 demos:
- Demo 1 - local development showing the speed with which developers can start and the use of Dapr components (Twitter and state)
- Demo 2 - expands on Demo 1 and adds service invocation using both, direct invocation and consumption of events across applications using PubSub
- Demo 3 - takes Demo 2 and illustrates how platform agnostic Dapr really is by containerizing these applications without any changes and deploying them onto Kubernetes. This demo also showcases the pluggability of components (state backed by Azure Table Storage, pubsub by Azure Service Bus)

Demo 1
C# ASP.NET app (provider) using dapr Twitter input component to subscribe to Twitter search results. This app uses the default statestore to persist each tweet into the Redis backed dapr state store.
Objectives
- Show idiomatic experience in Dapr allowing developers to be effective Day 1 (no Dapr libraries or attributes in user code)
- Introduce the concept of components as a way to leverage existing capabilities
Requirements
- Docker
- Node.js or dotnet core > 3.1 (instructions below are for Node.js though demo can be run using dotnet)
- Twitter API credentials
Twitter credentials will have to be added to components/twitter.yaml:
    spec:
      type: bindings.twitter
      # PLACE TWITTER CREDS HERE
      metadata:
      - name: consumerKey
        value: "" # twitter api consumer key, required
      - name: consumerSecret
        value: "" # twitter api consumer secret, required
      - name: accessToken
        value: "" # twitter api access token, required
      - name: accessSecret
        value: "" # twitter api access secret, required
      - name: query
        value: "dapr" # your search query, required
Run demo 1
Starting from the root of demo 1 (demos/demo1)
-
Install Dapr CLI
-
Run
dapr init -
Launch app locally using Dapr by running (example, running via dotnet)
dapr run --app-id provider --app-port 5000 --port 3500 node app.js -
Post a tweet with the word
dapr(e.g. "watching a cool dapr demo #build2020") -
Show dapr log to see the debug info
-
View Redis for persisted data
Demo 2
Demo 2 builds on demo 1. It illustrates interaction between multiple microservices in Dapr (processor being invoked by processor) and adds the concept of pubsub, where each scored tweet in stead of being saved in state store is being published onto a topic. This demo also includes a Go viewer app (viewer) which subscribes to pubsub processed-tweets topic and streaming scored tweets over WebSockets to a SPA in JavaScript which displays streamed tweets.
Objectives
- Builds on Demo 1, illustrate interaction between multiple microservices in Dapr
- Introduces service to service discovery/invocation
- Introduces eventing using Dapr pubsub component
Requirements
Run demo 2
Starting from the root of demo 2 (demos/demo2)
Start processor so it's ready when provider starts
Make sure you have the defined the
CS_TOKENenvironment variable holding your Azure Cognitive Services token docs
cd processor
dapr run node app.js --app-id processor --app-port 3002 --protocol http --port 3500
Start viewer so it's ready when provider starts
cd viewer
dapr run go run handler.go main.go --app-id viewer --app-port 8083 --protocol http
Navigate to the viewer UI in browser (make sure WebSockets connection is opened)
Start provider provider
For demo purposes use a frequently tweeted about topic, like microsoft. You need to change that search term in the demos/demo2/provider/components/twitter.yaml file under
querymetadata element BEFORE you start provider
cd provider
dapr run node app.js --app-id provider --app-port 3001 --protocol http
Switch back to the UI to see the scored tweets
The UI should look something like this

Demo 3
Demo 3 takes the local development work and illustrates how platform agnostic the developer experience really is in Dapr by deploying all the previously developed code onto Kubernetes.
Note, this demo requires Dapr v0.7
Objectives
- Show deployment of locally developed artifacts onto Kubernetes
- Illustrate the run-time portability and component pluggability
Run demo 3
Assumes the use of pre-built images for provider, processor, and viewer
This instructions assume Azure CLI has been configured and that the following CLI defaults have been set:
az account set --subscription <id or name>
az configure --defaults location=<preferred location> group=<preferred resource group>
Note, this demo installs into the
defaultnamespace in your cluster. When installing into a different namespace, make sure to append the-n <your namespace name>to all commands below (secret, component, and deployment)
State Store
To configure state component to use Azure Table Storage follow these instructions. Once finished, you will need to configure the Kubernates secrets to hold the Azure Table Storage token:
kubectl create secret generic demo-state-secret \
  --from-literal=account-name="" \
  --from-literal=account-key=""
Once the secret is configured, deploy the dapr state component from the demos/demo3 directory:
kubectl apply -f component/statestore.yaml
PubSub Topic
To configure pubsub component to use Azure Service Bus follow these instructions. Once finished, you will need to configure the Kubernates secret to hold Azure Service Bus connection string information.
kubectl create secret generic demo-bus-secret \
  --from-literal=connection-string=""
Once the secret is configured, deploy the dapr pubsub topic components from the demos/demo3 directory:
kubectl apply -f component/pubsub.yaml
Twitter Input Binding
Finally, to use the Dapr Twitter input binding we need to configure the Twitter API secretes. You can get these by registering Twitter application and obtain this information here.
kubectl create secret generic demo-twitter-secrets \
  --from-literal=access-secret="" \
  --from-literal=access-token="" \
  --from-literal=consumer-key="" \
  --from-literal=consumer-secret=""
Once the secret is configured you can deploy the Twitter binding:
kubectl apply -f component/twitter.yaml
Deploy Demo
Once the necessary components are created, you just need to create one more secret for the Cognitive Service token that is used in the processor service:
kubectl create secret generic demo-processor-secret \
  --from-literal=token=""
And now you can deploy the entire pipeline (provider, processor, viewer) with a single command:
kubectl apply -f provider.yaml \
              -f processor.yaml \
              -f viewer.yaml
You can check on the status of your deployment like this:
kubectl get pods -l demo=build2020
The results should look similar to this (make sure each pod has READY status 2/2)
NAME                        READY   STATUS    RESTARTS   AGE
processor-89666d54b-hkd5t   2/2     Running   0          18s
provider-85cfbf5456-lc85g   2/2     Running   0          18s
viewer-76448d65fb-bm2dc     2/2     Running   0          18s
Exposing viewer UI
To expose the viewer application externally, create Kubernetes service using route.yaml
kubectl apply -f service/viewer.yaml
Note, the provisioning of External IP may take little time.
To view the viewer application:
export VIEWER_IP=$(kubectl get svc viewer --output 'jsonpath={.status.loadBalancer.ingress[0].ip}')
open "http://${VIEWER_IP}/"
To change the Twitter topic query simply edit the demos/demo3/component/twitter.yaml, apply it, and
kubectl rollout restart deployment providerto ensure the new configuration is applied.
Observability
You can view the scored tweets in Azure table storage

Similarly you can monitor the pubsub topic throughout in Azure Service Bus

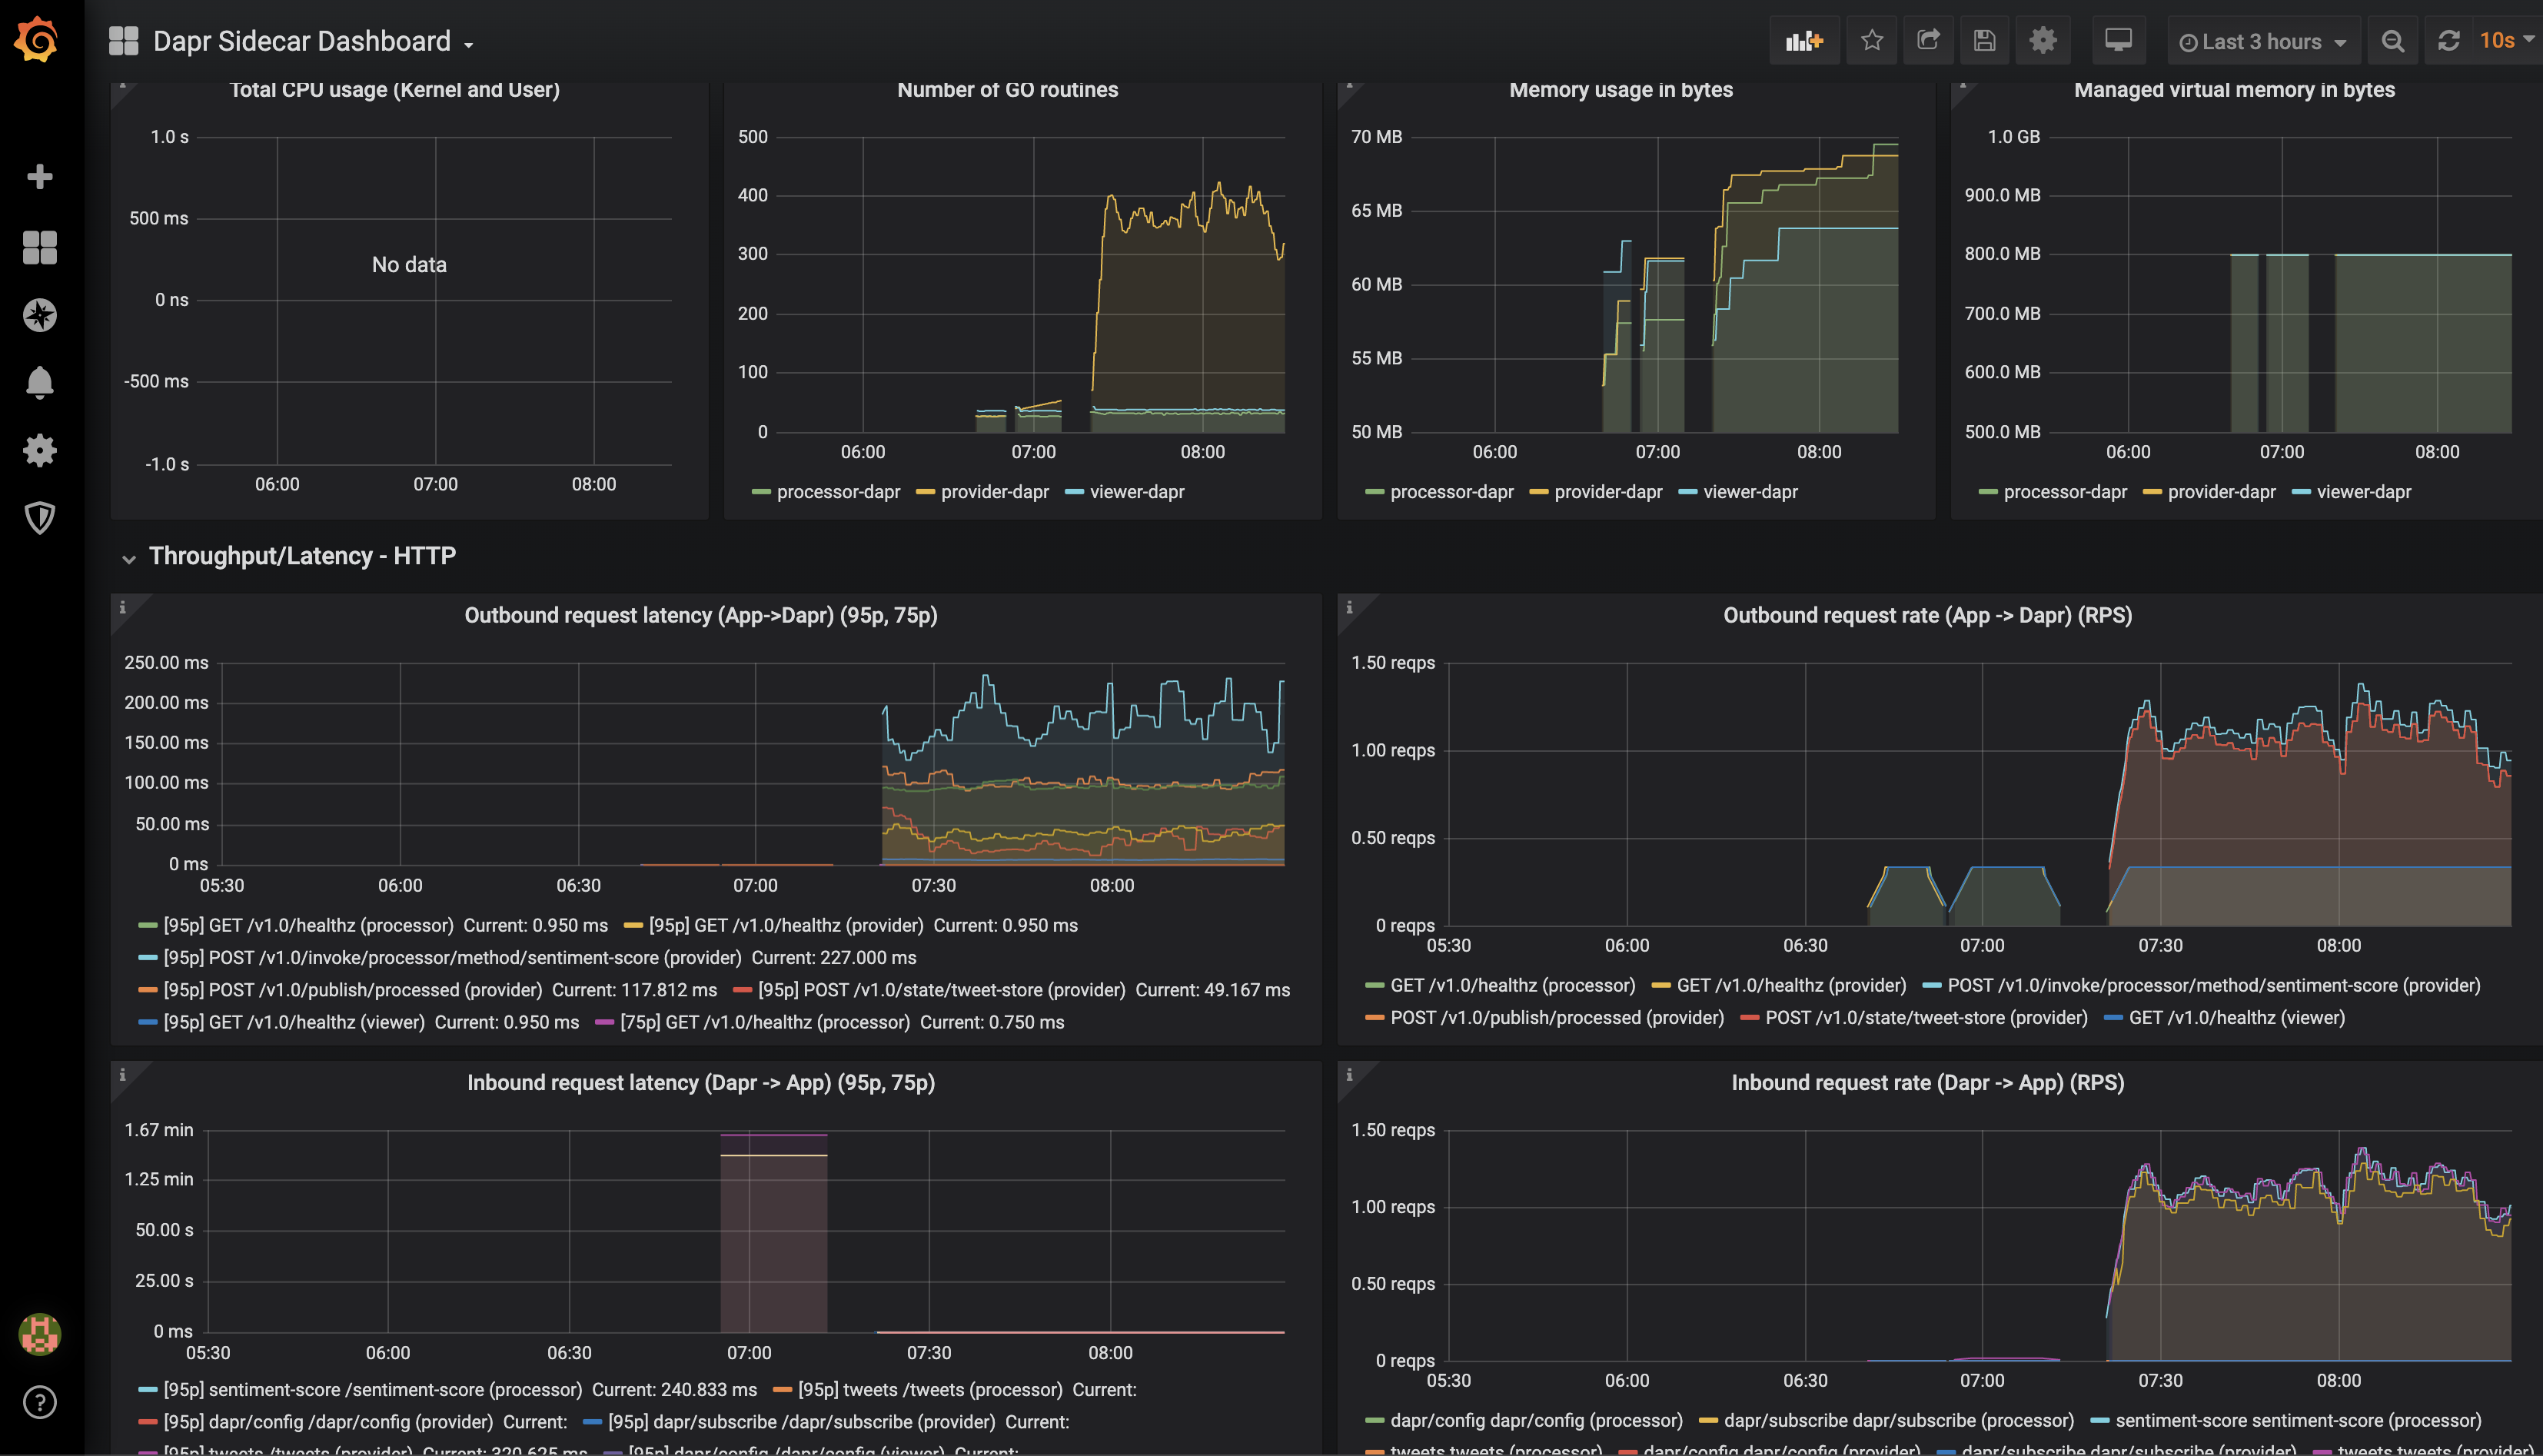
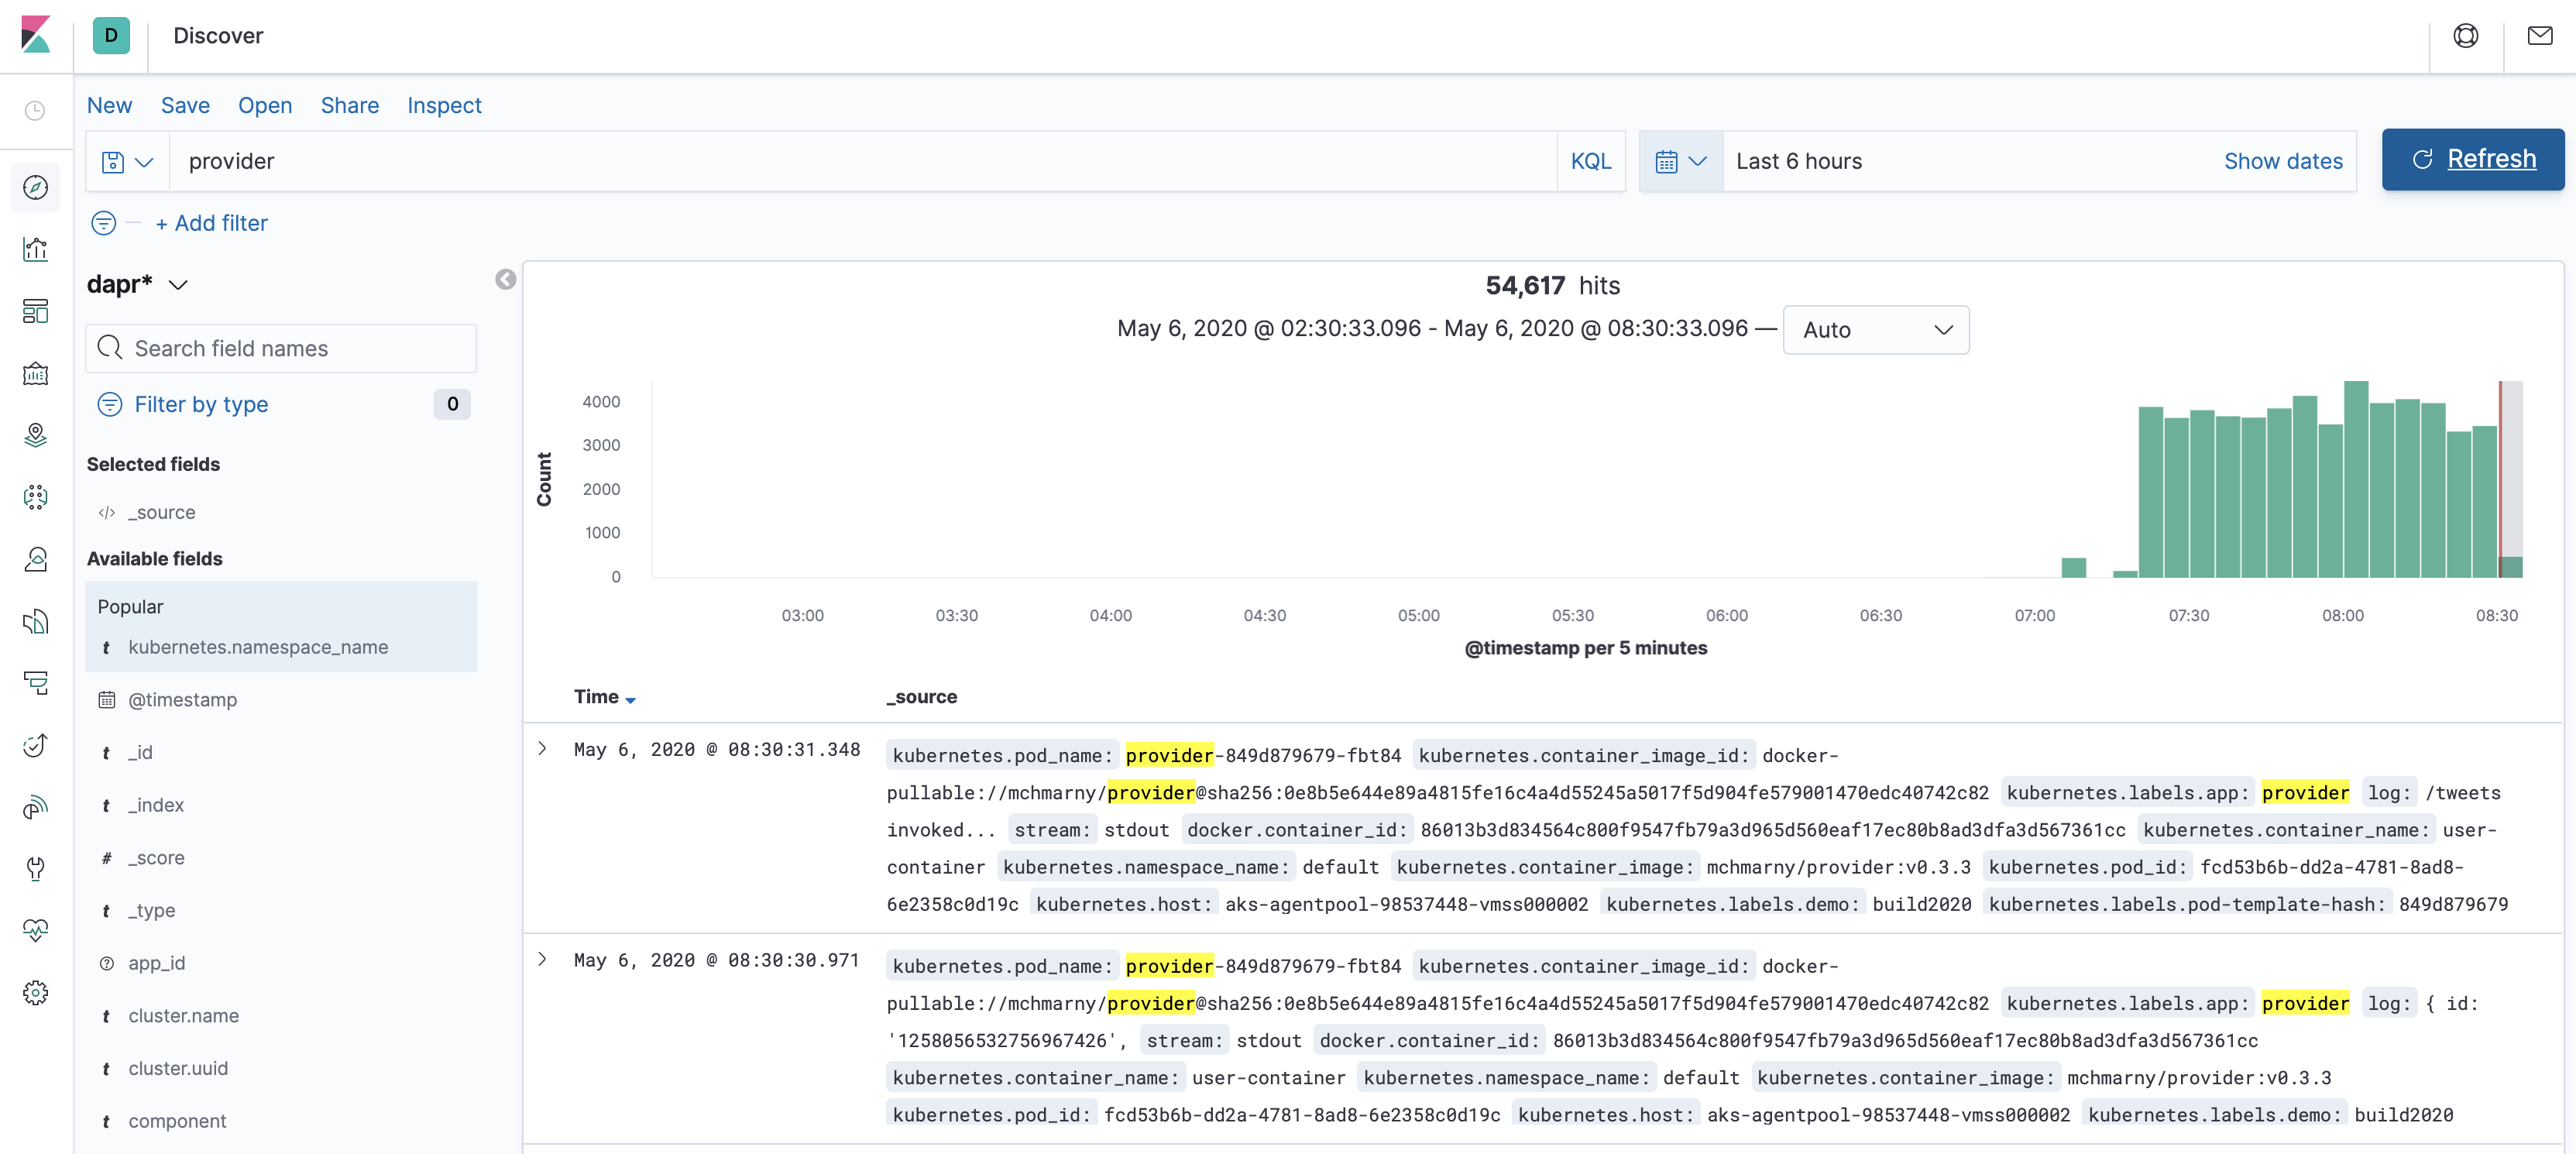
In addition to the state and pubsub, you can also observe Dapr metrics and logs for this demo.
The Dapr sidecar Grafana dashboard
And the Elastic backed Kibana dashboard for logs
For tracing first apply the tracing config
kubectl apply -f tracing/tracing.yaml
And then, if you have not already have it, install Zipkin
kubectl create deployment zipkin --image openzipkin/zipkin
kubectl expose deployment zipkin --type ClusterIP --port 9411
And configure the Zipkin exporter
kubectl apply -f tracing/zipkin .yaml
You may have to restart the deployments
kubectl rollout restart deployment processor provider viewer
At this point you should be able to access the Zipkin UI