8.8 KiB
| title | description | keywords | redirect_from | ui_tabs | |||||||||||
|---|---|---|---|---|---|---|---|---|---|---|---|---|---|---|---|
| Deploy a simple stateless app with RBAC | Learn how to deploy a simple application and customize access to resources. | rbac, authorize, authentication, users, teams, UCP, Docker |
|
|
{% if include.ui %}
This tutorial explains how to create a nginx web server and limit access to one team with role-based access control (RBAC).
Scenario
You are the Docker EE admin at Acme Company and need to secure access to
acme-blog and its component services, Wordpress and MySQL. The best way to do
this is to:
- Build the organization with teams and users
- Create collections (directories) for storing the resources of each component.
- Create grants that specify which team can do what operations on which collection.
- Give the all-clear for the ops team to deploy the blog.
Build the organization
Add the organization, acme-datacenter, and create three teams according to the
following structure:
acme-datacenter
├── dba
│   └── Alex Alutin
├── dev
│   └── Bett Bhatia
└── ops
    └── Chad Chavez
See: Create and configure users and teams.
{% if include.version=="ucp-3.0" %}
Kubernetes deployment
In this section, we deploy acme-blog with Kubernetes. See Swarm stack
for the same exercise with Swarm.
Generate Kubernetes secret
For the Kubernetes part of the tutorial, we need to generate a Kubernetes secret with kubectl. Download the client bundle in UCP to get it running.
- In the Docker EE UI: a. Go to My Profile. b. Click New Client Bundle > Generate Client Bundle.
- On your localhost:
a. Open a new terminal and navigate to the bundle.
b.
mkdir bundle && cd bundlec.unzip ucp-bundle-admin.zipd. Source the UCP environment:eval "$(<env.sh)" - Generate the secret:
echo -n "admin" > ./username.txt
echo -n "1f2d1e2e67df" > ./password.txt
kubectl create secret generic db-user-pass --from-file=./username.txt --from-file=./password.txt
- Ensure the secret was generated:
kubectl get secrets
To undo the eval setting, close the terminal.
Create namespaces
Under construction
apiVersion: v1
kind: Namespace
metadata:
  name: mysql-namespace
test
apiVersion: v1
kind: Namespace
metadata:
  name: wordpress-namespace
Grant roles
Under construction
Deploy Wordpress and MySQL with Kubernetes
Under construction
Test access
Under construction
Swarm Stack
In this section, we deploy acme-blog as a Swarm stack of two services. See
Kubernetes Deployment for the same exercise with
Kubernetes.
Create collection paths
Create three nested Swarm collections. First, create a collection for
acme-blog in the Shared collection and then nest collections for wordpress
and mysql resources:
/
├── System
└── Shared
    └── acme-blog
        ├── wordpress-collection
        └── mysql-collection
Tip: To drill into a collection, click View Children.
See: Group and isolate cluster resources.
Grant roles
Create three grants with built-in roles:
- acme-datacenter/ops + Full Control + /Shared/acme-blog
- acme-datacenter/dev + Full Control + /Shared/acme-blog/wordpress-collection
- acme-datacenter/dba + Full Control + /Shared/acme-blog/mysql-collection
In this exercise we use built-in roles but you can create custom ones too.
See: Grant access to cluster resources.
Deploy Wordpress and MySQL with Swarm
You've configured Docker EE. The ops team can now deploy acme-blog:
- Click Shared Resources > Stacks.
- Click Create Stack.
- Name it,
acme-blogand select Swarm Services mode. - Paste the YAML code below.
- Click Create, and when enabled, click Done.
version: "3.1"

services:
  db:
    image: mysql:5.7
    deploy:
      replicas: 1
      labels:
        com.docker.ucp.access.label: "/Shared/acme-blog/mysql-collection"
      restart_policy:
        condition: on-failure
        max_attempts: 3
    volumes:
      - db_data:/var/lib/mysql
    networks:
      - wordpress-net
    environment:
      MYSQL_ROOT_PASSWORD: wordpress
      MYSQL_DATABASE: wordpress
      MYSQL_USER: wordpress
      MYSQL_PASSWORD: wordpress
  wordpress:
    depends_on:
      - db
    image: wordpress:latest
    deploy:
      replicas: 1
      labels:
        com.docker.ucp.access.label: "/Shared/acme-blog/wordpress-collection"
      restart_policy:
        condition: on-failure
        max_attempts: 3
    volumes:
      - wordpress_data:/var/www/html
    networks:
      - wordpress-net
    ports:
      - "8000:80"
    environment:
      WORDPRESS_DB_HOST: db:3306
      WORDPRESS_DB_PASSWORD: wordpress

volumes:
  db_data:
  wordpress_data:

networks:
  wordpress-net:
    labels:
      com.docker.ucp.access.label: "/Shared/acme-blog"
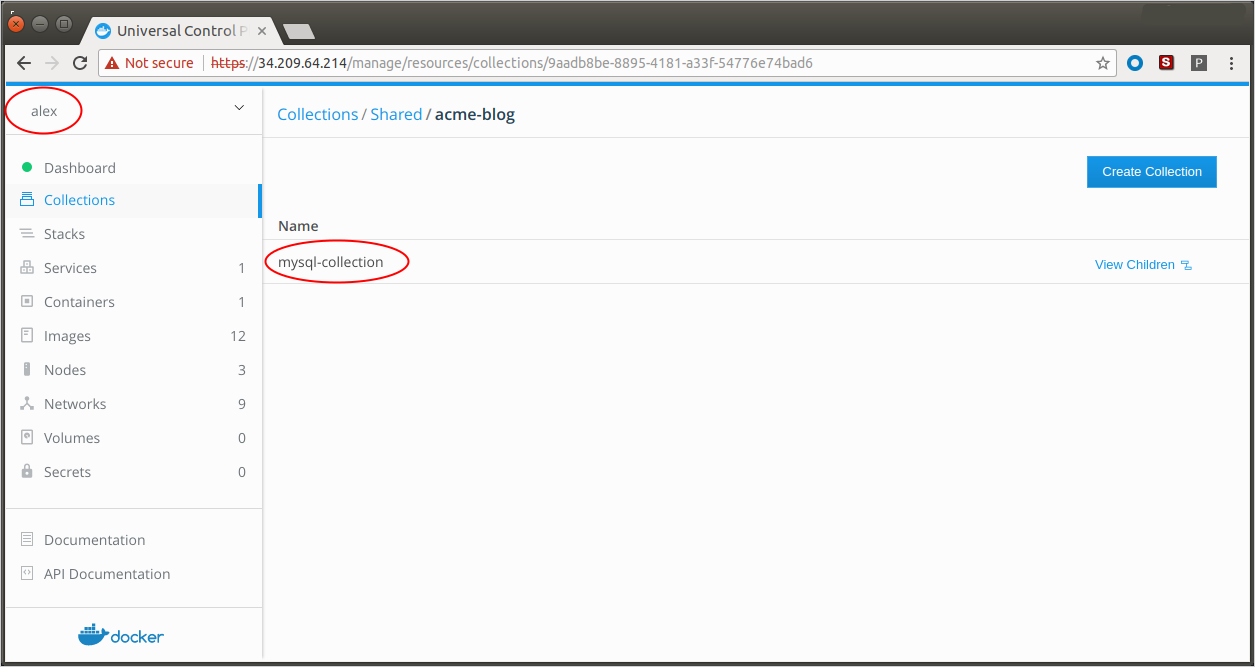
Test access
Log on to the Docker EE UI as each user and ensure that
dba(alex) can only see and accessmysql-collectiondev(bett) can only see and accesswordpress-collectionops(chad) can see and access both.
For example:
 {: .with-border}
{% elsif include.version=="ucp-2.2" %}
Swarm Stack
In this section, we deploy acme-blog as a Swarm stack of two services.
You are the UCP admin at Acme Company and need to secure access to acme-blog
and its component services, Wordpress and MySQL. The best way to do this is to:
- Add teams and users
- Create collections (directories) for storing the resources of each component.
- Create grants that specify which team can do what operations on which collection.
- Give the all-clear for the ops team to deploy the blog.
Build the organization
Add the organization, acme-datacenter, and create three teams according to the
following structure:
acme-datacenter
├── dba
│   └── Alex Alutin
├── dev
│   └── Bett Bhatia
└── ops
    └── Chad Chavez
See: Create and configure users and teams.
Create collection paths
Create three nested Swarm collections. First, create a collection for
acme-blog in the Shared collection and then nest collections for wordpress
and mysql resources:
/
├── System
└── Shared
    └── acme-blog
        ├── wordpress-collection
        └── mysql-collection
Tip: To drill into a collection, click View Children.
See Group and isolate cluster resources
Grant roles
Create three grants with built-in roles:
- acme-datacenter/ops + Full Control + /Shared/acme-blog
- acme-datacenter/dev + Full Control + /Shared/acme-blog/wordpress-collection
- acme-datacenter/dba + Full Control + /Shared/acme-blog/mysql-collection
In this exercise we use built-in roles but you can create custom ones too.
See: Grant access to cluster resources.
Deploy Wordpress and MySQL with Swarm
You've configured UCP. The ops team can now deploy acme-blog:
- Click Shared Resources > Stacks.
- Click Create Stack.
- Name it,
acme-blogand select Services mode. - Paste the YAML code below.
- Click Create, and when enabled, click Done.
version: "3.1"

services:
  db:
    image: mysql:5.7
    deploy:
      replicas: 1
      labels:
        com.docker.ucp.access.label: "/Shared/acme-blog/mysql-collection"
      restart_policy:
        condition: on-failure
        max_attempts: 3
    volumes:
      - db_data:/var/lib/mysql
    networks:
      - wordpress-net
    environment:
      MYSQL_ROOT_PASSWORD: wordpress
      MYSQL_DATABASE: wordpress
      MYSQL_USER: wordpress
      MYSQL_PASSWORD: wordpress
  wordpress:
    depends_on:
      - db
    image: wordpress:latest
    deploy:
      replicas: 1
      labels:
        com.docker.ucp.access.label: "/Shared/acme-blog/wordpress-collection"
      restart_policy:
        condition: on-failure
        max_attempts: 3
    volumes:
      - wordpress_data:/var/www/html
    networks:
      - wordpress-net
    ports:
      - "8000:80"
    environment:
      WORDPRESS_DB_HOST: db:3306
      WORDPRESS_DB_PASSWORD: wordpress

volumes:
  db_data:
  wordpress_data:

networks:
  wordpress-net:
    labels:
      com.docker.ucp.access.label: "/Shared/acme-blog"
Test access
Log on to UCP as each user and ensure that:
dba(alex) can only see and accessmysql-collectiondev(bett) can only see and accesswordpress-collectionops(chad) can see and access both.
For example:
 {: .with-border}
{% endif %} {% endif %}