10 KiB
Integrate with Docker Trusted Registry
This page explains how to integrate Universal Control Plane (UCP) with the Docker Trusted Registry (DTR). Trusted Registry is a image storage and management service that you can install within your company's private infrastructure.
Prerequisites
You must have already installed DTR on your infrastructure before performing this procedure. The DTR server and the UCP controller must be able to communicate over your network infrastructure.
The Universal Control Plane and Trusted Registry are both part of the Docker Datacenter solution. This means the license you use for UCP works with DTR or, if you have a DTR license, it also works with UCP.
Step 1. (Optional) Prepare a cert script
If you are using a self-signed or third-party CA with the Trusted Registry, you
need to the prepare a cert_create.sh script. You'll use this script to install
the self-signed cert on the nodes in your UCP cluster.
-
Create a file called
cert_create.shwith your favorite editor. -
Add the following to content to the file.
DTR_HOST="<dtr-fully-qualified-domain-name>" sudo mkdir -p /etc/docker/certs.d/${DTR_HOST} openssl s_client -host ${DTR_HOST} -port 443 </dev/null 2>/dev/null | openssl x509 -CAform PEM | sudo tee /etc/docker/certs.d/${DTR_HOST}/ca.crt -
Replace the
<dtr-fully-qualified-domain-name>value with the fully qualified DNS value for your DTR instance. -
Save and close the
cert_create.shfile. -
Set execute permission on the file.
$ chmod 755 cert_create.sh
Step 2. Add the UCP cert to the Trusted Registry
In this step, you configure DTR and UCP to communicate. To do this you need an admin level certificate bundle for UCP or terminal access to the UCP controller. This setup also requires restarting the Docker Trusted Registry server.
-
Log into or connect to the UCP primary controller.
-
Generate the UCP certificates using the
ucp dump-certscommand.This command generates the certificates for the Swarm cluster.
$ docker run --rm -it --name ucp -v /var/run/docker.sock:/var/run/docker.sock docker/ucp dump-certs --cluster -ca > /tmp/cluster-root-ca.pem -
Cat the
cluster-root-ca.pemfile.$ cat /tmp/cluster-root-ca.pem -
Copy the UCP cluster's root CA.
This example illustrates what you should copy, your installation certificate will be different.
-----BEGIN CERTIFICATE----- MIIFGDCCAwCgAwIBAgIIIQjwMnZnj2gwDQYJKoZIhvcNAQENBQAwGDEWMBQGA1UE AxMNU3dhcm0gUm9vdCBDQTAeFw0xNjAyMTAxNzQzMDBaFw0yMTAyMDgxNzQzMDBa MBgxFjAUBgNVBAMTDVN3YXJtIFJvb3QgQ0EwggIiMA0GCSqGSIb3DQEBAQUAA4IC DwAwggIKAoICAQC5UtvO/xju7INdZkXA9TG7T6JYo1CIf5yZz9LZBDrexSAx7uPi 7b5YmWGUA26VgBDvAFuLuQNRy/OlITNoFIEG0yovw6waLcqr597ox9d9jeaJ4ths ...<output snip>... 2wDuqlzByRVTO0NL4BX0QV1J6LFtrlWU92WxTcOV8T7Zc4mzQNMHfiIZcHH/p3+7 cRA7HVdljltI8UETcrEvTKb/h1BiPlhzpIfIHwMdA2UScGgJlaH7wA0LpeJGWtUc AKrb2kTIXNQq7phH -----END CERTIFICATE----- -
Login to the Trusted Registry dashboard as a user.
-
Choose Settings > General page.
-
Locate the Auth Bypass TLS Root CA field.
-
Paste the UCP root CA you copied in step 4 above into this field.
-
Scroll to the bottom of the page and press Save and restart.
Step 3. Add the Trusted Registry cert to UCP
You must integrate the Trusted Registry with UCP by installing the Trusted Registry CA into your UCP.
-
Log into UCP.
-
Choose Settings > DTR.
-
Enter the URL of your Trusted Registry in the URL field.
-
Do not set the Insecure option.
Regardless of whether you are using self-signed, external third-party, or internal certificates, setting this value means that traffic between the Trusted Registry and UCP is encrypted but unverified. Setting Insecure is not recommended as it makes your installation vulnerable to man-in-the-middle attacks.
-
(Optional) Upload the Trusted Registry root CA certificate.
If your Trusted Registry installation is using an external, 3rd-party root CA you can skip this step. If your registry is using internal, corporate or a self-signed root CA, you must follow this step. To create the Trusted Registry root CA file:
a. Run the following command from a machine (Linux/Mac) capable of connecting to your DTR node:
openssl s_client -host <dtr-fully-qualified-domain-name> -port 443 </dev/null 2>/dev/null | openssl x509 -CAform PEM | tee /tmp/dtr.pemFor example:
$ openssl s_client -host ec2-54-187-154-87.us-west-2.compute.amazonaws.com -port 443 </dev/null 2>/dev/null | openssl x509 -CAform PEM | tee /tmp/dtr.pemb. Upload the
dtr.pemfile you just created.
-
Press Update Registry to save your changes.
-
(Optional) Install the Trusted Registry certificate on every UCP node in your cluster.
This step ensures that the UCP nodes trust the registry's root CA. If your Trusted Registry installation is using an external, 3rd-party root CA you can skip this step. If your registry is using internal, corporate or a self-signed root CA, you must follow this step.
a. Log into a UCP node using an account with
sudoprivileges.b. Copy the
cert_create.shto the node.c. Run the
cert_create.shon the node.$ sudo cert_create.shd. Verify the cert was created.
$ sudo cat /etc/docker/certs.d/<dtr-fully-qualified-domain-name>/ca.crt
Step 4. Create a test repository
Before you can confirm you integration, you need to make sure you have a test repository on the Trusted Registry.
-
Log into the Trusted Registry.
-
Choose Repositories.
-
Choose New repository.
-
Create a private repository called
hello_worldunder your username.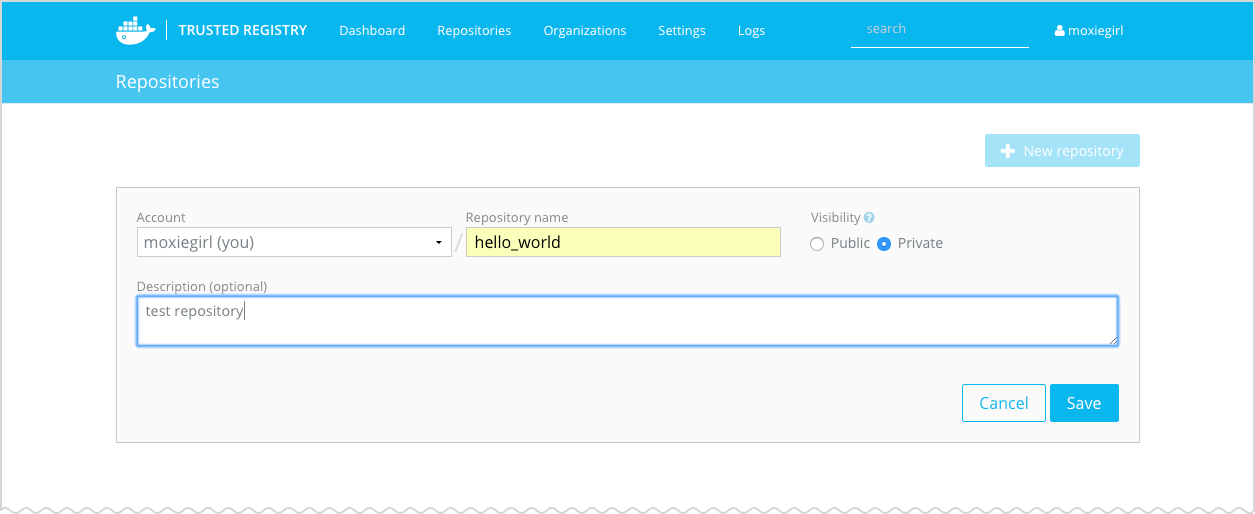
-
Press Save.
-
Go to the Settings page and look for the Domain name.
You'll use name value in the next section, write it down or remember it.
Step 5. Confirm the integration
The best way to confirm the integration is to push and pull an image from a UCP node to your test repository. In this procedure, you must use a username and password combination that exists on both the Trusted Registry and UCP.
-
Connect to the terminal on a UCP node via an authorized UCP certificate bundle.
-
Pull Docker's
hello-worldimage.$ docker pull hello-world Using default tag: latest latest: Pulling from library/hello-world 03f4658f8b78: Pull complete a3ed95caeb02: Pull complete Digest: sha256:8be990ef2aeb16dbcb9271ddfe2610fa6658d13f6dfb8bc72074cc1ca36966a7 Status: Downloaded newer image for hello-world:latest -
List the
hello-worldimage.$ docker images REPOSITORY TAG IMAGE ID CREATED SIZE ...<output snipped>... hello-world latest 690ed74de00f 4 months ago 960 B -
Retag the
hello-worldimage with a new tag.The syntax for tagging an image is:
docker tag <image-name> <dtr-domain-name>/<username>/<image-name>:<tag>Make sure to replace
<username>with your actual username and the with the ID of thehello-worldimage you pulled.$ docker tag hello-world mydtr.company.com/moxiegirl/hello_world:test -
List the new image.
$ docker images REPOSITORY TAG IMAGE ID CREATED SIZE ...<output snipped>... hello-world latest 690ed74de00f 4 months ago 960 B mydtr.company.com/admin/hello_world test 690ed74de00f 4 months ago 960 B -
Login into the DTR instance from the command line.
The example below uses
mydtr.company.comas the URL for the DTR instance. Your's will be different.$ docker login mydtr.company.comProvide your username, password, and email when prompted.
-
Push your newly tagged image to the DTR instance.
The following is an example only, substitute your DTR URL and username when you run this command.
$ docker push mydtr.company.com/moxiegirl/hello_world:test The push refers to a repository [mydtr.company.com/moxiegirl/hello_world] 5f70bf18a086: Pushed b652ec3a27e7: Pushed test: digest: sha256:6febc57b05c1a791edd184fd3480a33aaa63949573daa5d1bd17bb5f75477b82 size: 1941 -
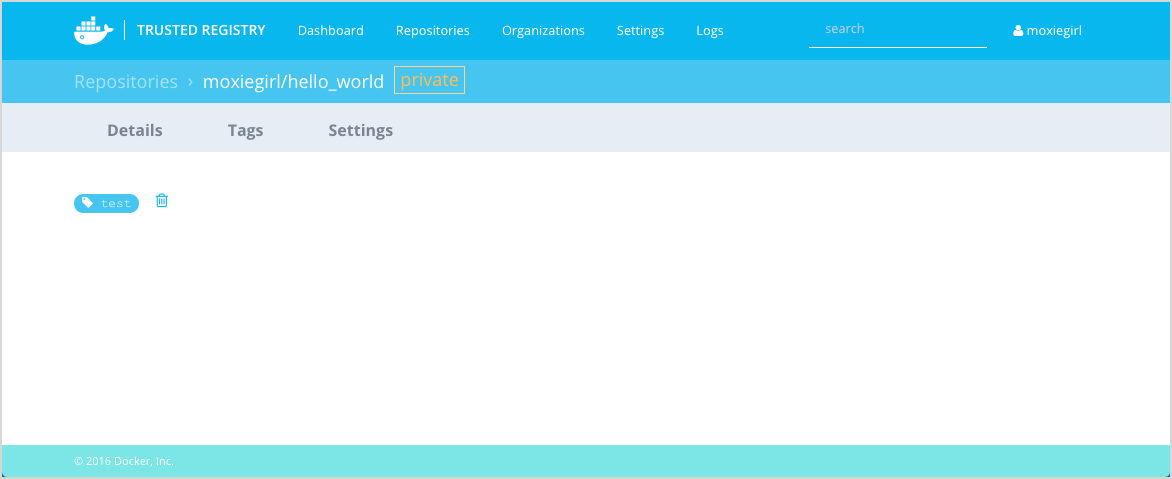
Log into the Trusted Registry and confirm your repository contains the image your pushed.
-
Log into UCP.
-
Choose Images and search for
hello.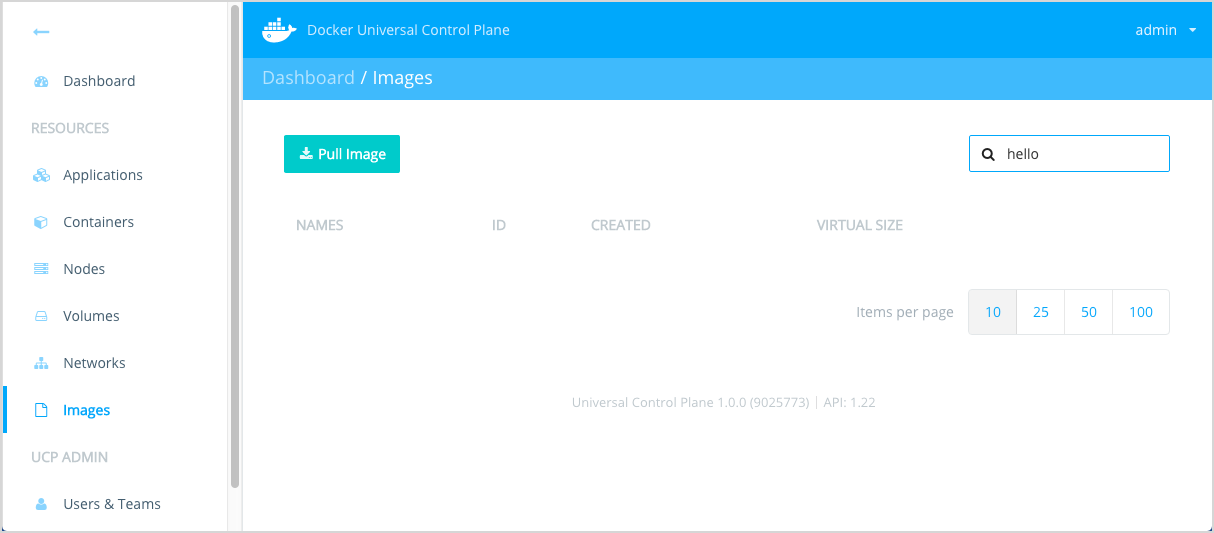
-
Delete any
hello-worldorhello_worldimage.This step ensures the next step goes to the Trusted Registry. Once you are sure you no longer have any of your test images in UCP, go onto the next step.
-
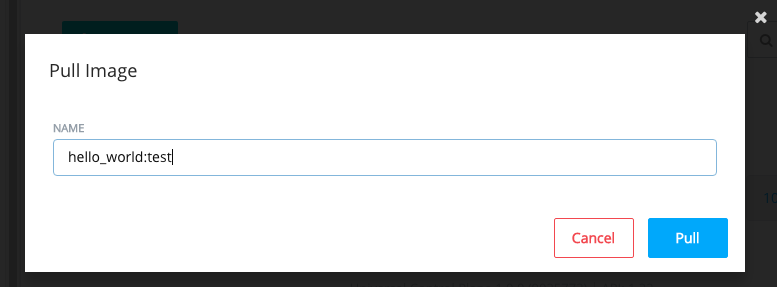
While still on Images, choose Pull Image
-
Enter the name of your test image and press Pull.
Troubleshooting section
This section details common problems you can encounter when working with the DTR / UCP integration.
Pull completes but no image is pulled
Currently, UCP does not return pull errors in the UI. If you do not get an image with the Pull Images operation, check the UCP controller logs.
Unknown authority error on push
Example:
% docker push mydtr.acme.com/jdoe/myrepo:latest
The push refers to a repository [mydtr.acme.com/jdoe/myrepo]
unable to ping registry endpoint https://mydtr.acme.com/v0/
v2 ping attempt failed with error: Get https://mydtr.acme.com/v2/: x509: certificate signed by unknown authority
v1 ping attempt failed with error: Get https://mydtr.acme.com/v1/_ping: x509: certificate signed by unknown authority
Review the trust settings in DTR and make sure they are correct. Try repasting
the first PEM block from the chain.pem file.
Authentication required
Example:
% docker push mydtr.acme.com/jdoe/myrepo:latest
The push refers to a repository [mydtr.acme.com/jdoe/myrepo]
5f70bf18a086: Preparing
2c84284818d1: Preparing
unauthorized: authentication required
You must login before you can push to DTR.