16 KiB
| description | keywords | title |
|---|---|---|
| Submit a product for the Docker Store | Docker, docker, store, purchase images | Submit a product to Docker Store |
Publishing Content on the Docker Store
To submit an image to the Docker Store, you must first apply to join our publisher program. You'll receive a welcome email when you're accepted into the program.
Once you've been accepted, click the link in your acceptance email, or go to the Docker Store and click Publish a Product.
Permitted Content and Support Options
-
Content that runs on a Docker Enterprise Edition (i.e. Docker Certified Infrastructure) may be published in the Store. This content may also qualify to become a Docker Certified Container or Plugin image and be backed by collaborative Docker/Publisher support
-
Content that runs on the Docker Community Edition may be published in the Store, but will not be supported by Docker nor is it eligible for certification.
-
Content that requires a non Certified Infrastructure environment may not be published in the Store.
| If your content: | Can publish on Store | Can be certified and supported by Docker | Supported by publisher |
|---|---|---|---|
| Works on Docker Edition | YES | YES | Required |
| Works on Docker Edition | YES | NO | Optional |
| Does not work on Docker Certified Infrastructure | NO | N/A | N/A |
Onboarding
The publishing process for the Docker Store is straightforward, and can be initiated from the landing page. You can sign in with your Docker ID, and specify a product name and image source from a private repository. We require that your product images are stored in private repositories via Docker Cloud and/or Hub, as they serve as an internal staging area from which you can revise and submit content for review.
Once you specify a private-repository source for your product, you can provide the content-manifest items to populate your product’s details page. These items include logos, descriptions, and licensing and support links so that customers can make informed decisions about your image. These items are submitted alongside the image itself for moderation.
The Docker Store team then conducts a comprehensive review of your image and metadata. We use Docker Security Scanning to evaluate your product images’ security, and share results with you as the publisher. During the image-moderation phase, we iterate back and forth with publishers to address outstanding vulnerabilities and content-manifest issues until the image is ready for publication.
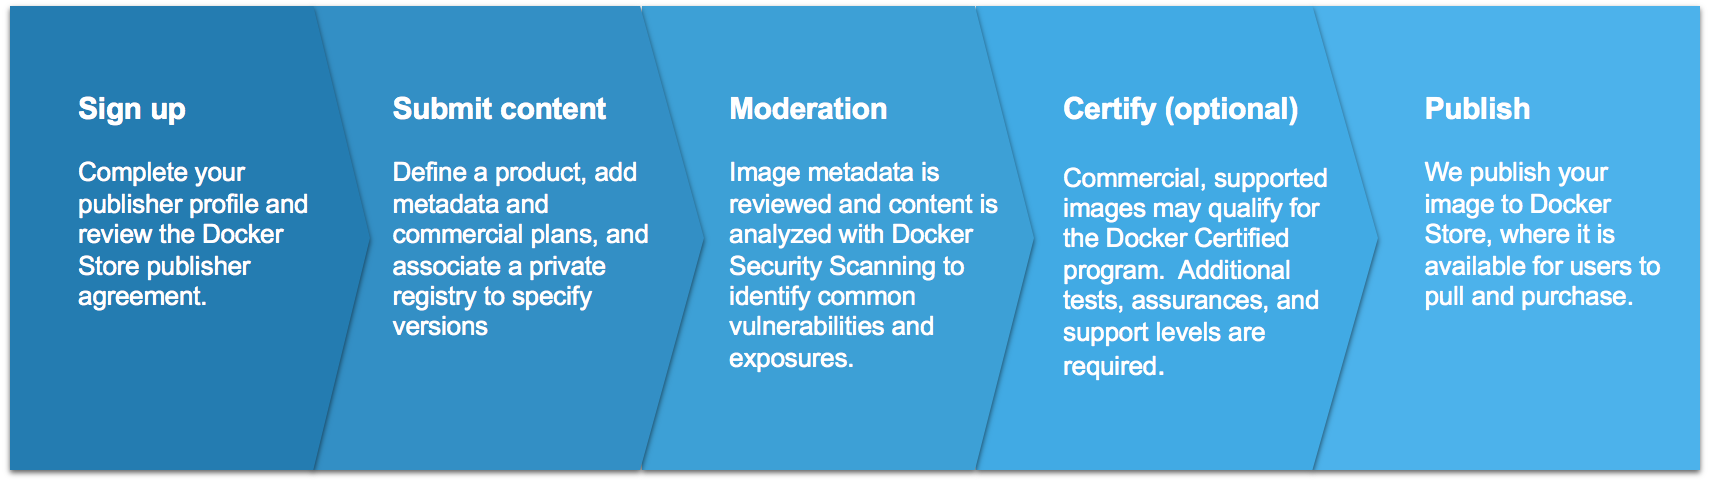
Commercial content and other supported images may qualify for the Docker Certified Container or Plugins quality mark. The testing for this program goes beyond the vulnerability scan and also evaluates container images for Docker best practices developed over years of experience. Collaborative support capability between Docker and the publisher is also established. Please refer to the diagram below for a high-level summary:
Create Great Content
Create your content, and follow our best practices to Dockerize it. Keep your images small, your layers few, and your components secure. Please refer to the links and guidelines listed below to build and deliver great content:
-
Docker Bench for Security{: target="blank" class=""}
Here are some best practices when it comes to building vulnerability-free Docker images:
Choose a secure base image (See your Dockerfile's FROM: directive)
Many base images have a strong record of being secure, including:
-
Debian{: target="blank" class=""} Linux: both small and tightly-controlled, Debian-linux is a good alternative if you're currently using Ubuntu.
-
Alpine{: target="blank" class=""} Linux: Alpine is a minimal linux distribution with an excellent security record.
-
Alpine-based application images: these include
python:alpine,ruby:alpine, andgolang:alpine. They are secure and minimal, while providing the convenience of their non-Alpine alternatives.
Docker strongly recommends Alpine Linux. The founder of this Linux distribution is leading an initiative at Docker to provide safe, compact base images for all container applications.
Remove unused components
Often, vulnerabilities exist in components that aren't actually used in the containerized application. To avoid this, you can:
-
Follow best practices when using the
apt-getcommand. -
Make sure to run
apt-get-removeto destroy any components required to build but not actually run your application. Usually, this involves creating multi-line Dockerfile directives, as seen below. The following example shows how to removecurlandpython-pipafter they are used to install the Pythonrequestspackage, all in a single Dockerfile directive:
RUN apt-get update && \
         apt-get install -y --no-install-recommends curl python-pip && \
         pip install requests && \
         apt-get remove -y python-pip curl && \
         rm -rf /var/lib/apt/lists/
Note: Keep in mind, any file introduced in one directive of your Dockerfile can only be removed in the same directive (and not in subsequent directives in your Dockerfile).
Keep required components up-to-date
Your images are comprised of open-source libraries and packages that amass vulnerabilities over time and are consequently patched. To optimize your product’s integrity, you must keep your images up-to-date:
-
Periodically update your base image's version, especially if you’re using a version deemed to be vulnerable.
-
Re-build your image periodically. Directives including commands such as
apt-get install ...pull the latest versions of dependencies, which may include security fixes.
Scan your own private repositories
Eliminating vulnerabilities is a trial-and-error process. To speed it up, consider using Docker Security Scanning on your own private Docker repositories in Docker Cloud and Docker Hub. This feature allows you to scan images you create on-demand, without relying on the scans provided by the Docker Publisher Program.
Create and maintain your publisher profile in the Store
Let the Docker community know who you are. Add your details, your company story, and what you do. At the very minimum, we require:
- Legal entity name
- Company website
- Phone number
- Valid company email
- Company icon/logo (square; at least 512x512px
Prepare your image-manifest materials
You must provide the namespace (including repository and tags) of a private repository on Docker Cloud or Hub that contains the source for your product. This repository path will not be shown to users, but the repositories you choose determine the Product Tiers available for customers to download.
The following content information helps us make your product look great and discoverable:
- Product Name
- Product icon/logo
- Short description: a one-to-two-sentence summary; up to 140 characters
- Category: Database, Networking, Business Software, etc. and any search tags
- Long description: includes product details/pitch
- Screenshot(s)
- Support link
- Product tier name
- Product tier description
- Product tier price
- Installation instructions
- Link to license agreements
How the manifest information is displayed in the UI
(Please note that this is an approximate representation. We frequently make enhancements to the look and some elements might shift around.)

Support your users
Docker users who download your content from the Store might need your help later, so be prepared for questions! The information you provide with your submission will save support time in the future.
Support information
If you provide support along with your content, include that information. Is there a support website? What email address can users contact for help? Are there self-help or troubleshooting resources available?
Support SLA
Include a Service Level Agreement (SLA) for each image you're offering for the Store. An SLA is your commitment to your users about the nature and level of support you provide to them. Make sure your SLA includes support hours and response-time expectations, where applicable.
OLD STUFF
Before you begin
Before you start, there are a few things you should know.
The Docker Store moderation process
The Docker Store team validates submitted products to ensure quality and security, and to make sure your product information is complete and helpful for potential customers.
To do this, you'll provide your product binaries and some information about the product (the "product manifest") which will be reviewed by a moderator. If changes are needed, the moderation team will notify you by email. At that point, you can make changes and resubmit the product.
Use private repositories
The source for your product must be in a private repository in either Docker Cloud or Docker Hub. This allows us to provide feedback to help you produce excellent products before you make your items available to the public.
Product tiers
You can create several different tiers for a single product. For example, you might have Free, Basic, and Enterprise versions of a single product, each with their own features, support levels, and subscription pricing.
At minimum, each product tier must be represented by a unique tag within a repository, however you can also select tags for each tier from several different repositories or namespaces.
Save and continue
We'll ask for a lot of information to display on your product page, and we know that you may not have all of it available right away. As you fill out your product information, you can always save your work and come back to work on it later, before you submit it.
Spot a typo? You can always edit and resubmit your product information. Resubmitted product information goes through the same moderation process, but small changes should take less time to validate.
Select repositories
Start with private repositories on Docker Cloud or Docker Hub.
Select at least one repository by choosing a user or organization (the namespace), then select a repository from that account, and then a tag.
Optionally, click Add another repository and repeat this process for any product tiers you plan to offer on the Docker Store. For example you might have a Free tier, a Basic tier, and an Enterprise tier, each represented by a different namespace/repo/tag combination.
Make sure you have read the required Vendor agreement, and check the box to indicate your agreement.
Click Save and Continue.
Add company information
Fill out your Publisher Details. If you've already done this, for example if you've already submitted a product, skip to the next section.
Your company name comes from the initial sign up form you filled out, however you can change your details on this screen if needed.
Provide a URL to the logo that represents your company or organization. This logo must be at least 512x512 pixels.
Provide the URL of your company website.
Add product information
Next, fill out the Product Details.
Provide a tagline: a short description of your product in 140 characters or less. This appears in Store search results along with the product icon, so make it useful.
Provide a URL to the image that will represent the overall product, again at least 512x512 pixels. Remember that in the Docker Store, this product icon displays for every product tier, so you may need to make it general.
Select any categories that apply to your image. These categories help customers find your image when they search the Docker Store.
Add a longer product description. If the tagline is your elevator pitch to get the customer's attention, the long description is your chance to highlight what makes your software great. Don't neglect it.
Provide the URL for the product's support pages. This can be as simple as a troubleshooting section in your product's README file, or a link to your company's Support site or knowledge base.
Finally, add some screenshots. These should be 1920x1200 pixels or larger, and should show your product in use.
Click Save and Continue to save your changes and go on to the next screen.
Product tier offerings
For each repository you selected in the first step, you'll be prompted to create a Product Tier.
Default tiers
The "Default" product tier is the one that is selected on your product's Docker Store listing page until the customer switches to another tier. You can use the default option to highlight a specific product tier, or to help your customers when you expect most of them will want a specific tier rather than another one.
One month trials
Docker Store allows you to offer a one-month free trial for any of your paid subscription products. When you select this option, Docker Store begins the subscription right away, but does not charge the user the monthly fee until the beginning of their second month. The user can cancel at any time during the first month trial period and not be charged.
Free product tiers
To create a free product tier, enter a monthly price of $0. Free subscriptions are treated exactly the same as paid subscriptions, except they do not produce monthly charges or invoices.
Create product tiers
For each binary you selected in step one, you'll see a section for product tier information. Choose one tier to make the Default tier. Then fill out the information for each individual tier.
For each tier, add a tier name and monthly subscription price. For example, you might have a tier called "Free" for $0, and a tier called and "Enterprise" for $10 per month. Optionally, you can choose to offer a free one-month trial.
Select the source repository for each tier.
Note: At this time, you can only select one source for each pricing tier. Support for bundled products is coming at a later date.
For each tier, enter a description. This description tells the customer what's included or different about this product tier.
Paste the link to your software's license agreement in the next field. This allows the customer to read and review your license agreement before purchasing.
Finally, provide installation instructions for this product tier.
Repeat this process for each tier.
What's next?
When you submitted the repository information for your product in the first step, we began the Docker Security Scan process. You'll receive notification of your scan results in a few days. During that time, we'll also review the product information you submitted to make sure it meets our quality guidelines. If any changes are needed, or if security vulnerabilities are discovered, you'll get an email explaining what needs to be changed.
When your product's image is secure and the product information meets our quality guidelines, you'll receive an email notification that the product is ready to publish to the Docker Store.
Once you receive this email you can go to the Docker Store and click Publish to make your product available.
Tip: Docker does not automatically make the approved product available. This means you can time the product's release on the Docker Store with announcements or marketing activity.