15 KiB
Deploy an app from the CLI
In this quickstart, you learn how to deploy multi-container applications onto UCP. While UCP is intended for deploying multi-container applications, the workflow for developing them begins outside of the UCP installation. This page explains the recommended workflow for developing applications. Then, it shows you step-by-step how to deploy the fully developed application.
The sample is written for a novice network administrator. You should have a
basic skills on Linux systems and ssh experience. Some knowledge of Git is
also useful but not strictly required.
Note: The command examples in this page were tested for a Mac OSX environment. If you are in another, you may need to adjust the commands to use analogous commands for you environment.
Understand the development workflow
UCP is at the end of the application development workflow. You should only deploy, or allowed to be deployed, individual containers or multi-container applications that have been systematically developed and tested.
Your development team should develop in a local environment using the Docker open source software (OSS) components. These components include:
- Docker Engine
- Docker Machine (if development is on Mac or Windows)
- Docker Swarm
- Docker Compose
- Docker Hub (for publicly available images)
Developing an application can include using public images from Docker Hub and developing new custom images. If there are multiple containers involved, the team should configure and test container port configurations. For applications that require them, the team may need to create Docker container volumes and ensure they are of sufficient size.
Once the team has developed a microservice application, they should test it locally at scale on a Swarm cluster.
The output of application development should be a Docker Compose file and a set of images ready for deployment. These images can be stored in Docker Hub. If your company is using Docker Trusted Registry, the team may want to or be required to store their application images in the company registry. The team must ensure store the images in an accessible registry account.
Step 1. Before you begin
This example requires that you have an installed UCP deployment and that you have enabled container networking. Take a moment to check this requirement.
When deploying an application to UCP, you work from a local environment using the UCP client bundle for your UCP user. You should never deploy from the command-line while directly logged into a UCP node. The deploy on this page, requires that your local environment includes the following software:
- Git
- Docker Engine
- Docker Compose
While not always the case, the expectation is your local environment is a Windows or Mac machine. If your personal machine is a Linux machine that Docker Engine supports, such a configuration works too.
Windows or Mac prerequisites
Because Docker Engine and UCP both rely on Linux-specific features, you can't run natively in Mac or Windows. Instead, you must install the Docker Toolbox application. Docker Toolbox installs:
- Docker Machine for running
docker-machinecommands - Docker Engine for running the
dockercommands - Docker Compose for running the
docker-composecommands - Kitematic, the Docker GUI
- a Quickstart shell preconfigured for a Engine command-line environment
- Oracle VirtualBox
These tools enable you to run Engine CLI commands from your Mac OS X or Windows shell.
Your Mac must be running OS X 10.8 "Mountain Lion" or higher to install Toolbox. To check your Mac OS X version, see the Docker Engine getting started on Mac.
On Windows, your machine must have a 64-bit operating system running Windows 7 or higher. Additionally, you must make sure that virtualization is enabled on your machine. For information on how to check for virtualization, see the Docker Engine getting started on Windows.
If you haven't already done so, make you have installed Docker Toolbox on your local Mac OS X or Windows machine. After a successful installation, continue to the next step.
About a Linux environment
If your local environment is Linux, make sure you have installed the correct Docker Engine for your Linux OS. Also, make sure you have installed Docker Compose.
Step 2. Get the client bundle and configure a shell
In this step, you download the client bundle. To issue commands to a UCP node, your local shell environment must be configured with the same security certificates as the UCP application itself. The client bundle contains the certificates and a script to configure a shell environment.
Download the bundle and configure your environment.
-
If you haven't already done so, log into UCP.
-
Choose admin > Profile from the right-hand menu.
Any user can download their certificates. So, if you were logged in under a user name such as
daveythe path to download bundle is davey > Profile. Since you are logged in asadmin, the path isadmin. -
Click Create Client Bundle.
The browser downloads the
ucp-bundle-admin.zipfile. -
Open a shell on your local terminal.
-
If you are on Mac or Windows, ensure your shell does not have an active Docker Machine VM.
 $ docker-machine ls
 NAME    ACTIVE   DRIVER       STATE     URL                         SWARM   DOCKER    ERRORS
 moxie   -        virtualbox   Stopped                                       Unknown
 test    -        virtualbox   Running   tcp://192.168.99.100:2376           v1.10.1
While Machine has a stopped and running host, neither is active in the shell. You know this because neither host shows an * (asterisk) indicating the shell is configured.
-
Create a directory to hold the deploy information.
$ mkdir deploy-app -
Inside of a
deploy-appcreate a directory to hold your UCP bundle files.$ mkdir deploy-app/bundle -
Change into the
deploy-app/bundledirectory and move the downloaded bundle into it.$ cd deploy-app/bundle $ mv ~/Downloads/ucp-bundle-admin.zip . -
Unzip the client bundle.
$ unzip bundle.zip Archive: bundle.zip extracting: ca.pem extracting: cert.pem extracting: key.pem extracting: cert.pub extracting: env.sh -
Change into the directory that was created when the bundle was unzipped
-
Execute the
env.shscript to set the appropriate environment variables for your UCP deployment$ source env.sh -
Verify that you are connected to UCP by using the
docker infocommand.$ docker info Containers: 11 Running: 11 Paused: 0 Stopped: 0 Images: 22 ... <output snipped> Plugins: Volume: Network: Kernel Version: 4.2.0-23-generic Operating System: linux Architecture: amd64 CPUs: 3 Total Memory: 11.58 GiB Name: ucp-controller-ucpdemo-0 ID: DYZQ:I5RM:VM6K:MUFZ:JXCU:H45Y:SFU4:CBPS:OMXC:LQ3S:L2HQ:VEWW Labels: com.docker.ucp.license_key=QMb9Ux2PKj-IshswTScxsd19n-c8LwtP-pQiDWy2nVtg com.docker.ucp.license_max_engines=10 com.docker.ucp.license_expires=2016-05-03 19:52:02 +0000 UTC
Step 3: Learn about the application
The application you'll be deploying is a voting application. The voting application is a dockerized microservice application. It uses a parallel web frontend that sends jobs to asynchronous background workers. The application's design can accommodate arbitrarily large scale. The diagram below shows the high level architecture of the application.

The application is fully dockerized with all services running inside of containers.
The frontend consists of an Interlock load balancer with n frontend web
servers and associated queues. The load balancer can handle an arbitrary number
of web containers behind it (frontend01- frontendN). The web containers run
a simple Python Flask application. Each web container accepts votes and queues
them to a Redis container on the same node. Each web container and Redis queue
pair operates independently.
The load balancer together with the independent pairs allows the entire application to scale to an arbitrary size as needed to meet demand.
Behind the frontend is a worker tier which runs on separate nodes. This tier:
- scans the Redis containers
- dequeues votes
- deduplicates votes to prevent double voting
- commits the results to a Postgres container running on a separate node
Just like the front end, the worker tier can also scale arbitrarily.
When deploying in UCP, you won't need this exact architecture. For example, you won't need the Interlock load balancer. Part of the work of UCP administrator may be to polish the application the team created, leaving only what's needed for UCP.
For example, the team fully developed and tested through a local environment using the open source Docker ecosystem. The Docker Compose file they created looks like this:
#
# Compose file to run the voting app and dependent services
#
version: '2'
services:
  web-vote-app:
    build: web-vote-app
    environment:
      WEB_VOTE_NUMBER: "01"
      constraint:node: "=frontend01"
  vote-worker:
    build: vote-worker
    environment:
      FROM_REDIS_HOST: 1
      TO_REDIS_HOST: 1
  results-app:
    build: results-app
  redis01:
    image: redis:3
  store:
    image: postgres:9.5
    environment:
      - POSTGRES_USER=postgres
      - POSTGRES_PASSWORD=pg8675309
In this docker-compose.file includes a build command. You should never
build an image against the UCP controller or its nodes. You can find out if
the team built and stored the images described in the file, or you can build the
images yourself and push them to a registry. After a little work you could come
up with a docker-compose.yml that looks like this:
version: "2"

services:
  voting-app:
    image: docker/example-voting-app-voting-app
    ports:
      - "80"
    networks:
      - voteapp
  result-app:
    image: docker/example-voting-app-result-app
    ports:
      - "80"
    networks:
      - voteapp
  worker:
    image: docker/example-voting-app-worker
    networks:
      - voteapp
  redis:
    image: redis
    ports:
      - "6379"
    networks:
      - voteapp
    container_name: redis
  db:
    image: postgres:9.4
    volumes:
      - "db-data:/var/lib/postgresql/data"
    networks:
      - voteapp
    container_name: db
volumes:
  db-data:

networks:
  voteapp:
This revised compose file uses a set of images stored in Docker Hub. They happen
to be in Docker repositories because the sample application was built by a
Docker team. Compose allows you to designate a network and it defaults to
creating an overlay network. So, you can specify which networks in UCP to run
on. In this case, you won't manually create the networks, you'll let Compose create
the network for you.
Step 4. Deploy the application
In this step, you deploy the application in UCP.
-
Bring up the shell you configured in the Step 2.
-
Clone the sample compose file onto your local machine..
$ git clone https://github.com/nicolaka/voteapp-base.gitThe clone command creates a
voteapp-basedirectory containing the Compose file. -
Change into the
voteapp-basedirectory.$ cd voteapp-base -
Deploy the application.
 $ docker-compose up
 Creating network "voteappbase_voteapp" with the default driver
 Pulling db (postgres:9.4)...
 ucpdemo-0: Pulling postgres:9.4... : downloaded
 ucpdemo-2: Pulling postgres:9.4... : downloaded
 ucpdemo-1: Pulling postgres:9.4... : downloaded
 Creating db
 Pulling redis (redis:latest)...
 ucpdemo-0: Pulling redis:latest... : downloaded
 ucpdemo-2: Pulling redis:latest... : downloaded
 ucpdemo-1: Pulling redis:latest... : downloaded
 Creating redis
 Pulling worker (docker/example-voting-app-worker:latest)...
Compose creates the
voteappbase_voteappnetwork and deploys the application. -
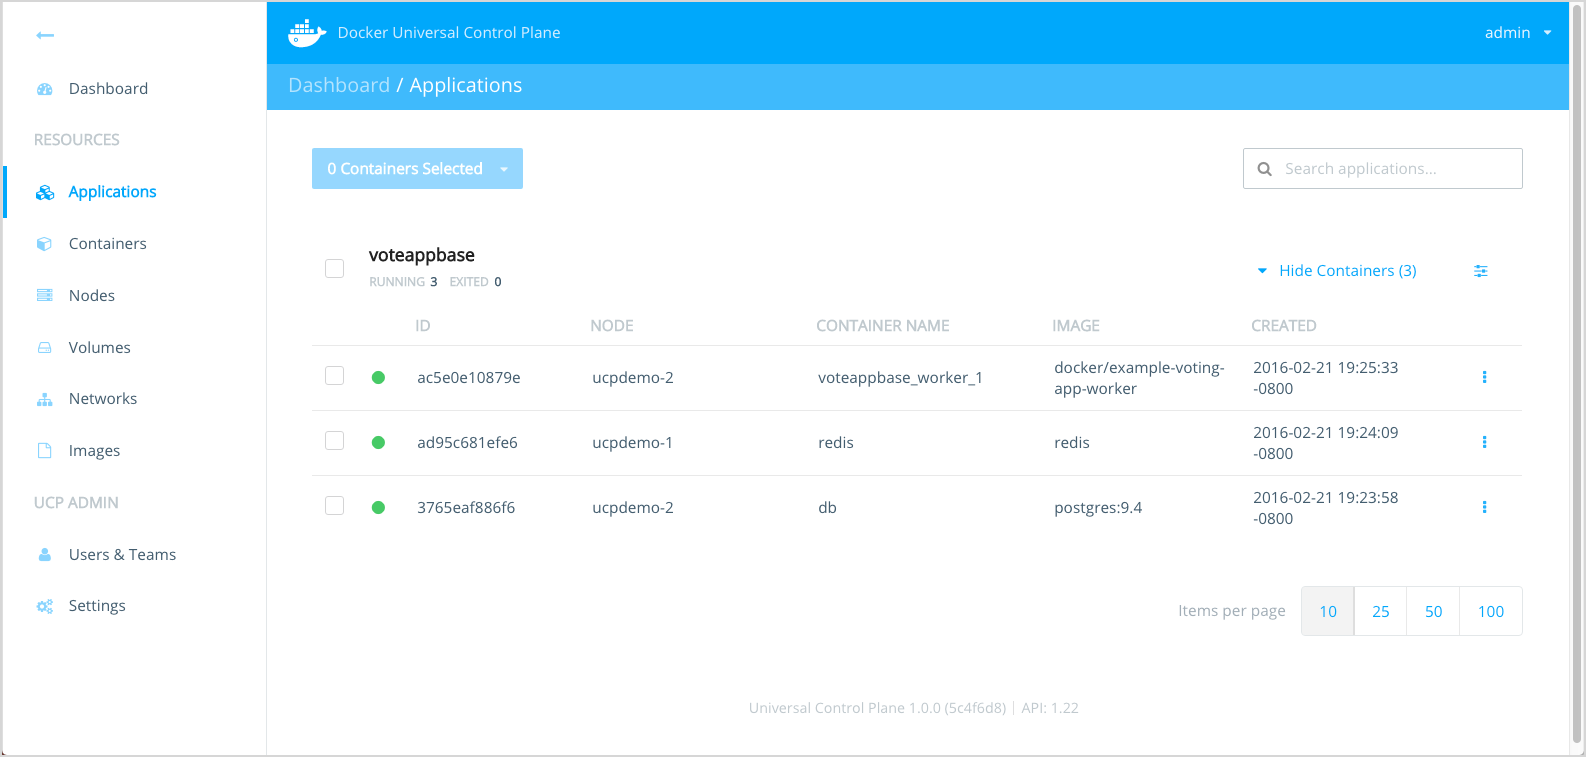
From UCP, go to the Applications page inside UCP.
Your new application should appear in the list.
-
Expand to the app to see which nodes the application containers are running in.
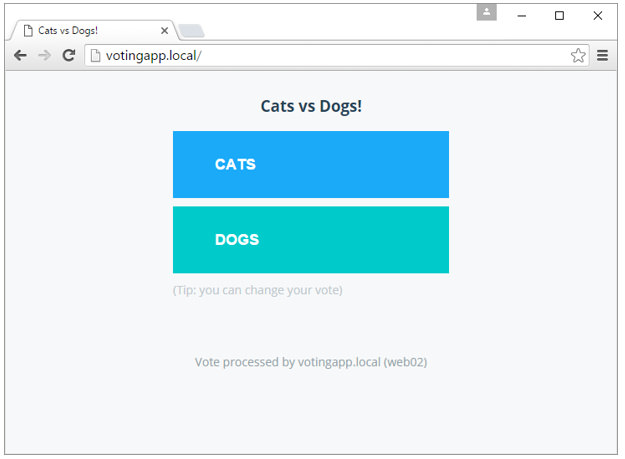
Step 5. Test the application
Now that the application is deployed and running, it's time to test it. To do
this, you configure a DNS mapping on the node where you are running
votingapp_web-vote-app_1 container. browser. This maps the "votingapp.local"
DNS name to the public IP address of the votingapp_web-vote-app_1 node.
-
Configure the DNS name resolution on your local machine for browsing.
-
On Windows machines this is done by adding
votingapp.local <votingapp_web-vote-app_1-public-ip>to theC:\Windows\System32\Drivers\etc\hosts file. Modifying this file requires administrator privileges. To open the file with administrator privileges, right-clickC:\Windows\System32\notepad.exeand selectRun as administrator. Once Notepad is open, clickfile>openand open the file and make the edit. -
On OSX machines this is done by adding
votingapp.local <votingapp_web-vote-app_1-public-ip>to/private/etc/hosts. -
On most Linux machines this is done by adding
votingapp.local <votingapp_web-vote-app_1-public-ip>to/etc/hosts.
Be sure to replace
<votingapp_web-vote-app_1-public-ip>with the public IP address of yourvotingapp_web-vote-app_1node. You can find thevotingapp_web-vote-app_1node's Public IP by selecting the node from within the UCP dashboard. -
-
Verify the mapping worked with a
pingcommand from your local machine.ping votingapp.local Pinging votingapp.local [54.183.164.230] with 32 bytes of data: Reply from 54.183.164.230: bytes=32 time=164ms TTL=42 Reply from 54.183.164.230: bytes=32 time=163ms TTL=42 Reply from 54.183.164.230: bytes=32 time=169ms TTL=42 -
Point your web browser to http://votingapp.local