31 KiB
| description | keywords | title |
|---|---|---|
| How to migrate apps from Docker Cloud to AKS | cloud, migration, kubernetes, azure, aks | Migrate Docker Cloud stacks to Azure Container Service |
AKS Kubernetes
This page explains how to prepare your applications for migration from Docker Cloud to Azure Container Service (AKS){: target="blank" class=""} clusters. AKS is a hosted Kubernetes service on Microsoft Azure. It exposes standard Kubernetes APIs so that standard Kubernetes tools and apps run on it without needing to be reconfigured.
At a high level, migrating your Docker Cloud applications requires that you:
- Build a target environment (Kubernetes cluster on AKS).
- Convert your Docker Cloud YAML stackfiles.
- Test the converted YAML stackfiles in the new environment.
- Point your application CNAMES to new service endpoints.
- Migrate your applications from Docker Cloud to the new environment.
To demonstrate, we build a target environment of AKS nodes, convert the Docker Cloud stackfile for example-voting-app{: target="blank" class=""} to a Kubernetes manifest, and test the manifest in the new environment to ensure that it is safe to migrate.
The actual process of migrating -- switching customers from your Docker Cloud applications to AKS applications -- will vary by application and environment.
Voting-app example
The Docker Cloud stack of our example voting application is defined in dockercloud.yml{: target="blank" class=""}. This document explains how dockercloud.yml is converted to a Kubernetes YAML manifest file so that you have the tools to do the same for your applications.
In the dockercloud.yml{: target="blank" class=""}, the voting app is defined as a stack of six microservices:
- vote: Web front-end that displays voting options
- redis: In-memory k/v store that collects votes
- worker: Stores votes in database
- db: Persistent store for votes
- result: Web server that pulls and displays results from database
- lb: Container-based load balancer
Votes are accepted with the vote service and stored in persistent backend database (db) with the help of services, redis, worker, and lb. The vote tally is displayed with the result service.
 {:width="500px"}
Migration prerequisites
To complete the migration from Docker Cloud to Kubernetes on AKS, you need:
- An active Azure subscription with billing enabled.
Build target environment
Azure Container Service (AKS) is a managed Kubernetes service. Azure takes care of all of the Kubernetes control plane management (the master nodes) -- delivering the control plane APIs, managing control plane HA, managing control plane upgrades, etc. You only need to look after worker nodes -- how many, the size and spec, where to deploy them, etc.
High-level steps to build a working AKS cluster are:
- Generate credentials to register AKS with Azure AD.
- Deploy an AKS cluster (and register with Azure AD).
- Connect to the AKS cluster.
Generate AD registration credentials
Currently, AKS needs to be manually registered with Azure Active Directory (AD) so that it can receive security tokens and integrate with secure sign-on and authorization.
When you register an Azure AD "application"{: target="blank" class=""} in the Azure portal, two objects are created in your Azure AD tenant: an application object, and a service principal object.
The following steps create the registration and output the credentials required to register AKS when deploying a cluster.
- Log in to the Azure portal{: target="blank" class=""}.
- Click Azure Active Directory > App registrations > New application registration.
- Assign a Name, select application type Web app/API, and enter a Sign-on URL. The sign-on URL needs to be a valid DNS name but does not need to be resolvable. An example might be
https://k8s-vote.com. - Click Create.
- Copy and save the Application ID (this is your Service principal client ID).
- Click Settings > Keys and set a description and duration.
- Click Save.
- Copy and save the Value (this your Service principal client secret, and also the only time you will see it, so don't lose it!).
You now have the credentials required to register AKS as part of the next section.
Deploy an AKS cluster
In this section, we build a three-node cluster; your cluster should probably be based on the configuration of your Docker Cloud node cluster.
Whereas Docker Cloud deploys work to all nodes in a cluster (managers and workers), Kubernetes only deploys work to worker nodes. This affects how you should size your cluster. If your Docker Cloud node cluster was working well with three managers and two workers of a particular size, you should probably size your AKS cluster to have five nodes of a similar size.
In Docker Cloud, to see the configuration of each of your clusters, select Node Clusters > your_cluster.
Before continuing, ensure you know:
- Your Azure subscription credentials
- Azure region to which you want to deploy your AKS cluster
- SSH public key to use when connecting to AKS nodes
- Service principal client ID and Service principal client secret (from the previous section)
- Number, size, and spec of the worker nodes you want.
To deploy a cluster of AKS nodes:
-
Select +Create a resource from the left-hand panel of the Azure portal dashboard.
-
Select Containers > Azure Container Service - AKS (preview). Do not select the other ACS option.
-
Fill out the required fields and click OK:
- Cluster name: Set any name for the cluster.
- Kubernetes version: Select one of the 1.8.x versions.
- Subscription: Select the subscription to pay for the cluster.
- Resource group: Create a new resource group or choose one from your existing list.
- Location: Select the Azure region to which to deploy the cluster. AKS may not be available in all Azure regions.
-
Configure additional AKS cluster parameters and click OK:
- User name: The default option should be fine.
- SSH public key: The public key (certificate) of a key-pair that you own and that can be used for SSH. If you need to generate a new set, you can use tools such as
ssh-keygenor PuTTY. The key should be a minimum of 2048 bits of typessh-rsa. - Service principal client ID: The application ID that you copied in an earlier step.
- Service principal client secret: The password value that you copied in a previous step.
- Node count: The number of worker nodes that you want in the cluster. It should probably match the total number of nodes in your existing Docker Cloud node cluster (managers + workers).
- Node virtual machine size: The size and specification of each AKS worker node. It should probably match the configuration of your existing Docker Cloud node cluster.
-
Review the configuration on the Summary screen and click OK to deploy the cluster. It can take a few minutes.
Connect to the AKS cluster
You can connect to your AKS cluster from the web-based Azure Cloud Shell{: target="blank" class=""}; but to do so from your laptop, or other local terminal, you must:
- Install the Azure CLI tool (
az). - Install the Kubernetes CLI (
kubectl) - Configure
kubectlto connect to your AKS cluster.
To connect to your AKS cluster from a local terminal:
-
Download and install the Azure CLI{: target="blank" class=""} for your Operating System.
-
With the Azure CLI, install the Kubernetes CLI,
kubectl.> az aks install-cli Downloading client to C:\Program Files (x86)\kubectl.exe from...You can install
kubectlwith or withoutaz. If you havekubectlalready installed, ensure that the current context is correct:> kubectl config get-context > kubectl config use-context <my_aks_namespace> -
Start the Azure login process:
> az login To sign in, use a web browser to open the page https://aka.ms/devicelogin and enter... -
Open the "devicelogin" page in a browser and paste the authentication code. When complete, the CLI returns some JSON.
-
Get the credentials and use them to configure
kubectl:The values for
--resource-groupand--nameare the Resource Group and Cluster Name that you set in the previous steps. Substitute the values below with the values for your environment.> az aks get-credentials --resource-group=k8s-vote --name=k8s-vote Merged "k8s-vote" as current context in C:\Users\nigel\.kube\config -
Test that
kubectlcan connect to your cluster.> kubectl get nodes NAME STATUS ROLES AGE VERSION aks-agentpool-29046111-0 Ready agent 3m v1.8.1 aks-agentpool-29046111-1 Ready agent 2m v1.8.1 aks-agentpool-29046111-2 Ready agent 2m v1.8.1If the values returned match your AKS cluster (number of nodes, age, and version), then you have successfully configured
kubectlto manage your AKS cluster.
You now have an AKS cluster and have configured kubectl to manage it. Let's look at how to convert your Docker Cloud app into a Kubernetes app.
Convert Docker Cloud stackfile
In the following sections, we discuss each service definition separately, but you should group them into one stackfile with the .yml extension, for example, k8s-vote.yml{: target="blank" class=""}.
To prepare your applications for migration from Docker Cloud to Kubernetes, you must recreate your Docker Cloud stackfiles as Kubernetes manifests. Once you have each application converted, you can test and deploy. Like Docker Cloud stackfiles, Kubernetes manifests are YAML files but usually longer and more complex.
In Docker Cloud, to find the stackfiles for your existing applications, you can either: (1) Select Stacks > your_stack > Edit, or (2) Select Stacks > your_stack and scroll down.
In the Docker Cloud stackfile, the six Docker services in our example-voting-app stack are defined as top-level keys:
db:
redis:
result:
lb:
vote:
worker:
Kubernetes applications are built from objects (such as Pods{: target="blank" class=""}) and object abstractions (such as Deployments{: target="blank" class=""} and Services{: target="blank" class=""}). For each Docker service in our voting app stack, we create one Kubernetes Deployment and one Kubernetes Service. Each Kubernetes Deployment spawns Pods. A Pod represents one or more containers (usually one) and is the smallest unit of work in Kubernetes.
A Docker serivce{: target="blank" class=""} is one component of an application that is generated from one image. A Kubernetes service{: target="blank" class=""} is a networking construct that load balances Pods behind a proxy.
A Kubernetes Deployment defines the application "service" -- which Docker image to use and the runtime instructions (which container ports to map and the container restart policy). The Deployment is also where you define rolling updates, rollbacks, and other advanced features.
A Kubernetes Service object is an abstraction that provides stable networking for a set of Pods. A Service is where you can register a cluster-wide DNS name and virtual IP (VIP) for accessing the Pods, and also create cloud-native load balancers.
This diagram shows four Pods deployed as part of a single Deployment. Each Pod is labeled as “app=vote”. The Deployment has a label selector, “app=vote”, and this combination of labels and label selector is what allows the Deployment object to manage Pods (create, terminate, scale, update, roll back, and so on). Likewise, the Service object selects Pods on the same label (“app-vote”) which allows the service to provide a stable network abstraction (IP and DNS name) for the Pods.
 {:width="500px"}
db service
Consider using a hosted database service for production databases. This is something that, ideally, should not change as part of your migration away from Docker Cloud stacks.
Docker Cloud stackfile: The Docker Cloud stackfile defines an image and a restart policy for the db service.
db:
  image: 'postgres:9.4'
  restart: always
Kubernetes manifest: The Kubernetes translation defines two object types or "kinds": a Deployment and a Service (separated by three dashes ---). Each object includes an API version, metadata (labels and name), and a spec field for object configuration (that is, the Deployment Pods and the Service).
apiVersion: apps/v1beta1
kind: Deployment
metadata:
 name: db
 labels:
   app: db
spec:
 selector:
   matchLabels:
     app: db
 template:
   metadata:
     labels:
       app: db
   spec:
     containers:
     - image: postgres:9.4
       name: db
     restartPolicy: Always
---
apiVersion: v1
kind: Service
metadata:
 name: db
spec:
 clusterIP: None
 ports:
 - port: 55555
   targetPort: 0
 selector:
   app: db
About the Kubernetes fields in general:
apiVersionsets the schema version for Kubernetes to use when managing the object. The versions set here are supported on AKS (1.7.7 and 1.8.1).kinddefines the object type. In this example, we only define Deployments and Services but there are many others.metadataassigns a name and set of labels to the object.specis where we configure the object. In a Deployment,specdefines the Pods to deploy.
It is important that Pod labels (Deployment.spec.template.metadata.labels) match both the Deployment label selector (Deployment.spec.selector.matchLabels) and the Service label selector (Service.spec.selector). This is how the Deployment object knows which Pods to manage and how the Service object knows which Pods to provide networking for.
Deployment and Service label selectors have different fields in the YAML file because Deployments use set-based selectors{: target="blank" class=""} and Services use equality-based selectors{: target="blank" class=""}.
For the db Deployment, we define a container called db based on the postgres:9.4 Docker image, and define a restart policy. All Pods created by this Deployment have the label, app=db and the Deployment selects on them.
The db Service is a “headless” service (clusterIP: None). Headless services are useful when you want a stable DNS name but do not need the cluster-wide VIP. They create a stable DNS record, but instead of creating a VIP, they map the DNS name to multiple
A records{: target="blank" class=""} -- one for each Pod associated with the Service.
The Service’s label selector (Service.spec.selector) has the value, "app=db". This means the Service provides stable networking and load balancing for all Pods on the cluster labeled as “app=db”. Pods defined in the Deployment section are all labelled as "app-db". It is this mapping between the Service label selector and the Pod labels that tells the Service object which Pods for which to provide networking.
redis service
Docker Cloud stackfile:
redis:
  image: 'redis:latest'
  restart: always
Kubernetes manifest:
apiVersion: apps/v1beta1
kind: Deployment
metadata:
 labels:
   app: redis
 name: redis
spec:
 selector:
   matchLabels:
     app: redis
 template:
   metadata:
     labels:
       app: redis
   spec:
     containers:
     - image: redis:alpine
       name: redis
       ports:
       - containerPort: 6379
     restartPolicy: Always
---
apiVersion: v1
kind: Service
metadata:
 labels:
   app: redis
 name: redis
spec:
 ports:
 - port: 6379
   targetPort: 6379
 selector:
   app: redis
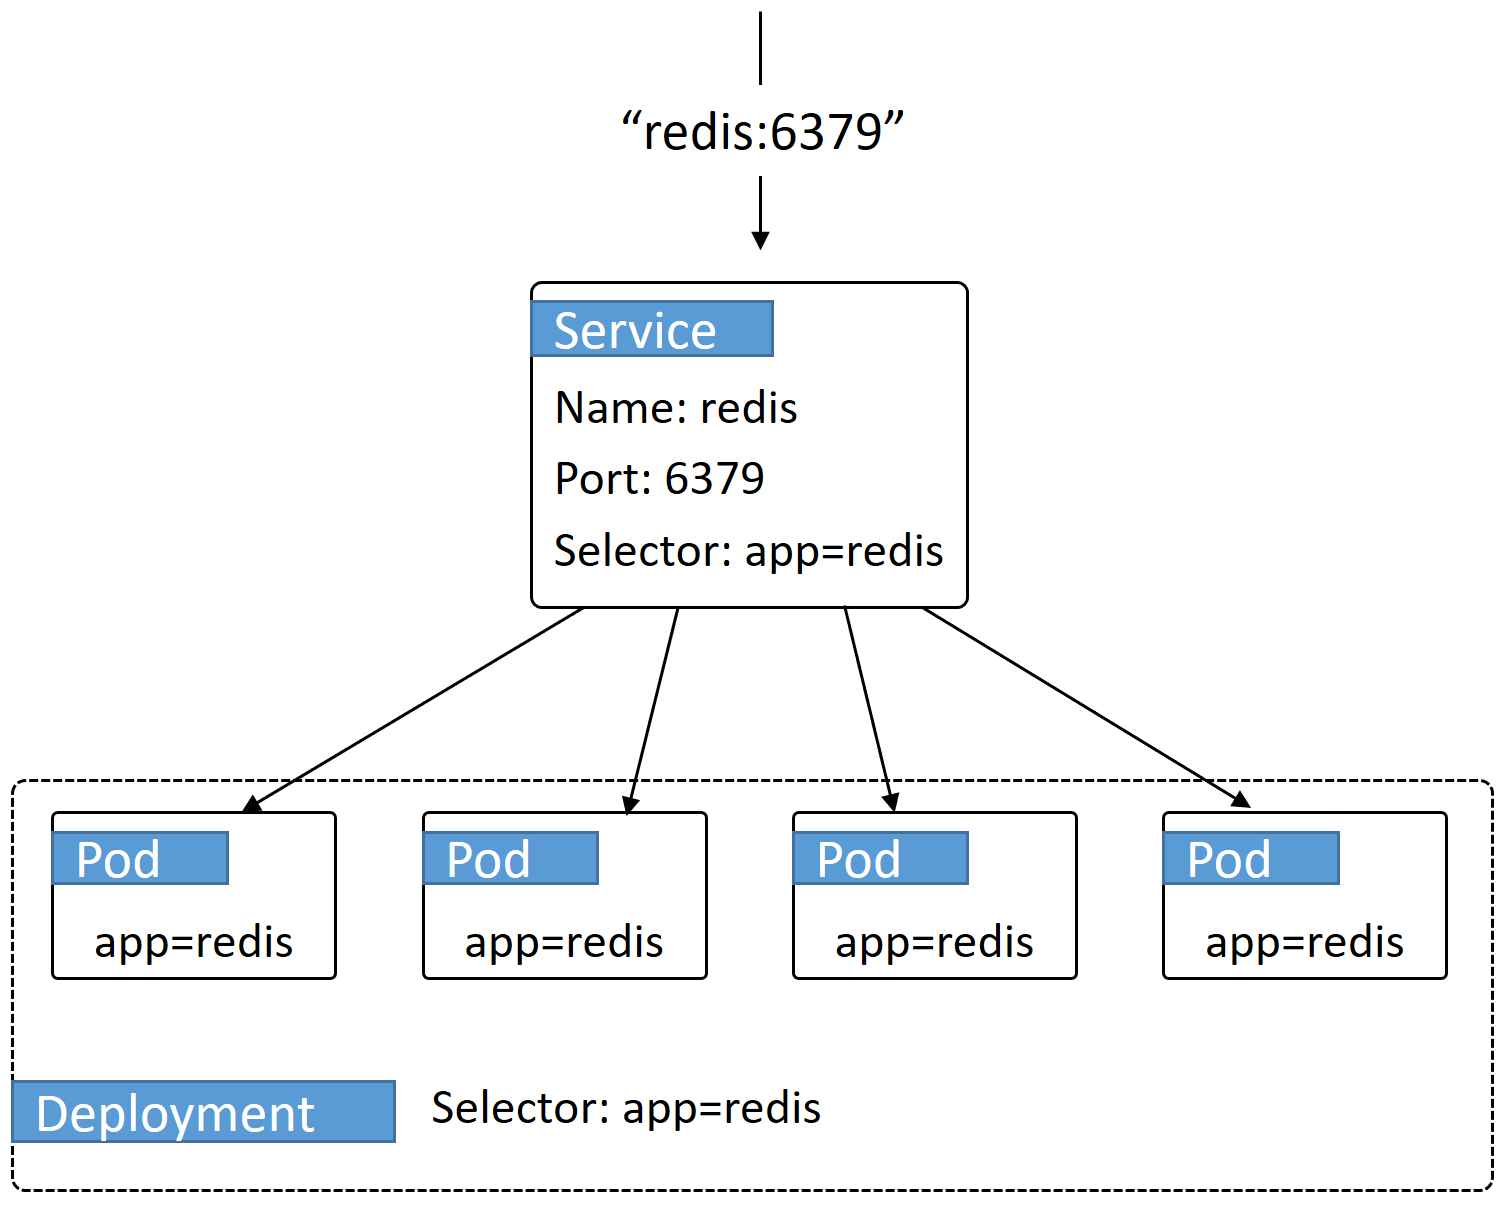
Here, the Deployment object deploys a Pod from the redis:alpine image and sets the container port to 6379. It also sets the labels for the Pods to the same value ("app=redis") as the Deployment’s label selector to tie the two together.
The Service object defines a cluster-wide DNS mapping for the name "redis" on port 6379. This means that traffic for tcp://redis:6379 is routed to this Service and is load balanced across all Pods on the cluster with the "app=redis" label. The Service is accessed on the cluster-wide port and forwards to the Pods on the targetPort. Again, the label-selector for the Service and the labels for the Pods are what tie the two together.
The diagram shows traffic intended for tcp://redis:6379 being sent to the redis Service and then load balanced across all Pods that match the Service label selector.
 {:width="500px"}
lb service
The Docker Cloud stackfile defines an lb service to balance traffic to the vote service. On AKS, this is not necessary because Kubernetes lets you define a Service object with type=balancer, which creates a native Azure load balancer to do this job. We demonstrate in the vote section.
vote service
The Docker Cloud stackfile for the vote service defines an image, a restart policy, and a specific number of Pods (replicas: 5). It also enables the Docker Cloud autoredeploy feature. We can tell that it listens on port 80 because the Docker Cloud lb service forwards traffic to it on port 80; we can also inspect its image.
Autoredeploy options: Autoredeploy is a Docker Cloud feature that automatically updates running applications every time you push an image. It is not native to Docker CE, AKS or GKE, but you may be able to regain it with Docker Cloud auto-builds, using web-hooks from the Docker Cloud repository for your image back to the CI/CD pipeline in your dev/staging/production environment.
Docker Cloud stackfile:
vote:
  autoredeploy: true
  image: 'docker/example-voting-app-vote:latest'
  restart: always
  target_num_containers: 5
Kubernetes manifest:
apiVersion: apps/v1beta1
kind: Deployment
metadata:
 labels:
   app: vote
 name: vote
spec:
 selector:
   matchLabels:
     app: vote
 replicas: 5
 template:
   metadata:
     labels:
       app: vote
   spec:
     containers:
     - image: docker/example-voting-app-vote:latest
       name: vote
       ports:
       - containerPort: 80
     restartPolicy: Always
---
apiVersion: v1
kind: Service
metadata:
 labels:
   app: vote
 name: vote
spec:
 type: LoadBalancer
 ports:
 - port: 80
 selector:
   app: vote
Again, we ensure that both Deployment and Service objects can find the Pods with matching labels ("app=vote"). We also set the number of Pod replicas to five (Deployment.spec.replicas) so that it matches the target_num_containers from the Docker Cloud stackfile.
We define the Service as "type=loadbalancer". This creates a native Azure load balancer with a stable, publicly routable IP for the service. It also maps port 80 so that traffic hitting port 80 is load balanced across all five Pod replicas in the cluster. (This is why the lb service from the Docker Cloud app is not needed.)
worker service
Like the vote service, the worker service defines an image, a restart policy, and a specific number of Pods (replicas: 5). It also defines the Docker Cloud autoredeploy policy (which is not supported in AKS).
Autoredeploy options: Autoredeploy is a Docker Cloud feature that automatically updates running applications every time you push an image. It is not native to Docker CE, AKS or GKE, but you may be able to regain it with Docker Cloud auto-builds, using web-hooks from the Docker Cloud repository for your image back to the CI/CD pipeline in your dev/staging/production environment.
Docker Cloud stackfile:
worker:
  autoredeploy: true
  image: 'docker/example-voting-app-worker:latest'
  restart: always
  target_num_containers: 3
Kubernetes manifest:
apiVersion: apps/v1beta1
kind: Deployment
metadata:
 labels:
   app: worker
 name: worker
spec:
 selector:
   matchLabels:
     app: worker
 replicas: 3
 template:
   metadata:
     labels:
       app: worker
   spec:
     containers:
     - image: docker/example-voting-app-worker:latest
       name: worker
     restartPolicy: Always
---
apiVersion: v1
kind: Service
metadata:
 labels:
   app: worker
 name: worker
spec:
 clusterIP: None
 ports:
 - port: 55555
   targetPort: 0
 selector:
   app: worker
Again, we ensure that both Deployment and Service objects can find the Pods with matching labels ("app=worker").
The worker Service (like db) is another "headless" service{: target="blank" class=""} where a DNS name is created and mapped to individual
A records{: target="blank" class=""} for each Pod rather than a cluster-wide VIP.
result service
Docker Cloud stackfile:
result:
  autoredeploy: true
  image: 'docker/example-voting-app-result:latest'
  ports:
    - '80:80'
  restart: always
Kubernetes manifest:
apiVersion: apps/v1beta1
kind: Deployment
metadata:
 labels:
   app: result
 name: result
spec:
 selector:
   matchLabels:
     app: result
 template:
   metadata:
     labels:
       app: result
   spec:
     containers:
     - image: docker/example-voting-app-result:latest
       name: result
       ports:
       - containerPort: 80
     restartPolicy: Always
---
apiVersion: v1
kind: Service
metadata:
 labels:
   app: result
 name: result
spec:
 type: LoadBalancer
 ports:
 - port: 80
 selector:
   app: result
The Deployment section defines the usual names, labels and container spec. The result Service (like the vote Service) defines a native Azure load balancer to distribute external traffic to the cluster on port 80.
Combined manifest k8s-vote.yml
You can combine all Deployments and Services in a single YAML file, or have individual YAML files per Docker Cloud service. The choice is yours, but it's usually easier to deploy and manage one file.
You should manage your Kubernetes manifest files the way you manage your application code -- checking them in and out of version control repositories etc.
Here, we combine all the Kubernetes definitions explained above into one YAML file that we call, k8s-vote.yml.
apiVersion: apps/v1beta1
kind: Deployment
metadata:
 name: db
 labels:
   app: db
spec:
 selector:
   matchLabels:
     app: db
 template:
   metadata:
     labels:
       app: db
   spec:
     containers:
     - image: postgres:9.4
       name: db
     restartPolicy: Always
---
apiVersion: v1
kind: Service
metadata:
 name: db
spec:
 clusterIP: None
 ports:
 - port: 55555
   targetPort: 0
 selector:
   app: db
---
apiVersion: apps/v1beta1
kind: Deployment
metadata:
 labels:
   app: redis
 name: redis
spec:
 selector:
   matchLabels:
     app: redis
 template:
   metadata:
     labels:
       app: redis
   spec:
     containers:
     - image: redis:alpine
       name: redis
       ports:
       - containerPort: 6379
     restartPolicy: Always
---
apiVersion: v1
kind: Service
metadata:
 labels:
   app: redis
 name: redis
spec:
 ports:
 - port: 6379
   targetPort: 6379
 selector:
   app: redis
---
apiVersion: apps/v1beta1
kind: Deployment
metadata:
 labels:
   app: vote
 name: vote
spec:
 selector:
   matchLabels:
     app: vote
 replicas: 5
 template:
   metadata:
     labels:
       app: vote
   spec:
     containers:
     - image: docker/example-voting-app-vote:latest
       name: vote
       ports:
       - containerPort: 80
     restartPolicy: Always
---
apiVersion: v1
kind: Service
metadata:
 labels:
   app: vote
 name: vote
spec:
 type: LoadBalancer
 ports:
 - port: 80
 selector:
   app: vote
---
apiVersion: apps/v1beta1
kind: Deployment
metadata:
 labels:
   app: worker
 name: worker
spec:
 selector:
   matchLabels:
     app: worker
 replicas: 3
 template:
   metadata:
     labels:
       app: worker
   spec:
     containers:
     - image: docker/example-voting-app-worker:latest
       name: worker
     restartPolicy: Always
---
apiVersion: v1
kind: Service
metadata:
 labels:
   app: worker
 name: worker
spec:
 clusterIP: None
 ports:
 - port: 55555
   targetPort: 0
 selector:
   app: worker
---
apiVersion: apps/v1beta1
kind: Deployment
metadata:
 labels:
   app: result
 name: result
spec:
 selector:
   matchLabels:
     app: result
 template:
   metadata:
     labels:
       app: result
   spec:
     containers:
     - image: docker/example-voting-app-result:latest
       name: result
       ports:
       - containerPort: 80
     restartPolicy: Always
---
apiVersion: v1
kind: Service
metadata:
 labels:
   app: result
 name: result
spec:
 type: LoadBalancer
 ports:
 - port: 80
 selector:
   app: result
Save the Kubernetes manifest file (as k8s-vote.yml) and check it into version control.
Test the app on AKS
Before migrating, you should thoroughly test each new Kubernetes manifest on a AKS cluster. Healthy testing includes deploying the application with the new manifest file, performing scaling operations, increasing load, running failure scenarios, and doing updates and rollbacks. These tests are specific to each of your applications. You should also manage your manifest files in a version control system.
The following steps explain how to deploy your app from the Kubernetes manifest file and verify that it is running. The steps are based on the sample application used throughout this guide, but the general commands should work for any app.
Run from an Azure Cloud Shell{: target="blank" class=""} or local terminal with
kubectlconfigured to talk to your AKS cluster.
-
Verify that your shell/terminal is configured to talk to your AKS cluster. The output should match your cluster.
> kubectl get nodes NAME STATUS ROLES AGE VERSION aks-agentpool-29046111-0 Ready agent 6h v1.8.1 aks-agentpool-29046111-1 Ready agent 6h v1.8.1 aks-agentpool-29046111-2 Ready agent 6h v1.8.1 -
Deploy your Kubernetes application to your cluster.
The Kubernetes manifest here is
ks8-vote.ymland lives in the system PATH. To use a different manifest, substituteks8-vote.ymlwith the name of your manifest file.> kubectl create -f k8s-vote.yml deployment "db" created service "db" created deployment "redis" created service "redis" created deployment "vote" created service "vote" created deployment "worker" created service "worker" created deployment "result" created service "result" created -
Check the status of the app (both Deployments and Services):
> kubectl get deployments
NAME      DESIRED   CURRENT   UP-TO-DATE   AVAILABLE   AGE
db        1         1         1            1           43s
redis     1         1         1            1           43s
result    1         1         1            1           43s
vote      5         5         5            5           43s
worker    3         3         3            3           43s

> kubectl get services
NAME         TYPE           CLUSTER-IP     EXTERNAL-IP   PORT(S)        AGE
db           ClusterIP      None           <none>        55555/TCP      48s
kubernetes   ClusterIP      10.0.0.1       <none>        443/TCP        6h
redis        ClusterIP      10.0.168.188   <none>        6379/TCP       48s
result       LoadBalancer   10.0.76.157    <pending>     80:31033/TCP   47s
vote         LoadBalancer   10.0.244.254   <pending>     80:31330/TCP   48s
worker       ClusterIP      None           <none>        55555/TCP      48s
Both
LoadBalancerServices arependingbecause it takes a minute or two to provision an Azure load balancer. You can runkubectl get svc --watchto see when they are ready. Once provisioned, the output looks like this (with different external IPs):> kubectl get services <Snip> result LoadBalancer 10.0.76.157 52.174.195.232 80:31033/TCP 7m vote LoadBalancer 10.0.244.254 52.174.196.199 80:31330/TCP 8m -
Test that the application works in your new environment.
For example, the voting app exposes two web front-ends -- one for casting votes and the other for viewing results:
- Copy/paste the
EXTERNAL-IPvalue for thevoteservice into a browser and cast a vote. - Copy/paste the
EXTERNAL-IPvalue for theresultservice into a browser and ensure your vote registered.
- Copy/paste the
If you had a CI/CD pipeline with automated tests and deployments for your Docker Cloud stacks, you should build, test, and implement one for each application on AKS.
You can extend your Kubernetes manifest file with advanced features to perform rolling updates and simple rollbacks. But you should not do this until you have confirmed your application is working with the simple manifest file.
Migrate apps from Docker Cloud
Remember to point your application CNAMES to new service endpoints.
How you migrate your applications is unique to your environment and applications.
- Plan with all developers and operations teams.
- Plan with customers.
- Plan with owners of other applications that interact with your Docker Cloud app.
- Plan a rollback strategy if problems occur.
Once your migration is in process, check that the everything is working as expected. Ensure that users are hitting the new application on the Docker CE infrastructure and getting expected results.
Think before you terminate stacks and clusters
Do not terminate your Docker Cloud stacks or node clusters until some time after the migration has been signed off as successful. If there are problems, you may need to roll back and try again. {: .warning}