20 KiB
+++ title = "Configuration options" description = "Configuration instructions for Docker Trusted Registry" keywords = ["docker, documentation, about, technology, understanding, enterprise, hub, registry"] [menu.main] parent="smn_dhe" weight=5 +++
Configuring Docker Trusted Registry
Overview
This page will help you properly configure Docker Trusted Registry so it can run in your environment.
Start with Docker Trusted Registry loaded in your browser and click "Settings" in the global nav bar at the top of the page to view configuration options. You'll see menus organizing the options for configuring:
- General Settings (ports, proxies, etc.)
- Security settings
- Storage settings
- Your Docker Trusted Registry license
- Authentication settings
Note: Saving changes you've made to settings may restart various services, as follows:
- General settings: full Docker Trusted Registry restart
- License change: full Docker Trusted Registry restart
- SSL change: Nginx reload
- Storage config: only registries restart
- Authentication config: no restart
General Settings
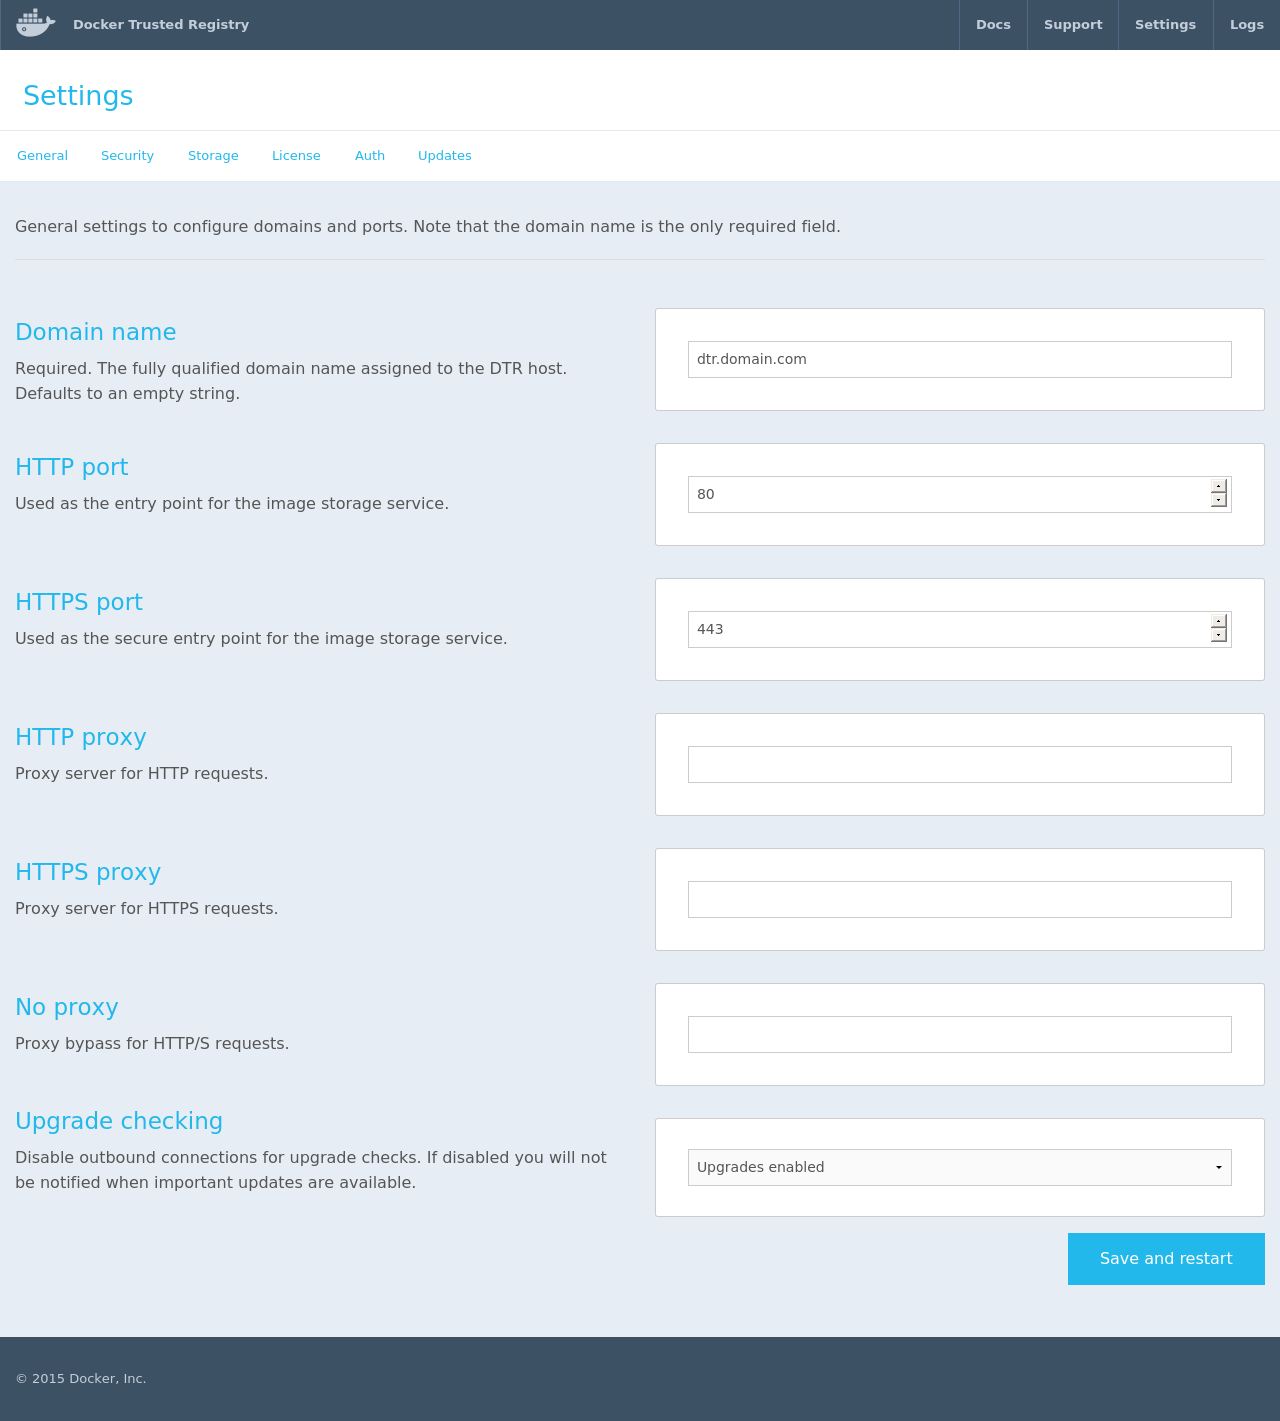
- Domain Name: required defaults to an empty string, the fully qualified domain name assigned to the Docker Trusted Registry host.
- HTTP Port: defaults to 80, used as the entry point for the image storage service. To see load balancer status, you can query http://<dtr-host>/load_balancer_status.
- HTTPS Port: defaults to 443, used as the secure entry point for the image storage service.
- HTTP proxy: defaults to an empty string, proxy server for HTTP requests.
- HTTPS proxy: defaults to an empty string, proxy server for HTTPS requests.
- No proxy: defaults to an empty string, proxy bypass for HTTP and HTTPS requests.
- Upgrade checking: enables or disables automatic checking for Docker Trusted Registry software updates.
Note: If you need Docker Trusted Registry to re-generate a self-signed certificate at some point, you'll need to first delete
/usr/local/etc/dtr/ssl/server.pem, and then restart the Docker Trusted Registry containers, either by changing and saving the "Domain Name", or usingbash -c "$(docker run docker/trusted-registry restart)".
Security

- SSL Certificate: Used to enter the hash (string) from the SSL Certificate. This cert must be accompanied by its private key, entered below.
- SSL Private Key: The hash from the private key associated with the provided SSL Certificate (as a standard x509 key pair).
In order to run, Docker Trusted Registry requires encrypted communications via HTTPS/SSL between (a) the Docker Trusted Registry and your Docker Engine(s), and (b) between your web browser and the Docker Trusted Registry admin server. There are a few options for setting this up:
- You can use the self-signed certificate Docker Trusted Registry generates by default.
- You can generate your own certificates using a public service or your enterprise's infrastructure. See the Generating SSL certificates section for the options available.
If you are generating your own certificates, you can install them by following the instructions for Adding your own registry certificates to Docker Trusted Registry.
On the other hand, if you choose to use the Docker Trusted Registry-generated certificates, or the certificates you generate yourself are not trusted by your client Docker hosts, you will need to do one of the following:
-
Install a registry certificate on all of your client Docker daemons,
-
Set your client Docker daemons to run with an unconfirmed connection to the registry.
Generating SSL certificates
There are three basic approaches to generating certificates:
-
Most enterprises will have private key infrastructure (PKI) in place to generate keys. Consult with your security team or whomever manages your private key infrastructure. If you have this resource available, Docker recommends you use it.
-
If your enterprise can't provide keys, you can use a public Certificate Authority (CA) like "InstantSSL.com" or "RapidSSL.com" to generate a certificate. If your certificates are generated using a globally trusted Certificate Authority, you won't need to install them on all of your client Docker daemons.
-
Use the self-signed registry certificate generated by Docker Trusted Registry, and install it onto the client Docker daemon hosts as shown below.
Adding your own Registry certificates to Docker Trusted Registry
Whichever method you use to generate certificates, once you have them you can set up your Docker Trusted Registry server to use them by navigating to the "Settings" page, going to "Security," and putting the SSL Certificate text (including all intermediate Certificates, starting with the host) into the "SSL Certificate" edit box, and the previously generated Private key into the "SSL Private Key" edit box.
Click the "Save" button, and then wait for the Docker Trusted Registry Admin site to restart and reload. It should now be using the new certificate.
Once the "Security" page has reloaded, it will show # hashes instead of the
certificate text you pasted in.
If your certificate is signed by a chain of Certificate Authorities that are already trusted by your Docker daemon servers, you can skip the "Installing registry certificates" step below.
Installing Registry certificates on client Docker daemons
If your certificates do not have a trusted Certificate Authority, you will need to install them on each client Docker daemon host.
The procedure for installing the Docker Trusted Registry certificates on each Linux distribution has slightly different steps, as shown below.
You can test this certificate using curl:
$ curl https://dtr.yourdomain.com/v2/
curl: (60) SSL certificate problem: self signed certificate
More details here: http://curl.haxx.se/docs/sslcerts.html

curl performs SSL certificate verification by default, using a "bundle"
 of Certificate Authority (CA) public keys (CA certs). If the default
 bundle file isn't adequate, you can specify an alternate file
 using the --cacert option.
If this HTTPS server uses a certificate signed by a CA represented in
 the bundle, the certificate verification probably failed due to a
 problem with the certificate (it might be expired, or the name might
 not match the domain name in the URL).
If you'd like to turn off curl's verification of the certificate, use
 the -k (or --insecure) option.

$ curl --cacert /usr/local/etc/dtr/ssl/server.pem https://dtr.yourdomain.com/v2/
{"errors":[{"code":"UNAUTHORIZED","message":"access to the requested resource is not authorized","detail":null}]}
Continue by following the steps corresponding to your chosen OS.
Ubuntu/Debian
    $ export DOMAIN_NAME=dtr.yourdomain.com
    $ openssl s_client -connect $DOMAIN_NAME:443 -showcerts </dev/null 2>/dev/null | openssl x509 -outform PEM | sudo tee /usr/local/share/ca-certificates/$DOMAIN_NAME.crt
    $ sudo update-ca-certificates
    Updating certificates in /etc/ssl/certs... 1 added, 0 removed; done.
    Running hooks in /etc/ca-certificates/update.d....done.
    $ sudo service docker restart
    docker stop/waiting
    docker start/running, process 29291
RHEL/Centos
    $ export DOMAIN_NAME=dtr.yourdomain.com
    $ openssl s_client -connect $DOMAIN_NAME:443 -showcerts </dev/null 2>/dev/null | openssl x509 -outform PEM | sudo tee /etc/pki/ca-trust/source/anchors/$DOMAIN_NAME.crt
    $ sudo update-ca-trust
    $ sudo /bin/systemctl restart docker.service
Docker Machine and Boot2Docker
You'll need to make some persistent changes using bootsync.sh in your
Boot2Docker-based virtual machine (as documented in local customization). To do this:
docker-machine ssh devto enter the VMvi /var/lib/boot2docker/bootsync.sh(create it if it doesn't exist, or edit it if it does)
Install the CA cert (or the auto-generated cert) by adding the following to
your /var/lib/boot2docker/bootsync.sh:
#!/bin/sh

cat /var/lib/boot2docker/server.pem >> /etc/ssl/certs/ca-certificates.crt
Then get the certificate from the new Docker Trusted Registry server using:
$ openssl s_client -connect dtr.yourdomain.com:443 -showcerts </dev/null 2>/dev/null | openssl x509 -outform PEM | sudo tee -a /var/lib/boot2docker/server.pem
If your certificate chain is complicated, you may want to use the changes in Pull request 807
Now you can either reboot your virtual machine, or run the following to install the server certificate, and then restart the Docker daemon.
$ sudo chmod 755 /var/lib/boot2docker/bootsync.sh
$ sudo /var/lib/boot2docker/bootsync.sh
$ sudo /etc/init.d/docker restart`.
If you can't install the certificates
If for some reason you can't install the certificate chain on a client Docker host,
or your certificates do not have a global CA, you can configure your Docker daemon to run in "insecure" mode. This is done by adding an extra flag,
--insecure-registry host-ip|domain-name, to your client Docker daemon startup flags.
You'll need to restart the Docker daemon for the change to take effect.
This flag means that the communications between your Docker client and the Docker Trusted Registry Registry server are still encrypted, but the client Docker daemon is not confirming that the Registry connection is not being hijacked or diverted.
Note: If you enter a "Domain Name" into the "Security" settings, it needs to be DNS resolvable on any client Docker daemons that are running in "insecure-registry" mode.
To set the flag, follow the directions below for your operating system.
Ubuntu
On Ubuntu 14.04 LTS, you customize the Docker daemon configuration with the
/etc/defaults/docker file.
Open or create the /etc/defaults/docker file, and add the
--insecure-registry flag to the DOCKER_OPTS setting (which may need to be
added or uncommented) as follows:
DOCKER_OPTS="--insecure-registry dtr.yourdomain.com"
Then restart the Docker daemon with sudo service docker restart.
RHEL/Centos
On RHEL/Centos, you customize the Docker daemon configuration with the
/etc/sysconfig/docker file.
Open or create the /etc/sysconfig/docker file, and add the
--insecure-registry flag to the OPTIONS setting (which may need to be
added or uncommented) as follows:
OPTIONS="--insecure-registry dtr.yourdomain.com"
Then restart the Docker daemon with sudo service docker restart.
Docker Machine and Boot2Docker
In your Boot2Docker-based virtual machine, you customize the Docker daemon configuration with the
/var/lib/boot2docker/profile file.
Open or create the /var/lib/boot2docker/profile file, and add an EXTRA_ARGS
setting as follows:
EXTRA_ARGS="--insecure-registry dtr.yourdomain.com"
Then restart the Docker daemon with sudo /etc/init.d/docker restart.
Image Storage Configuration
Docker Trusted Registry image storage can be configured to use the local filesystem, or a cloud service such as S3 or Azure.
See the Registry 2.0 configuration documentation for the full options specific to each driver. Storage drivers can be added or customized via the Docker Registry storage driver API.
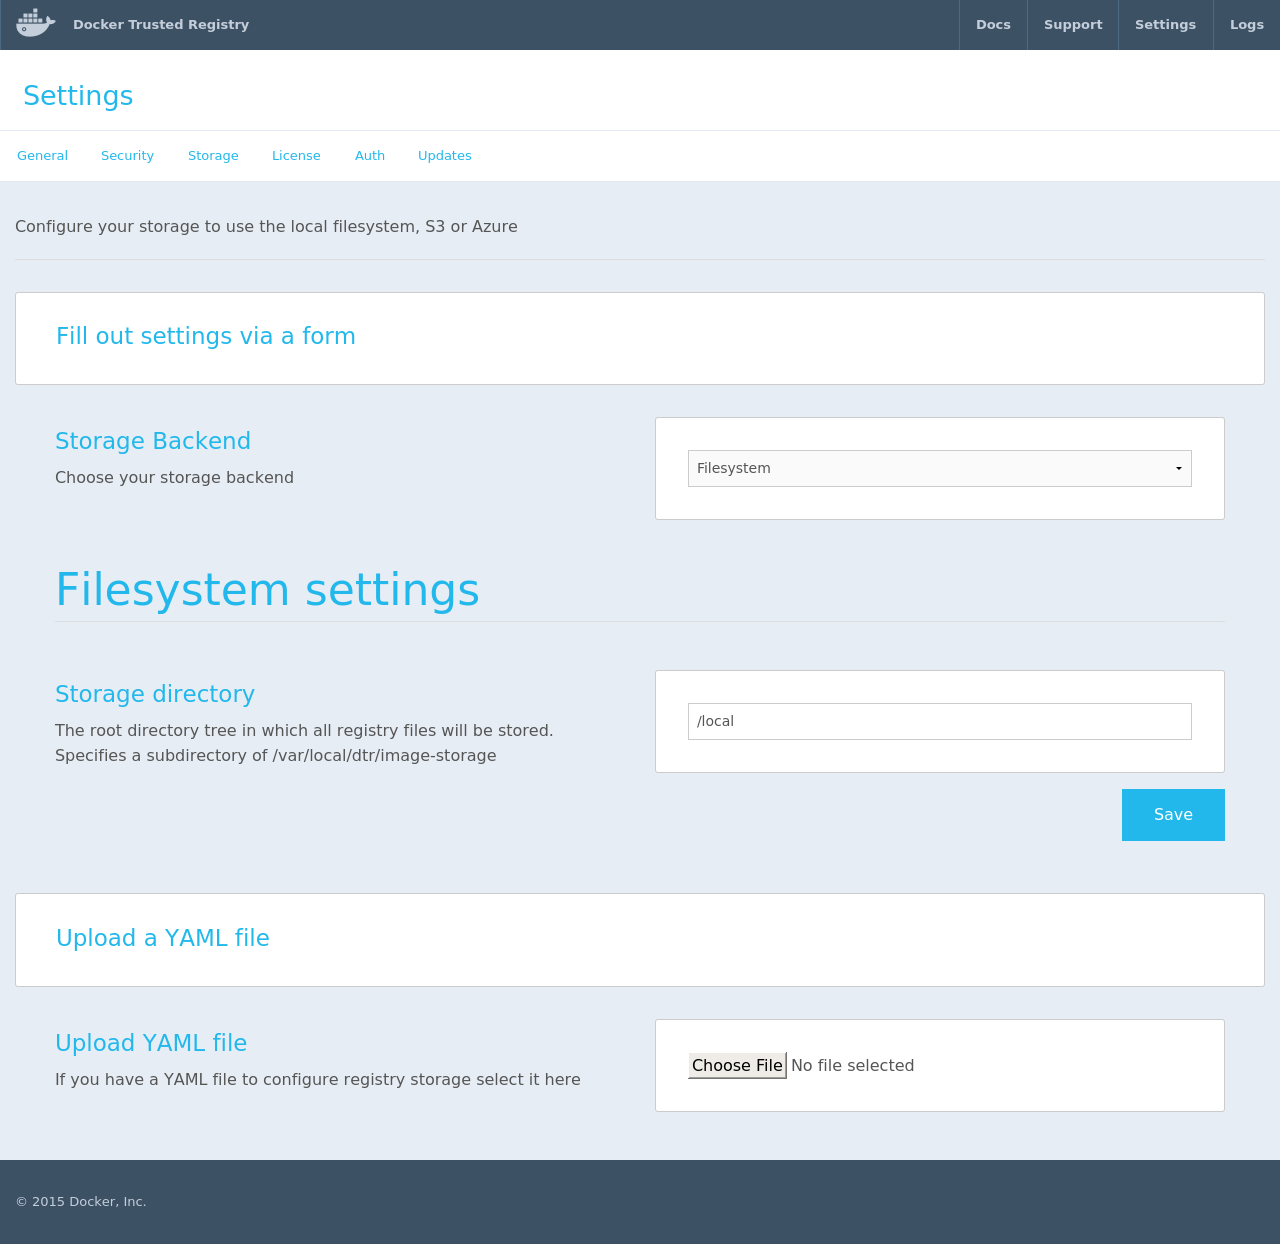
After you select the image storage method you would like to use from the drop-down menu near the top of the page, the UI will change to reflect the configuration settings appropriate to the selected method.
You can either use the storage specific input boxes to configure the most common settngs for local filesystem, S3 or Azure storage backends, or use the full Yaml configuration file upload to have more detailed control.
You can view the current storage.yaml file on your Docker Trusted Registry Docker host in the /usr/local/etc/dtr/
directory.
Filesystem settings
The filesystem storage backend
has only one setting - the "Storage directory", the subdirectory of /var/local/dtr/image-storage
in which all registry files are stored.
The default value of /local means the files are stored in /var/local/dtr/image-storage/local.
S3 settings
The S3 storage backend page allows you to set the "AWS region", "Bucket name", "Access Key", and "Secret Key".
Azure settings
The Azure storage backend page allows you to set the "Account name", "Account key", "Container", and "Realm".
Yaml configuration file
If the Quick setup options above are not sufficient to configure your Registry options, you can upload a YAML file.
The schema of this file is identical to that used by the Registry 2.0.
- If you are using the file system driver to provide local image storage, you
will need to specify a root directory which will get mounted as a sub-path of
/var/local/dtr/image-storage. The default value of this root directory is/local, so the full path to it is/var/local/dtr/image-storage/local.
Authentication
The "Authentication" settings lets Docker Trusted Registry administrators control access to the Docker Trusted Registry web admin tool and to the Docker Trusted Registry.
The current authentication methods are None, Managed and LDAP.
Note: if you have issues logging into the Docker Trusted Registry admin web interface after changing the authentication settings, you may need to use the emergency access to the Docker Trusted Registry admin web interface.
No authentication
No authentication means that everyone that can access your Docker Trusted Registry web administration site. This is not recommended for any use other than testing.
Managed authentication
With Managed authentication, the Docker Trusted Registry admin can control users' access by setting username/password pairs. The admin can then use the API to give these users global "admin", "read-write" or "read-only" privileges while assigning them Organization, Team or User repository access.
The "read-only" role can pull all images from the registry, "read-write" can push and pull all images, and the "admin" role can push and pull and also access the web administration UI and metrics dashboard.
When you create users and assign their roles via the API, you do not need to assign those users roles using the Docker Trusted Registry admin web UI.

- Choose the appropriate button to add one user, or to upload a CSV file containing username, password pairs, and selection boxes for "admin", "read-write", and "read-only" roles.
- You can also create, or allow others to create the username, password pair using the Account API
LDAP authentication
Using LDAP authentication allows you to integrate your Docker Trusted Registry into your organization's existing LDAP user and authentication database.
To improve the performance of Docker Trusted Registry's Access Control Lists, User and Group membership data is synced into Docker Trusted Registry's database at a configurable LDAP Sync Interval. User passwords are not transferred during syncing; Docker Trusted Registry will defer to the LDAP server to validate username/password pairs.
Note: LDAP syncing does not create new user accounts or teams in Docker Trusted Registry. It will only manage existing teams that have been specified to sync with LDAP. Use the Docker Trusted Registry APIs to create new users and teams from your LDAP server.
You can configure the "userFilter" to select the set of users that are candidates for each of the "admin", global "read-write", and global "read-only" roles. Unlike "Managed" authentication, the "admin" role is separate from the registry access roles, so LDAP users in the "admin" role won't have access to Docker Trusted Registry images unless they are also given the "read-write" or "read-only" role.
Alternativly, you can assign Organization, Team or User repository roles using the API.
Because connecting to LDAP involves existing infrastructure external to Docker Trusted Registry and Docker, you will need to gather the details required to configure Docker Trusted Registry for your organization's particular LDAP implementation.
You can test that you have the correct LDAP server information by connecting to the LDAP server from inside a Docker container running on the same server as your Docker Trusted Registry:
Note: if the LDAP server is configured to use StartTLS, then you need to add
-Zto theldapsearchcommand examples below.
docker run --rm -it svendowideit/ldapsearch -h <LDAP Server hostname> -b <User Base DN> -D <Search User DN> -w <Search User Password>
Or if the LDAP server is set up to allow anonymous access (which means your Search User DN and Search User Password settings will remain empty):
docker run --rm -it svendowideit/ldapsearch -h <LDAP Server hostname> -b <User Base DN> -x
The result of these queries should be a (very) long list - if you get an authentication error, then the details you have are not sufficient - contact your organization's LDAP team.
The User Login Attribute key setting must match the field used in the LDAP server
for the user's login-name. On OpenLDAP, it's generally uid, and on Microsoft Active Directory
servers, it's sAMAccountName. The ldapsearch output above should allow you to
confirm which setting you need.

LDAP Configuration options
- LDAP Server URL: required defaults to null, LDAP server URL (e.g., - ldap://example.com)
- Use StartTLS: defaults to unchecked, check to enable StartTLS
- User Base DN: required defaults to null, user base DN in the form (e.g., - dc=example,dc=com)
- User Login Attribute: required defaults to null, user login attribute (e.g., - uid or sAMAccountName)
- Search User DN: required defaults to null, search user DN (e.g., - domain\username)
- Search User Password: required defaults to null, search user password
- LDAP Sync Interval: required defaults to 1h0m0s, sets the interval for Docker Trusted Registry to sync with the LDAP db.
- User Search filters: allows you to configure LDAP queries to limit the users that have the roles:
-
- User Filter: This filter is used to select the objects to use as candidates for the role filters
-
- Admin Role Filter: Combined with the "User Filter" to specify users with the "Admin" role - permitted to access the Docker Trusted Registry web UI
-
- Read-Write Role Filter: Combined with the "User Filter" to specify users permitted to push images to, and pull images from Docker Trusted Registry
-
- Read-Only Role Filter: Combined with the "User Filter" to specify users permitted to pull images from Docker Trusted Registry
Note: While the "role" filters are optional, keep in mind that if they are left empty, all users will get those full privileges. In other words, if the "admin" filter is left empty, all users will get admin privileges, if the "read-write" filter is empty, all users can push/pull any image, etc. (This behavior will be corrected in future versions.)
Confirm login with current configuration
You can test your current LDAP configuration before saving it by entering a test username and password and then clicking "Try Login". If the login succeeds, your configuration is working.
Next Steps
For information on getting support for Docker Trusted Registry, take a look at the Support information.