10 KiB
Upgrade UCP
This page guides you on upgrading Docker Universal Control Plane (UCP).
Before upgrading to a new version of UCP, check the release notes for the version you are upgrading to. There you'll find information about the new features, breaking changes, and other relevant information for upgrading to a particular version.
Before starting an upgrade, make sure your cluster is healthy. If a problem occurs, that will make it easier to find and troubleshoot any problems. Also, don't change any cluster configuration during an upgrade. That can lead to misconfigurations that are difficult to troubleshoot.
The UCP upgrade command
To upgrade a UCP installation, you run the ucp upgrade command on each node
of the cluster.
You can check the options available on the upgrade command by running:
$ docker run --rm -it docker/ucp upgrade --help
You can also find the documentation for the upgrade command on the
UCP upgrade command reference.
When you run the upgrade command, it:
-
Pulls the images of the new UCP version from Docker Hub.
-
Checks if it is possible to upgrade directly to the new version.
Depending on the version you have installed, it might not be possible to upgrade directly to the latest version. In that case, you'll need to upgrade to intermediate versions before upgrading to the latest version.
Check the release notes to see if its possible to upgrade directly or not.
-
Stops and removes the old UCP containers.
This doesn't affect other running containers. Also, existing cluster configurations are not affected, since they are persisted on volumes.
-
Deploys the new UCP containers to the node.
The upgrade procedure
The upgrade procedure depends on whether your cluster is set up for high-availability or not. A cluster that is not set for high-availability, has only one controller node, while a cluster that supports high-availability has multiple controller nodes.
To check the number of controller nodes in your cluster, navigate to the UCP web application, and check the Nodes page.
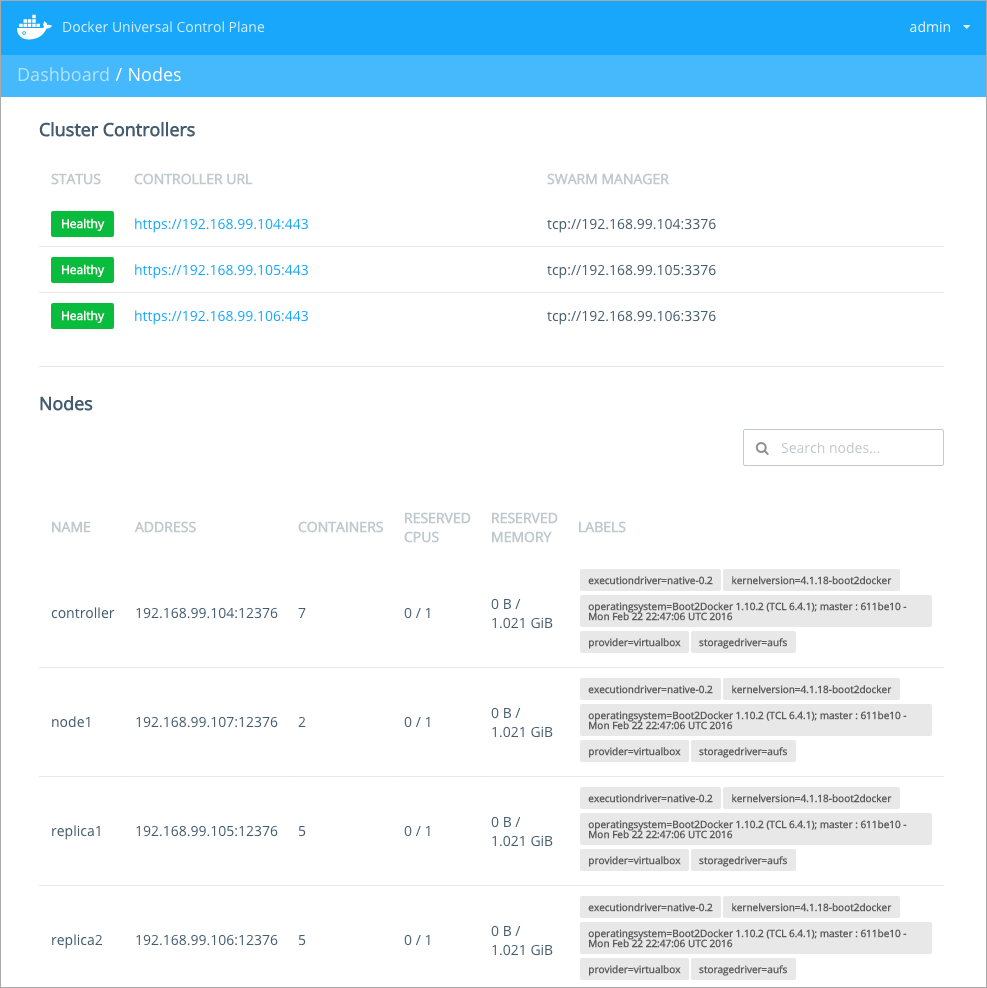
In this example we have 3 controller nodes set up, which means that this cluster is set up for high-availability.
After finding the number of controller nodes in your cluster, jump to the upgrade instructions that apply to you:
- My cluster is not set for high-availability, if your cluster has only one controller node.
- My cluster is set for high-availability, if your cluster has multiple controller nodes.
My cluster is not set for high-availability
If your cluster is not set up for high-availability (does not have replica nodes):
-
Make sure you have an admin client bundle.
You can use a client bundle to make the Docker client connect to the Docker Engine running on the node. This way, you won't have to use ssh to connect directly to the hosts you want to upgrade.
To download a client bundle, login with an administrator user, go to your profile and click the Create a Client Bundle button.

-
Make sure your cluster is healthy before starting the upgrade.
Login into UCP and navigate to the Nodes page. Make sure all nodes are listed.

You can also use your client bundle for this. In the command line, navigate to the directory of the client bundle and run:
$ eval $(<env.sh) $ docker info -
$ docker --host=tcp://[controller-ip]:[engine-port] run --rm -it --name ucp -v /var/run/docker.sock:/var/run/docker.sock docker/ucp upgrade -iThe
--hostoption allows you to specify the IP and port of the Docker Engine running on the controller node.If the controller node is on a separate network, or there are firewall rules blocking requests to the Docker Engine port, you might need to connect directly to the machine using ssh.
When running the
upgradecommand, you should have the following result:$ docker --host=tcp://192.168.99.100:12376 run --rm -it --name ucp -v /var/run/docker.sock:/var/run/docker.sock docker/ucp upgrade -i # INFO[0000] We're about to upgrade the local components for UCP ID: KRIJ:UEYA:AGTD:6BBO:AHS7:QSPA:ZFAM:X7KW:GNXR:4MWQ:UDPU:MRGR Do you want proceed with the upgrade? (y/n): y # INFO[0028] All required images are present # INFO[0000] Checking for version compatibility # INFO[0000] Your system is compatible. Removing old UCP Containers while preserving data # INFO[0000] Redeploying UCP containers # INFO[0002] Verifying containers started # INFO[0004] Success! Please log in to the UCP console to verify your system before proceeding to upgrade additional nodes. -
Make sure the controller node is healthy.
In your browser, navigate to the UCP web app, to make sure the controller is running. Navigate to the Nodes page, to make sure the controller is healthy.
You can also use the
docker infocommand from the CLI for this. -
For all other nodes in the cluster:
My cluster is set for high-availability
If your cluster is set up for high-availability (has several replica nodes):
-
Schedule the upgrade to take place outside business hours.
During an upgrade, all user containers will continue running normally. But upgrading outside business hours ensures the impact on your business is close to none.
-
Make sure you have an admin client bundle.
You can use a client bundle to make the Docker client connect to the Docker Engine running on the node. This way, you won't have to use ssh to connect directly to the hosts you want to upgrade.
To download a client bundle, login with an administrator user, go to your profile and click the Create a Client Bundle button.
-
Make sure your cluster is healthy before starting the upgrade.
Login into UCP and navigate to the Nodes page. Make sure all nodes are listed.
You can also use your client bundle for this. In the command line, navigate to the directory of the client bundle and run:
$ eval $(<env.sh) $ docker info -
Ensure no administrator user makes configuration changes during the upgrade.
The UCP cluster uses an internal key-value store to save configuration settings, like the method used for authenticating users. For high-availability that key-value store is replicated across the controller and replica nodes.
During an upgrade, new values are stored on the key-value store. If at the same time an administrator makes configuration changes, some nodes might use that configuration, while others might not.
To avoid misconfigurations, ensure no administrator changes UCP configurations during the upgrade.
-
Block user access to the controller node.
This can be done by setting the load balancer to drain existing connections to the controller node.
While connections are being drained, all new user requests are sent to the replica nodes, and existing connections to the controller are given some time to complete.
This way users can continue using UCP, while the controller node is being upgraded.
-
$ docker --host=tcp://[controller-ip]:[engine-port] run --rm -it --name ucp -v /var/run/docker.sock:/var/run/docker.sock docker/ucp upgrade -iThe
--hostoption allows you to specify the IP and port of the Docker Engine running on the controller node.If the controller node is on a separate network, or there are firewall rules blocking requests to the Docker Engine port, you might need to connect directly to the machine using ssh.
When running the
upgradecommand, you should have the following result:$ docker --host=tcp://192.168.99.100:12376 run --rm -it --name ucp -v /var/run/docker.sock:/var/run/docker.sock docker/ucp upgrade -i # INFO[0000] We're about to upgrade the local components for UCP ID: KRIJ:UEYA:AGTD:6BBO:AHS7:QSPA:ZFAM:X7KW:GNXR:4MWQ:UDPU:MRGR Do you want proceed with the upgrade? (y/n): y # INFO[0028] All required images are present # INFO[0000] Checking for version compatibility # INFO[0000] Your system is compatible. Removing old UCP Containers while preserving data # INFO[0000] Redeploying UCP containers # INFO[0002] Verifying containers started # INFO[0004] Success! Please log in to the UCP console to verify your system before proceeding to upgrade additional nodes. -
Make sure the controller node is healthy.
In your browser, navigate to the UCP web app. In the Nodes page confirm that the controller is running, and the cluster is healthy.
You can also do this on the CLI with the
docker infocommand. -
For each replica node in the cluster:
-
For all other nodes in the cluster: