9.2 KiB
| description | keywords | title |
|---|---|---|
| System for Cross-domain Identity Management | SCIM, SSO | System for Cross-domain Identity Management |
This section is for administrators who want to enable System for Cross-domain Identity Management (SCIM) 2.0 for their business. SCIM is a provisioning system that lets you manage users within your identity provider (IdP). You can enable SCIM on organizations that are part of the Docker Business subscription. To upgrade your existing account to a Docker Business subscription, see Upgrade your subscription{:target="blank" rel="noopener" class=""}.
SCIM provides automated user provisioning and de-provisioning for your Docker organization through your identity provider (IdP). Once SCIM is enabled in the IdP, any user assigned to the Docker application in the IdP, is automatically provisioned in Docker Hub and added to the organization. Also, if a user gets unassigned from the Docker application in the IdP, the user is removed from the organization in Docker Hub. SCIM also synchronizes changes made to users’ attributes in the IdP, for instance the user’s first name and last name.
We currently support the following provisioning features: creating new users, push user profile updates, remove users, deactivate users and reactivate users. Group management is currently not supported.
The table below lists the supported attributes.
| Attribute | Description |
|---|---|
| username | Unique identifier of the user (email) |
| givenName | User’s first name |
| familyName | User’s surname |
Configure
SAML-based SSO must be properly set up and be functional for your organization before you start configuring automated provisioning. In addition, you must verify your company domain and have the appropriate connectors in your IdP. Your user email domain must be the same company domain you use for Single Sign-on (SSO). Enforcing SSO is not required to enable SCIM. However, you must configure SAML SSO{: target="blank" rel="noopener" class=""} before you enable SCIM.
Before you make SCIM configuration changes in your IdP, navigate to Docker Hub{: target="blank" rel="noopener" class=""} and select Organizations > Settings > Security. SCIM is locked until you complete the SSO configuration and verify your company domain. Enable SCIM and access your Base URL and API Token. You can also generate a new API token.
 {:width="700px"}
Okta
-
In Okta, navigate to Applications > Create App Integration > SAML 2.0, and click Next.
-
In the General tab, on your new application page, select Edit App Settings to enable SCIM provisioning and click Save.
-
In the Provisioning tab, edit the SCIM Connection and complete the following:
- SCIM connector base URL: SCIM Base URL from Docker Hub
- Unique identifier field for users: enter email
- Supported Provisioning actions: select Push New Users, Push Profile Updates
- Authorization/Bearer: SCIM API Token from Docker Hub
 {:width="700px"}
 -
Click Test Connection Configuration to complete the configuration and Save.
-
Once configured, you must enable synchronization. Navigate to Provisioning > To App > Edit, and enable Create Users, Update User Attributes and Deactivates Users, and click Save.
 {:width="700px"}
 -
Remove all fields that are not supported from your Docker Hub Attributes Mappings.
 {:width="700px"}
The synchronization of user data is now automated, and the members in your Docker organization will now be automatically provisioned, updated, and de-provisioned based on the access control managed through your identity provider, Okta.
Generate a full-sync
You must run a full-sync after enabling SCIM, if you already have users assigned to the Docker Hub app. This provisions the users that are assigned in the IdP Directory to Docker Hub.
-
Navigate to Applications > Applications and select the Docker Hub app.
-
In the Assignments tab, click Provision User if you have pending users.
-
Click Apply to All > Reapply Mappings and Confirm.
Note
This will generate a full-sync and any user that was not previously provisioned is now provisioned in Docker Hub.
 {:width="700px"}
Azure AD
-
Navigate to Azure AD and select AzureAD admin.
-
In the Default Directory, select Add > Enterprise Application > Create your own application.
Note
When you create an Enterprise Application you can configure SCIM with Security Assertion Markup Language (SAML).
-
Type Docker for application name, select non-gallery, and click Create.
-
In your Docker application, navigate to Provisioning, and click Get Started.
-
Select Automatic for the provisioning mode and enter your SCIM credentials.
Note
You can access and copy your SCIM URL (Tenant URL) and API Token (Secret Token) in Docker Hub.
-
Click Test Connection to enable and authorize the provisioning and click Save.
-
In Mappings, click Provision Azure Active Directory Groups to disable Groups and click Save.
-
Click Provision Azure Active Directory Users, in Attribute Mappings, and keep the userName, Active, givenName, familyName. Delete the other attributes listed.
 {:width="700px"}
 -
Click Start Provisioning to begin the full synchronization.
Note
It can take up to 30 minutes to begin provisioning. You can also provision on demand provisioning with one user that is already assigned to the application.
Onelogin
-
In Onelogin, navigate to Applications > Applications > Add app.
-
In the search field, enter SCIM Provisioner with SAML (SCIM v2 Core) and select the item in the results.
-
Enter Docker Hub as the display name and click Save.
-
Navigate to the left navigation, and select Configuration.
-
In a separate tab, navigate to Docker Hub > Settings > Security > SSO > SAML.
-
Copy the following fields from Docker Hub, in to OneLogin:
- Entity ID: SAML Audience URL
- ACS URL: SAML Consumer URL
- SCIM Base URL: SCIM Base URL
- Custom Headers:
Content-Type: application/scim+json User-Agent: OneLogin SCIM- SCIM Bearer Token: SCIM Bearer Token
- SCIM JSON Template:
{
"schemas": [
    "urn:ietf:params:scim:schemas:core:2.0:User"
],
"userName": "{$parameters.scimusername}",
"name": {
    "givenName": "{$user.firstname}",
    "familyName": "{$user.lastname}"
},
"emails": [
    {
        "value": "{$user.email}",
        "primary": true
    }
]
} ```
 {:width="700px"}
-
Click API Connection > Enable and Save.
-
Navigate to the Parameters tab, click scimusername, select Email and Save.
 {:width="700px"}
 -
Navigate to the SSO tab, and copy the SAML 2.0 Endpoint (HTTP) url and paste it in to Docker Hub{: target="blank" rel="noopener" class=""} > Settings > Security > SSO > SAML Sign-in URL.
-
In the X.509 Certificate field, click View Details.
-
Copy the PEM certificate, and paste it in to Docker Hub{: target="blank" rel="noopener" class=""} > Settings > Security > SSO > Key x509 Certificate and click Save.
-
In Onelogin, navigate to the Access tab, enable the app for
ol_rolethat was already created and click Save. -
Navigate to the Provisioning tab and select Enable provisioning, and deselect the other options.
-
In the drop-down, select Suspend and click Save.
Generate a full-sync
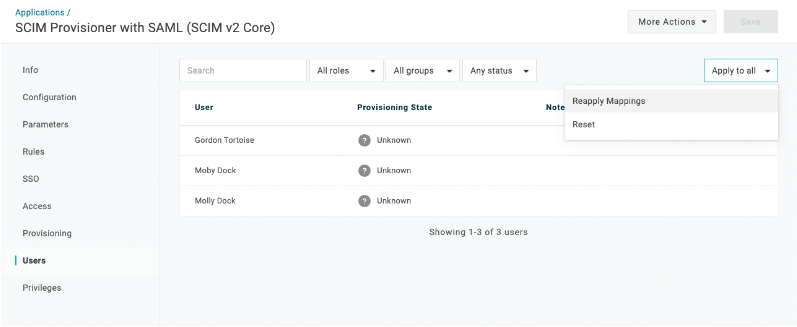
- In Onelogin, navigate to Applications and select the Docker Hub application.
- In Users, click Apply to All and Reapply Mappings.
- Click Confirm to provision your users in Docker Hub.
Note
This creates a full-sync and any user that was not previously provisioned is now provisioned in Docker Hub.
 {:width="700px"}
Disabling SCIM
If SCIM is disabled, any user provisioned through SCIM will remain in the organization. Future changes for your users will not sync from your IdP. User de-provisioning is only possible when manually removing the user from the organization.
 {:width="700px"}