29 KiB
| aliases | description | keywords | menu | title | ||||||||||
|---|---|---|---|---|---|---|---|---|---|---|---|---|---|---|
|
Evaluation installation |
|
|
Evaluate UCP in a sandbox |
Evaluate UCP in a sandbox
This page helps you to learn about Docker Universal Control Plane (UCP) at a high-level through installing and running UCP in your local, sandbox installation. The installation should be done on a Mac OS X or Windows system. If you are experienced with Linux or a technical DevOps user wanting a technical deep dive, please feel free to skip this evaluation and go directly to Plan a production installation and then to Install UCP for production.
A UCP installation consists of an UCP controller and one or more hosts. These instructions use Docker Machine, Docker's provisioning tool, to create several local hosts running Docker Engine. Once you create these hosts, you'll install UCP and its components on them just as you would in a full-on UCP installation.
Note: This evaluation installs UCP on top of the open source software version of Docker Engine inside of a VirtualBox VM which is running the small-footprint
boot2docker.isoLinux. Such a configuration is not supported for UCP in production.
Step 1. About this example
This example introduces you to UCP by means of a very simple sandbox example. You'll create a small UCP installation, deploy a container through UCP, and examine the interface.
For this evaluation installation, you'll use Machine to create two VirtualBox
VMs. Each VM runs small foot-print Linux image called boot2docker.iso. Machine
provisions each VM with the open source Docker Engine.

You'll use each of these VMs as a node in a simple UCP installation. The installation will have a controller and a node. The installation rests on top of a Docker Swarm cluster. The UCP installation process by default secures the cluster via self-signed TLS certificates.

This example is intended as an introduction for non-technical users wanting to explore UCP for themselves. If you are a highly technical user intending to act as UCP administration operator, you may prefer to skip this and go straight to Plan a production installation.
Note: The command examples in this page were tested for a Mac OSX environment. If you are in another, you may need to adjust the commands to use analogous commands for you environment.
Step 2. Verify the prerequisites
This example requires that you have:
- Docker Engine
- Docker Machine
If you don't have those components, start by installing them.
Step 3. Provision hosts with Engine
In this step, you provision two VMs for your UCP installation. This step is purely to enable your evaluation. You would never run UCP in production on local VMs with the open source Engine.
In a production installation, you would use enterprise-grade Linux servers as your nodes. These nodes could be on your company's private network or in the cloud. UCP requires that each node be installed with the Commercially Supported Docker Engine (CS Engine).
Set up the nodes for your evaluation:
-
Open a terminal on your computer.
-
Use Docker Machine to list any VMs in VirtualBox.
$ docker-machine ls NAME ACTIVE DRIVER STATE URL SWARM default * virtualbox Running tcp://192.168.99.100:2376 -
Create a VM named
node1.UCP runs best with a minimum of 1.50 GB in memory and requires a minimum of 3.00 GB disk space. When you create your virtual host, you supply options to size it appropriately.
$ docker-machine create -d virtualbox \ --virtualbox-memory "2000" \ --virtualbox-disk-size "5000" node1 Running pre-create checks... Creating machine... (node1) Copying /Users/mary/.docker/machine/cache/boot2docker.iso to /Users/mary/.docker/machine/machines/node1/boot2docker.iso... (node1) Creating VirtualBox VM... (node1) Creating SSH key... (node1) Starting the VM... (node1) Waiting for an IP... Waiting for machine to be running, this may take a few minutes... Machine is running, waiting for SSH to be available... Detecting operating system of created instance... Detecting the provisioner... Provisioning with boot2docker... Copying certs to the local machine directory... Copying certs to the remote machine... Setting Docker configuration on the remote daemon... Checking connection to Docker... Docker is up and running! To see how to connect Docker to this machine, run: docker-machine env node1 -
Create a VM named
node2.$ docker-machine create -d virtualbox \ --virtualbox-memory "2000" node2 -
Use the Machine
lscommand to list your hosts.NAME ACTIVE DRIVER STATE URL SWARM DOCKER ERRORS node1 - virtualbox Running tcp://192.168.99.104:2376 v1.10.0 node2 - virtualbox Running tcp://192.168.99.102:2376 v1.10.0At this point, all the nodes are in the
Runningstate. You have your hosts provisioned, now you are ready to install UCP itself.
Step 4. Learn about the ucp tool
You install UCP by using the Engine CLI to run the ucp tool. The ucp tool is
an image with subcommands to install a UCP controller or join a node to a
UCP controller. The general format of these commands are:
| Docker client | run command with options |
ucp image |
Subcommand with options |
|---|---|---|---|
docker |
run --rm -it |
docker/ucp |
install --help |
docker |
run --rm -it |
docker/ucp |
join --help |
docker |
run --rm -it |
docker/ucp |
uninstall --help |
You can these subcommands interactively by passing them the -i option or by
passing command-line options. The ucp tool is designed to make UCP easier to
install than many enterprise-grade applications. In interactive mode the tool
works to discover your network topology and suggest default answers to you. This
evaluation uses the interactive method.
Regardless of how you use the docker/ucp tool, the default install supplies
some quick default options for both data volumes and the certificate authority
(CA). In a production installation you can optionally:
- use the high availability feature
- customize the port used by the UCP web application
- customize the port used by the Swarm manager
- create your own data volumes
- use your own TLS certificates
You'll learn more about these when you Plan a production installation. For now, in this evaluation sandbox installation, you'll use all the default values with one exception, you'll specify a custom port for the Swarm manager.
Step 5. Install the UCP controller
In this step, you install the UCP controller on the node1 you provisioned
earlier. A controller serves the UCP application and runs the processes that
manage an installation's Docker objects.
In a production installation, a system administrator can implement UCP's high availability feature. High availability allows you to designate several nodes as controller replicas. In this way, if one controller fails a replica node is ready to take its place.
For this evaluation, you won't need that level of robustness. A single host for the controller suffices.
-
If you don't already have one, open a terminal on your computer.
-
Connect the terminal environment to the
node1you created.a. Use
docker-machine envcommand to get the settings.$ docker-machine env node1 export DOCKER_TLS_VERIFY="1" export DOCKER_HOST="tcp://192.168.99.103:2376" export DOCKER_CERT_PATH="/Users/mary/.docker/machine/machines/node1" export DOCKER_MACHINE_NAME="node1" # Run this command to configure your shell: # eval $(docker-machine env node1)b. Run the
evalcommand to set your environment.$ eval $(docker-machine env node1)c. Verify that
node1has an active environment.$ docker-machine ls NAME ACTIVE DRIVER STATE URL SWARM DOCKER ERRORS node1 * virtualbox Running tcp://192.168.99.104:2376 v1.10.0 node2 - virtualbox Running tcp://192.168.99.102:2376 v1.10.0An
*(asterisk) in theACTIVEfield indicates that thenode1environment is active.The client will send the
dockercommands in the following steps to the Docker Engine on onnode1. -
Start the
ucptool to install interactively.Note: If you are on a Windows system, your shell can't resolve the
$(docker-machine ip node2)variable. So, replace it with the actual IP address.$ docker run --rm -it \ -v /var/run/docker.sock:/var/run/docker.sock \ --name ucp docker/ucp install -i \ --swarm-port 3376 --host-address $(docker-machine ip node1) Unable to find image 'docker/ucp:latest' locally latest: Pulling from docker/ucp 0198ad4008dc: Pull complete 291084ae72f3: Pull complete Digest: sha256:28b6c9640e5af0caf2b2acbbbfd7c07bdbec6b170f04cbaeea7bb4909d74898d INFO[0000] Verifying your system is compatible with UCPThe first time you run the
ucptool, thedocker runcommand pulls its image from the Docker Hub. The image contains theucptool. The tool downloads if needed and then verifies your system supports UCP. The tool is designed to discover the information it needs if it can. This reduces the change for human error or mistakes during the install. -
Enter a UCP password when prompted and then confirm it.
 Please choose your initial UCP admin password:
 Confirm your initial password:
 INFO[0016] Pulling required images... (this may take a while)
The UCP system relies on a set of Docker images running in containers. The
ucpinstaller gets the latest official UCP images.The system prompts you for Subject alternative names (SANs). UCP requires that all clients, including the Docker Engine, use a Swarm TLS certificate chain signed by the UCP Swarm Root CA. You can provide the certificate system with subject alternative names or SANs. The SANs are used to set up individual "leaf certificates." In this sandbox, you've already provided the IP address and the
ucptool discovered this for you and shows it in the controller list.WARN[0004] None of the hostnames we'll be using in the UCP certificates [controller 127.0.0.1 172.17.0.1 192.168.99.106] contain a domain component. Your generated certs may fail TLS validation unless you only use one of these shortnames or IPs to connect. You can use the --san flag to add more aliases You may enter additional aliases (SANs) now or press enter to proceed with the above list. Additional aliases: -
Press enter to proceed with the list the
ucptool provided.INFO[0005] Installing UCP with host address 192.168.99.106 - If this is incorrect, please specify an alternative address with the '--host-address' flag WARN[0000] None of the hostnames we'll be using in the UCP certificates [controller 127.0.0.1 172.17.0.1 192.168.99.106 192.168.99.106] contain a domain component. Your generated certs may fail TLS validation unless you only use one of these shortnames or IPs to connect. You can use the --san flag to add more aliases INFO[0001] Generating Swarm Root CA INFO[0022] Generating UCP Root CA INFO[0024] Deploying UCP Containers INFO[0028] UCP instance ID: CJQN:ZQVX:B6CC:KFD3:IXN5:FGLF:GXMN:WALD:QFHU:QLSX:ZCBY:CAL7 INFO[0028] UCP Server SSL: SHA1 Fingerprint=02:36:16:93:B4:21:B7:AD:0A:6C:0F:3C:99:75:18:5D:5A:F7:C4:0C INFO[0028] Login as "admin"/(your admin password) to UCP at https://192.168.99.106:443When it completes, the
ucptool prompts you to login into the UCP GUI gives you its location. You'll do this and install a license in Step 5, below.
Step 6. License your installation
In this step, you log into UCP, get a license, and install it. Docker allows you to run an evaluation version of UCP with a single controller and node for up to 30 days.
-
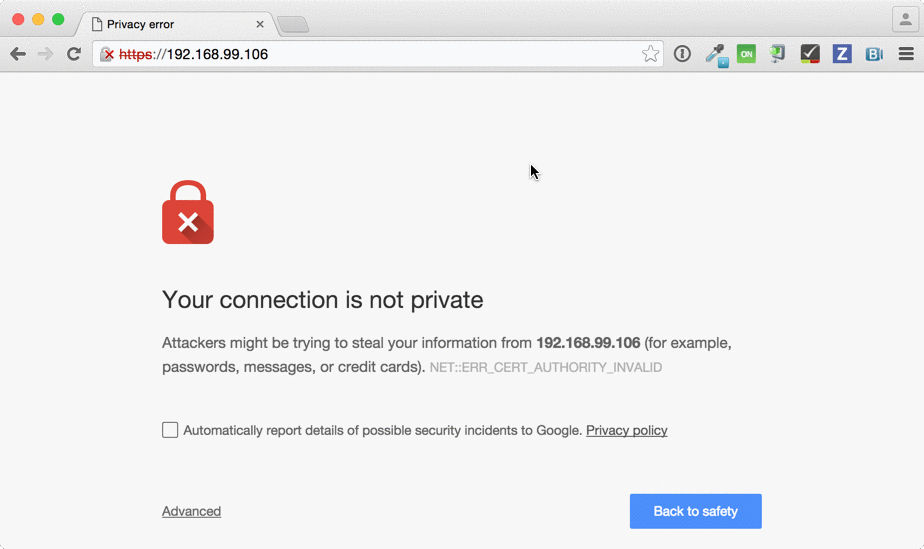
Enter the address into your browser to view the UCP login screen.
Your browser may warn you about the connection. The warning appears because, in this evaluation installation, the UCP certificate was issued by a built-in certificate authority (CA). Your actions with the install actually created the certificate. If you are concerned, the certificate's fingerprint is displayed during install and you can compare it.
-
Click the Advanced link and then the Proceed to link.
The login screen displays.
-
Enter
adminfor the username along with the password you provided to theinstall.After you enter the correct credentials, the UCP dashboard prompts for a license.

-
Press Skip for now to continue to the dashboard.

The dashboard shows a single node, your controller node. It also shows you a banner saying that you need a license.
-
Follow the link on the UCP Dashboard to the Docker website to get a trial license.
You must fill out a short form. After you complete the form, you are prompted with some Installation Steps.
-
Press Next until you reach the Add License step.

-
Press the Download License button.
Your browser downloads a
docker_subscription.licfile. -
Save the file to a safe location.
-
Return to the UCP Dashboard.
-
Choose Settings from the "hamburger" menu on the left side.
As you move through UCP, the header changes to display the appropriate breadcrumbs. In this case you are on the Dashboard/Settings* page.
-
Scroll down to the License section and click Choose File.
Locate and upload your file.
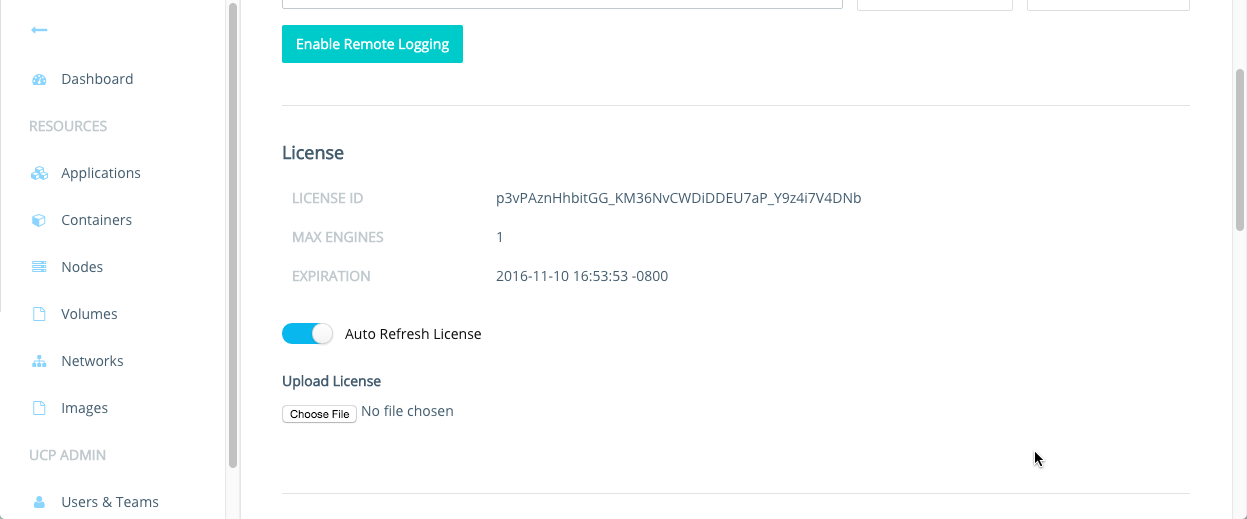
Once you upload the file, the license message disappears from UCP.
Take a minute and explore UCP. At this point, you have a single controller running. How many nodes is that? What makes a controller is the containers it runs. Locate the Containers page and show the system containers on your controller. You'll know you've succeeded if you see this list:
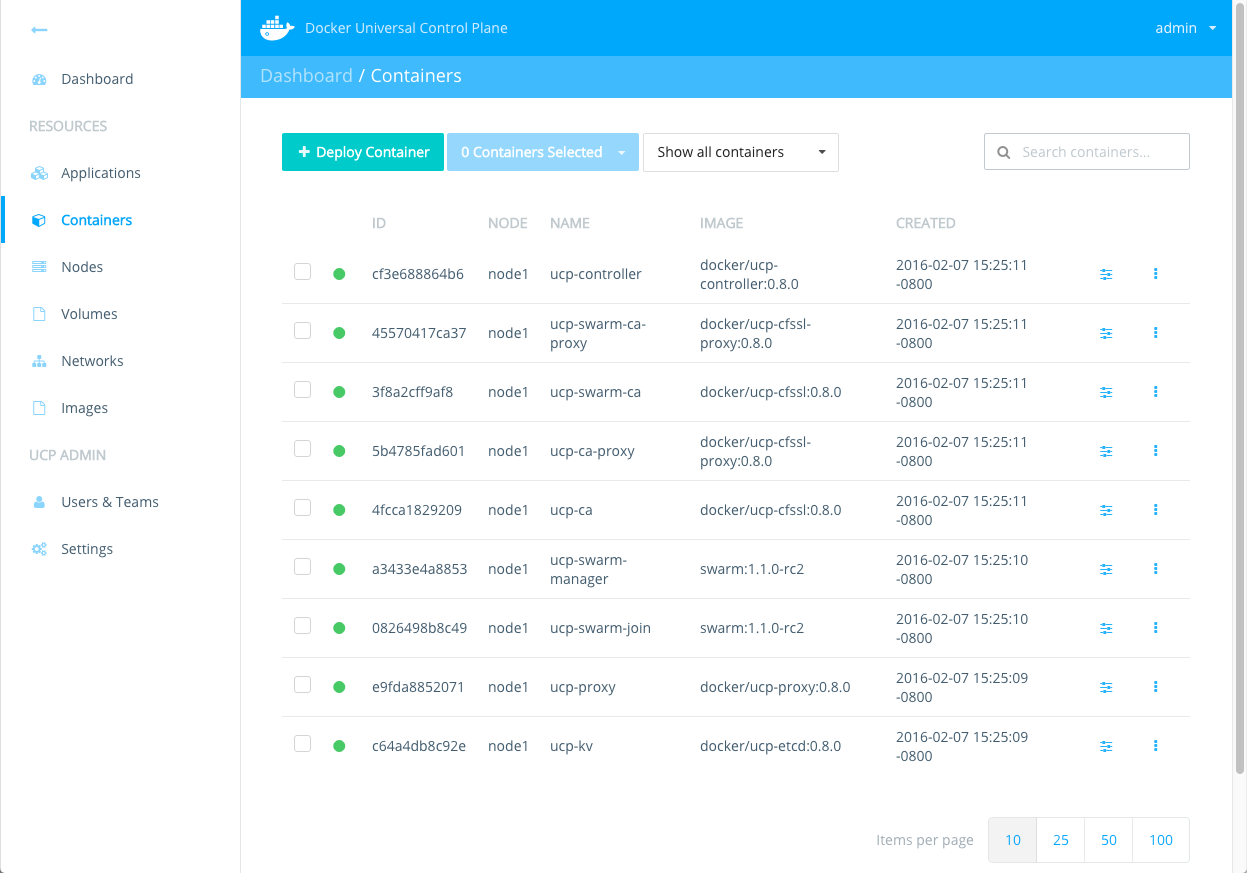
The containers reflect the architecture of UCP. The containers are running Swarm, a key-value store process, and some containers with certificate volumes. Explore the other resources.
Step 7. Join a node
In this step, you join your UCP node2 to the controller using the ucp join
subcommand. In a UCP production installation, you'd do this step for each node
you want to add.
-
If you don't already have one, open a terminal on your computer.
-
Connect the terminal environment to the
node2you provisioned earlier.a. Use
docker-machine envcommand to get the settings.$ docker-machine env node2 export DOCKER_TLS_VERIFY="1" export DOCKER_HOST="tcp://192.168.99.104:2376" export DOCKER_CERT_PATH="/Users/mary/.docker/machine/machines/node2" export DOCKER_MACHINE_NAME="node2" # Run this command to configure your shell: # eval $(docker-machine env node2)b. Run the
evalcommand to set your environment.$ eval $(docker-machine env node2)The client will send the
dockercommands in the following steps to the Docker Engine on oncontroller. -
Run the
docker/ucp joincommand.Note: If you are on a Windows system, your shell can't resolve the
$(docker-machine ip node2)variable. So, replace it with the actual IP address.$ docker run --rm -it \ -v /var/run/docker.sock:/var/run/docker.sock \ --name ucp docker/ucp join -i \ --host-address $(docker-machine ip node2)The
joinpulls several images and prompts you for the UCL of the UCP Server.Unable to find image 'docker/ucp:latest' locally latest: Pulling from docker/ucp 0198ad4008dc: Pull complete 291084ae72f3: Pull complete Digest: sha256:28b6c9640e5af0caf2b2acbbbfd7c07bdbec6b170f04cbaeea7bb4909d74898d Status: Downloaded newer image for docker/ucp:latest Please enter the URL to your UCP Server: -
Enter the URL of your server to continue.
 Orca server https://192.168.99.106
 Subject: ucp
 Issuer: UCP Root CA
 SHA1 Fingerprint=02:36:16:93:B4:21:B7:AD:0A:6C:0F:3C:99:75:18:5D:5A:F7:C4:0C
 Do you want to trust this server and proceed with the join? (y/n):
The system prompts you to join the server.
-
Press
yto continue and the tool prompts you for the username and password for your UCP server.Please enter your UCP Admin username: admin Please enter your UCP Admin password: INFO[0027] Pulling required images... (this may take a while) WARN[0070] None of the hostnames we'll be using in the UCP certificates [node1 127.0.0.1 172.17.0.1 192.168.99.108] contain a domain component. Your generated certs may fail TLS validation unless you only use one of these shortnames or IPs to connect. You can use the --san flag to add more aliases You may enter additional aliases (SANs) now or press enter to proceed with the above list. Additional aliases:The system continues and prompts you for SANs. In this sandbox, you've already provided the IP address and the
ucptool discovered this for you and shows it in the controller list. -
Press enter to proceed without providing a SAN.
WARN[0000] None of the hostnames we'll be using in the UCP certificates [node1 127.0.0.1 172.17.0.1 192.168.99.108 192.168.99.108] contain a domain component. Your generated certs may fail TLS validation unless you only use one of these shortnames or IPs to connect. You can use the --san flag to add more aliases INFO[0000] This engine will join UCP and advertise itself with host address 192.168.99.108 - If this is incorrect, please specify an alternative address with the '--host-address' flag INFO[0000] Verifying your system is compatible with UCP INFO[0011] Starting local swarm containers ’ -
Login into UCP with your browser and check to make sure your new node appears.
The page should display your new node.

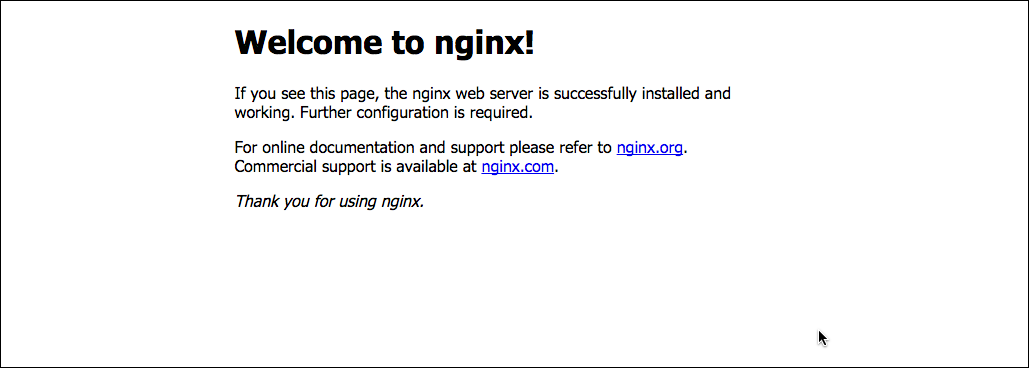
Step 8. Deploy a container
UCP allows you to deploy and manage "Dockerized" applications in production. An application is built up using Docker objects, such as images and containers, and Docker resources, such as volumes and networks.
UCP deploys and manages these objects and resources using remote API calls the
Engine daemons running on the nodes. For example, the run action may deploy an
image in a Docker container. That image might define a service such as an Nginix
web server or a database like Postgres.
A UCP operator initiates Engine actions through the UCP dashboard or through the
Docker Engine CLI. In this step, you deploy a container through the UCP
dashboard. The container will run an Nginx server, so you'll need to launch the
nginx image inside of it.
-
Log into the UCP Dashboard.
-
Click Containers.
The system displays the Containers page. UCP runs some containers that support its own operations. These are called "system" containers and they are hidden by default.
-
Click + Deploy Container.
The system displays a dialog with several fields. Using the dialog requires some basic knowledge of Docker objects and their attributes. A UCP admin or operator would typically have this knowledge. For now, you'll just follow along.
-
Enter
nginxfor the image name.An image is simply predefined software you want to run. The software might be an actual standalone application or maybe some component software necessary to support a complex service.
-
Enter
nginx_serverfor the container name.This name just identifies the container on your network.
-
Click Publish Ports from the Overview menu.
A Docker container, like it sounds, is securely isolated from other processes on your network. In fact, the container has its own internal network configuration. If you want to access to a service inside a container, you need to expose a container's port. This container port maps to a port on the node. The node is hosting an instance of Docker Engine, so its port is called the Host Port.
-
Enter
443in the Port and in the Host Port field. -
Use the plus sign to add another Port.
-
For this port, enter
80in the Port and Host Port field.When you are done, your dialog looks like the following:

-
Click Run Container to deploy your container.

Step 9. View a running service
At this point, you have deployed a container and you should see the application running. Recall that you deployed an Nginx web server. That server comes with a default page. In this step, you open the running server.
-
Make sure you are still on the Containers page.
-
Select the edit icon on the container.

The system displays the container's details and some operations you can run on the container.
-
Scroll down to the ports section.
You'll see an IP address with port
80for the server. -
Copy the IP address to your browser and paste the information you copied.
You should see the welcome message for nginx.
Step 10. Download a client bundle
In this step, you download the client bundle. Each node in your UCP cluster is running Engine. A UCP operator can use the Engine CLI client instead of UCP to interact with the Docker objects and resources UCP manages. To issue commands to a UCP node, your local shell environment must be configured with the same security certificates as the UCP application itself. The client bundle contains the certificates and a script to configure a shell environment.
Download the bundle and configure your environment.
-
If you haven't already done so, log into UCP.
-
Choose admin > Profile from the right-hand menu.
Any user can download their certificates. So, if you were logged in under a user name such as
daveythe path to download bundle is davey > Profile. Since you are logged in asadmin, the path isadmin. -
Click Create Client Bundle.
The browser downloads the
ucp-bundle-admin.zipfile. -
Open a new shell on your local machine.
-
Make sure your shell is does not have an active Docker Machine host.
 $ docker-machine ls
 NAME    ACTIVE   DRIVER       STATE     URL                         SWARM   DOCKER    ERRORS
 moxie   -        virtualbox   Stopped                                       Unknown
 test    -        virtualbox   Running   tcp://192.168.99.100:2376           v1.10.1
While Machine has a stopped and running host, neither is active in the shell. You know this because neither host shows an * (asterisk) indicating the shell is configured.
-
Create a directory to hold the deploy information.
$ mkdir deploy-app -
Navigate to where the bundle was downloaded, and unzip the client bundle
$ unzip bundle.zip Archive: bundle.zip extracting: ca.pem extracting: cert.pem extracting: key.pem extracting: cert.pub extracting: env.sh -
Change into the directory that was created when the bundle was unzipped
-
Execute the
env.shscript to set the appropriate environment variables for your UCP deployment.$ source env.shIf you are on Windows, you may need to set the environment variables manually.
-
Run
docker infoto examine the UCP deployment.Your output should show that you are managing UCP vs. a single node.
 $ docker info
 Containers: 12
  Running: 0
  Paused: 0
  Stopped: 0
 Images: 17
 Role: primary
 Strategy: spread
 Filters: health, port, dependency, affinity, constraint
 Nodes: 2
  node1: 192.168.99.106:12376
   └ Status: Healthy
   └ Containers: 9
   └ Reserved CPUs: 0 / 1
   └ Reserved Memory: 0 B / 3.01 GiB
   └ Labels: executiondriver=native-0.2, kernelversion=4.1.17-boot2docker, operatingsystem=Boot2Docker 1.10.0 (TCL 6.4.1); master : b09ed60 - Thu Feb  4 20:16:08 UTC 2016, provider=virtualbox, storagedriver=aufs
   └ Error: (none)
   └ UpdatedAt: 2016-02-09T12:03:16Z
  node2: 192.168.99.107:12376
   └ Status: Healthy
   └ Containers: 3
   └ Reserved CPUs: 0 / 1
   └ Reserved Memory: 0 B / 4.956 GiB
   └ Labels: executiondriver=native-0.2, kernelversion=4.1.17-boot2docker, operatingsystem=Boot2Docker 1.10.0 (TCL 6.4.1); master : b09ed60 - Thu Feb  4 20:16:08 UTC 2016, provider=virtualbox, storagedriver=aufs
   └ Error: (none)
   └ UpdatedAt: 2016-02-09T12:03:11Z
 Cluster Managers: 1
  192.168.99.106: Healthy
   └ Orca Controller: https://192.168.99.106:443
   └ Swarm Manager: tcp://192.168.99.106:3376
   └ KV: etcd://192.168.99.106:12379
 Plugins:
  Volume:
  Network:
 CPUs: 2
 Total Memory: 7.966 GiB
 Name: ucp-controller-node1
 ID: P5QI:ZFCX:ELZ6:RX2F:ADCT:SJ7X:LAMQ:AA4L:ZWGR:IA5V:CXDE:FTT2
 WARNING: No oom kill disable support
 WARNING: No cpu cfs quota support
 WARNING: No cpu cfs period support
 WARNING: No cpu shares support
 WARNING: No cpuset support
 Labels:
  com.docker.ucp.license_key=p3vPAznHhbitGG_KM36NvCWDiDDEU7aP_Y9z4i7V4DNb
  com.docker.ucp.license_max_engines=1
  com.docker.ucp.license_expires=2016-11-11 00:53:53 +0000 UTC
Step 11. Deploy with the CLI
In this exercise, you'll launch another Nginx container. Only this time, you'll use the Engine CLI. Then, you'll look at the result in the UCP dashboard.
-
Connect the terminal environment to the
node2.$ eval "$(docker-machine env node2)" -
Change to your user
$HOMEdirectory.$ cd $HOME -
Make a
sitedirectory.$ mkdir site -
Change into the
sitedirectory.$ cd site -
Create an
index.htmlfile.$ echo "my new site" > index.html -
Start a new
nginxcontainer and replace thehtmlfolder with yoursitedirectory.$ docker run -d -P -v $HOME/site:/usr/share/nginx/html --name mysite nginx
This command runs an nginx image in a container called mysite. The -P tells the Engine to expose all the ports on the container.
-
Open the UCP dashboard in your browser.
-
Navigate to the Containers page and locate your
mysitecontainer.
-
Scroll down to the ports section.
You'll see an IP address with port
80/tcpfor the server. This time, you'll find that the port mapped on this container than the one created yourself. That's because the command didn't explicitly map a port, so the Engine chose mapped the default Nginx port80inside the container to an arbitrary port on the node. -
Copy the IP address to your browser and paste the information you copied.
You should see your
index.htmlfile display instead of the standard Nginx welcome.
Explore UCP
At this point, you've completed the guided tour of a UCP installation. You've learned how to create a UCP installation by creating two nodes and designating one of them as a controller. You've created a container running a simple web server both using UCP and directly on the command line. You used UCP to get information about what you created.
In a real UCP production installation, UCP admins and operators are expected to do similar work every day. While the applications they launch will be more complicated, the interaction channels a user can take, the GUI or the certificate bundle plus a command line, remain the same.
Take some time to explore UCP some more. Investigate the documentation for other activities you can perform with UCP.