3.0 KiB
| title | description | keywords | redirect_from | |
|---|---|---|---|---|
| Deploy a Compose-based app to a Kubernetes cluster | Use Docker Enterprise Edition to deploy a Kubernetes workload from a Docker compose. | UCP, Docker EE, Kubernetes, Compose |
|
Docker Enterprise Edition enables deploying Docker Compose
files to Kubernetes clusters. Starting in Compose file version 3.3, you use the
same docker-compose.yml file that you use for Swarm deployments, but you
specify Kubernetes workloads when you deploy the stack. The result is a
true Kubernetes app.
Get access to a Kubernetes namespace
To deploy a stack to Kubernetes, you need a namespace for the app's resources.
Contact your Docker EE administrator to get access to a namespace. In this
example, the namespace is called labs.
Learn how to grant access to a Kubernetes namespace.
Create a Kubernetes app from a Compose file
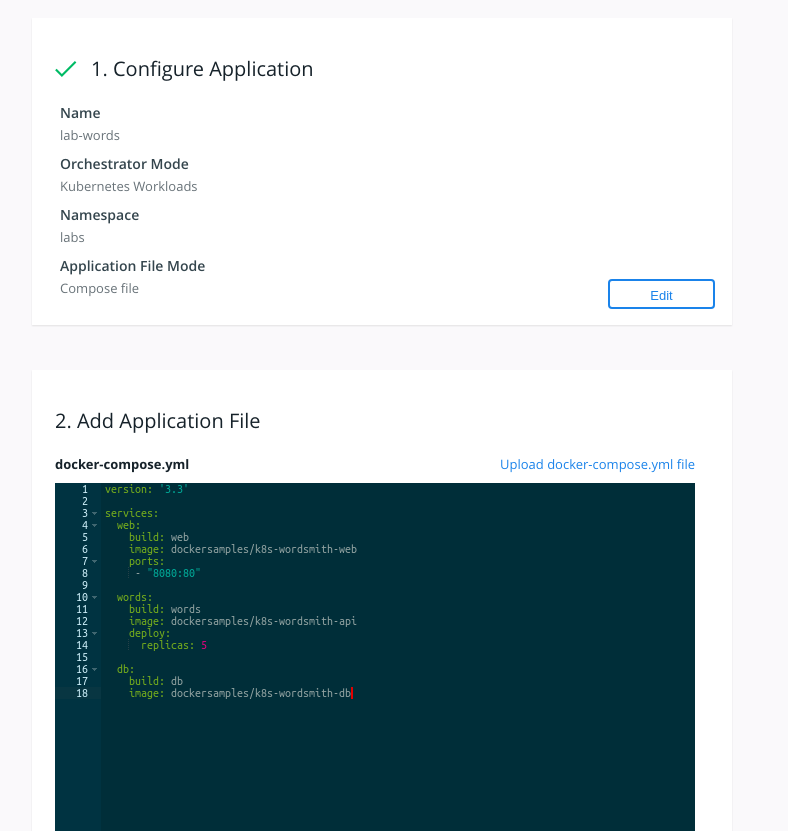
In this example, you create a simple app, named "lab-words", by using a Compose file. This assumes you are deploying onto a cloud infrastructure. The following YAML defines the stack:
version: '3.3'

services:
  web:
    image: dockersamples/k8s-wordsmith-web
    ports:
     - "8080:80"

  words:
    image: dockersamples/k8s-wordsmith-api
    deploy:
      replicas: 5

  db:
    image: dockersamples/k8s-wordsmith-db
- In your browser, log in to
https://<ucp-url>. Navigate to Shared Resources > Stacks. - Click Create Stack to open up the "Create Application" page.
- Under "Configure Application", type "lab-words" for the application name.
- Select Kubernetes Workloads for Orchestrator Mode.
- In the Namespace drowdown, select "labs".
- Under "Application File Mode", leave Compose File selected and click Next.
- Paste the previous YAML, then click Create to deploy the stack.
 {: .with-border}
Inspect the deployment
After a few minutes have passed, all of the pods in the lab-words deployment
are running.
-
Navigate to Kubernetes > Pods. Confirm that there are seven pods and that their status is Running. If any pod has a status of Pending, wait until every pod is running.
-
Next, select Kubernetes > Load balancers and find the web-published service.
-
Click the web-published service, and scroll down to the Ports section.
-
Under Ports, grab the Node Port information.
 {: .with-border}
 -
In a new tab or window, enter your cloud instance public IP Address and append
:<NodePort>from the previous step. For example, to find the public IP address of an EC2 instance, refer to Amazon EC2 Instance IP Addressing. The app is displayed. {: .with-border}