13 KiB
Canaries with Helm charts and GitOps
This guide shows you how to package a web app into a Helm chart, trigger canary deployments on Helm upgrade and automate the chart release process with Weave Flux.
Packaging
You'll be using the podinfo chart. This chart packages a web app made with Go, it's configuration, a horizontal pod autoscaler HPA and the canary configuration file.
├── Chart.yaml
├── README.md
├── templates
│   ├── NOTES.txt
│   ├── _helpers.tpl
│   ├── canary.yaml
│   ├── configmap.yaml
│   ├── deployment.yaml
│   ├── hpa.yaml
│   ├── service.yaml
│   └── tests
│       ├── test-config.yaml
│       └── test-pod.yaml
└── values.yaml
You can find the chart source here.
Install
Create a test namespace with Istio sidecar injection enabled:
export REPO=https://raw.githubusercontent.com/weaveworks/flagger/master

kubectl apply -f ${REPO}/artifacts/namespaces/test.yaml
Add Flagger Helm repository:
helm repo add flagger https://flagger.app
Install podinfo with the release name frontend replace `example.com` with your own domain:
helm upgrade -i frontend flagger/podinfo \
--namespace test \
--set nameOverride=frontend \
--set backend=http://backend.test:9898/echo \
--set canary.enabled=true \
--set canary.istioIngress.enabled=true \
--set canary.istioIngress.gateway=public-gateway.istio-system.svc.cluster.local \
--set canary.istioIngress.host=frontend.istio.example.com
Flagger takes a Kubernetes deployment and a horizontal pod autoscaler HPA, then creates a series of objects Kubernetes deployments, ClusterIP services and Istio virtual services. These objects expose the application on the mesh and drive the canary analysis and promotion.
# generated by Helm
configmap/frontend
deployment.apps/frontend
horizontalpodautoscaler.autoscaling/frontend
canary.flagger.app/frontend

# generated by Flagger
configmap/frontend-primary
deployment.apps/frontend-primary
horizontalpodautoscaler.autoscaling/frontend-primary
service/frontend
service/frontend-canary
service/frontend-primary
virtualservice.networking.istio.io/frontend
When the frontend-primary deployment comes online, Flagger will route all traffic to the primary pods and scale to zero the frontend deployment.
Open your browser and navigate to the frontend URL:

Now let's install the backend release without exposing it outside the mesh:
helm upgrade -i backend flagger/podinfo \
--namespace test \
--set nameOverride=backend \
--set canary.enabled=true \
--set canary.istioIngress.enabled=false
Check if Flagger has successfully deployed the canaries:
kubectl -n test get canaries

NAME       STATUS        WEIGHT   LASTTRANSITIONTIME
backend    Initialized   0        2019-02-12T18:53:18Z
frontend   Initialized   0        2019-02-12T17:50:50Z
Click on the ping button in the frontend UI to trigger a HTTP POST request that will reach the backend app:

We'll use the /echo endpoint same as the one the ping button calls to generate load on both apps during a canary deployment.
Upgrade
First let's install a load testing service that will generate traffic during analysis:
helm upgrade -i flagger-loadtester flagger/loadtester \
--namespace=test
Install Flagger's helm test runner in the kube-system using tiller service account:
helm upgrade -i flagger-helmtester flagger/loadtester \
--namespace=kube-system \
--set serviceAccountName=tiller
Enable the load and helm tester and deploy a new frontend version:
helm upgrade -i frontend flagger/podinfo/ \
--namespace test \
--reuse-values \
--set canary.loadtest.enabled=true \
--set canary.helmtest.enabled=true \
--set image.tag=3.1.1
Flagger detects that the deployment revision changed and starts the canary analysis:
kubectl -n istio-system logs deployment/flagger -f | jq .msg

New revision detected! Scaling up frontend.test
Halt advancement frontend.test waiting for rollout to finish: 0 of 2 updated replicas are available
Starting canary analysis for frontend.test
Pre-rollout check helm test passed
Advance frontend.test canary weight 5
Advance frontend.test canary weight 10
Advance frontend.test canary weight 15
Advance frontend.test canary weight 20
Advance frontend.test canary weight 25
Advance frontend.test canary weight 30
Advance frontend.test canary weight 35
Advance frontend.test canary weight 40
Advance frontend.test canary weight 45
Advance frontend.test canary weight 50
Copying frontend.test template spec to frontend-primary.test
Halt advancement frontend-primary.test waiting for rollout to finish: 1 old replicas are pending termination
Promotion completed! Scaling down frontend.test
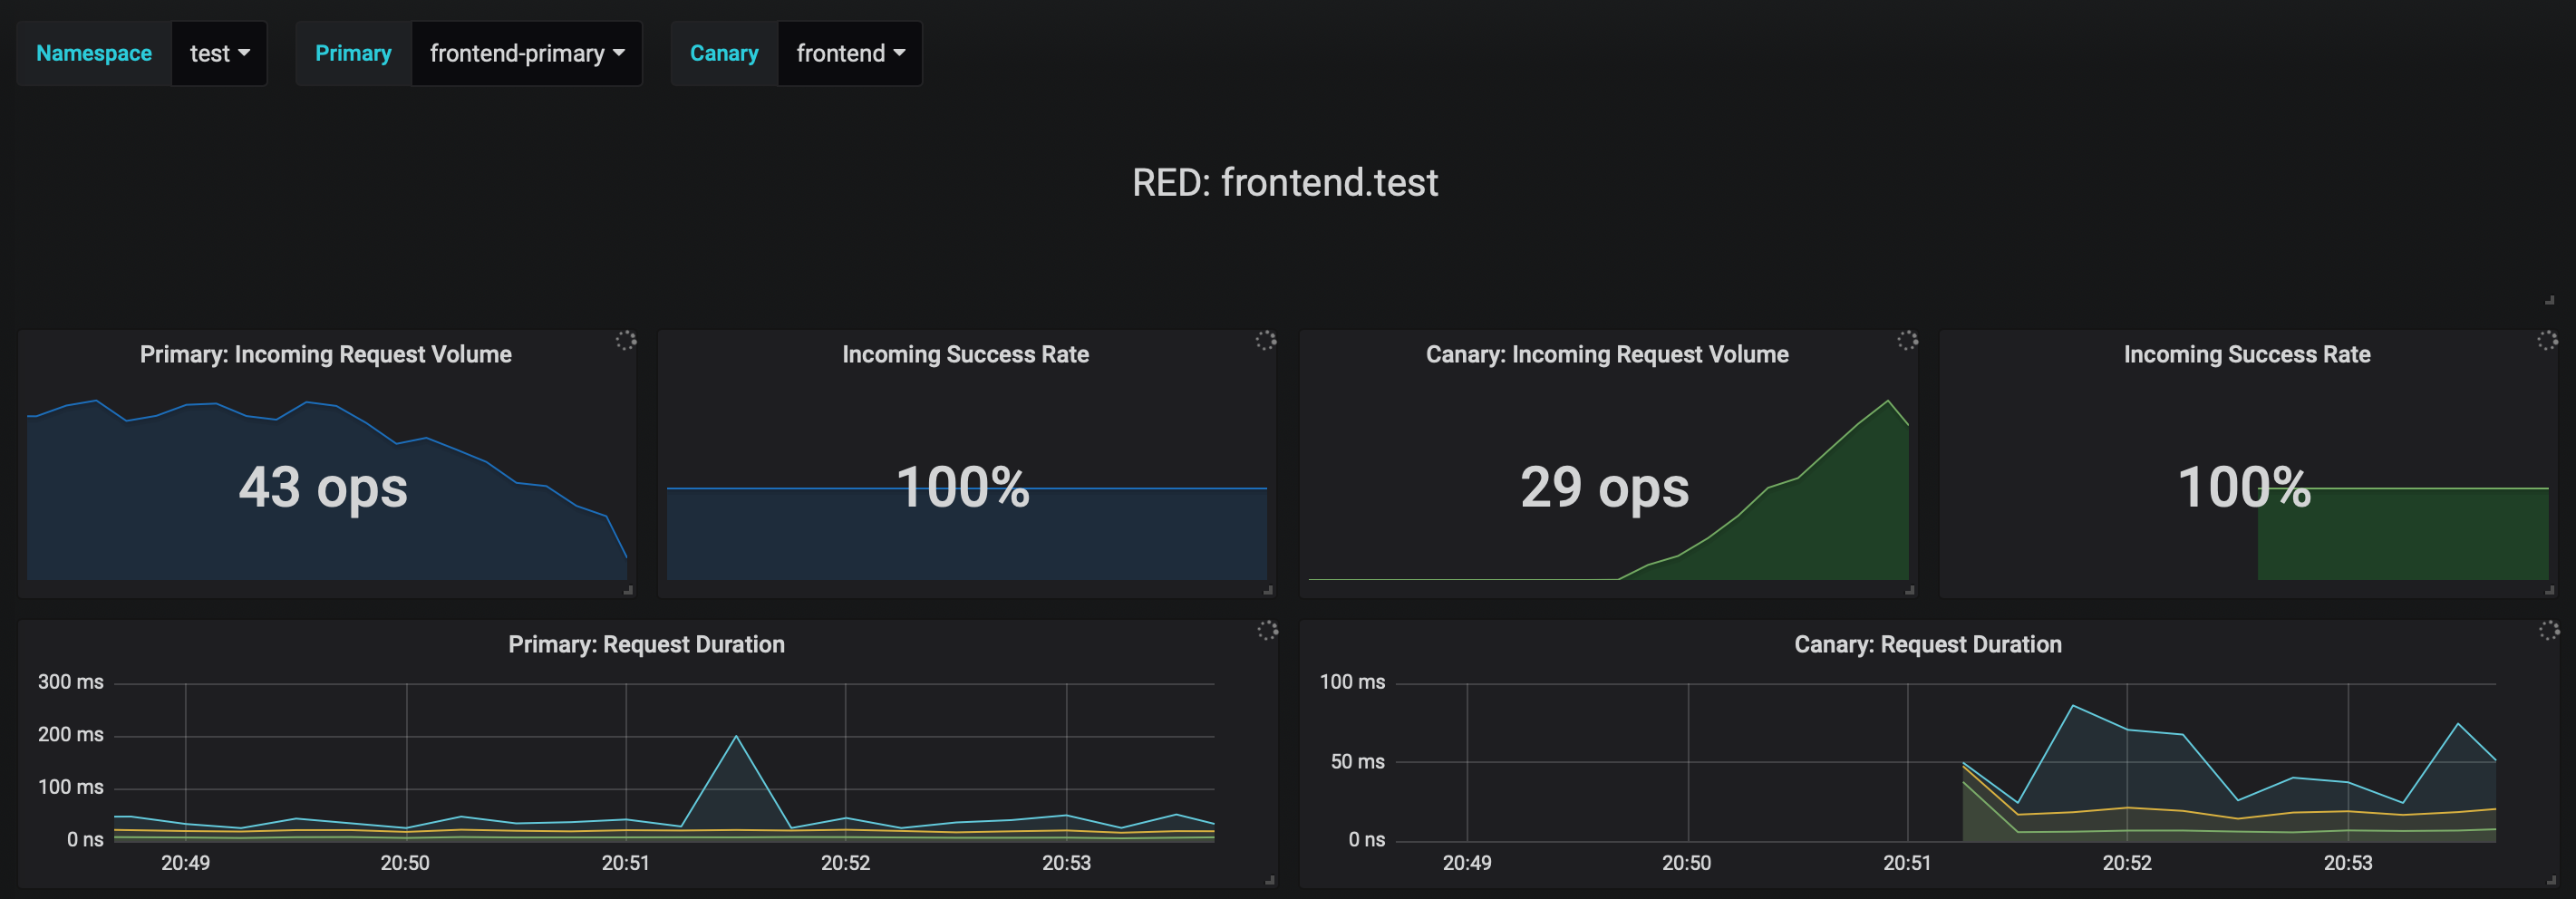
You can monitor the canary deployment with Grafana. Open the Flagger dashboard, select test from the namespace dropdown, frontend-primary from the primary dropdown and frontend from the canary dropdown.
Now trigger a canary deployment for the backend app, but this time you'll change a value in the configmap:
helm upgrade -i backend flagger/podinfo/ \
--namespace test \
--reuse-values \
--set canary.loadtest.enabled=true \
--set canary.helmtest.enabled=true \
--set httpServer.timeout=25s
Generate HTTP 500 errors:
kubectl -n test exec -it flagger-loadtester-xxx-yyy sh

watch curl http://backend-canary:9898/status/500
Generate latency:
kubectl -n test exec -it flagger-loadtester-xxx-yyy sh

watch curl http://backend-canary:9898/delay/1
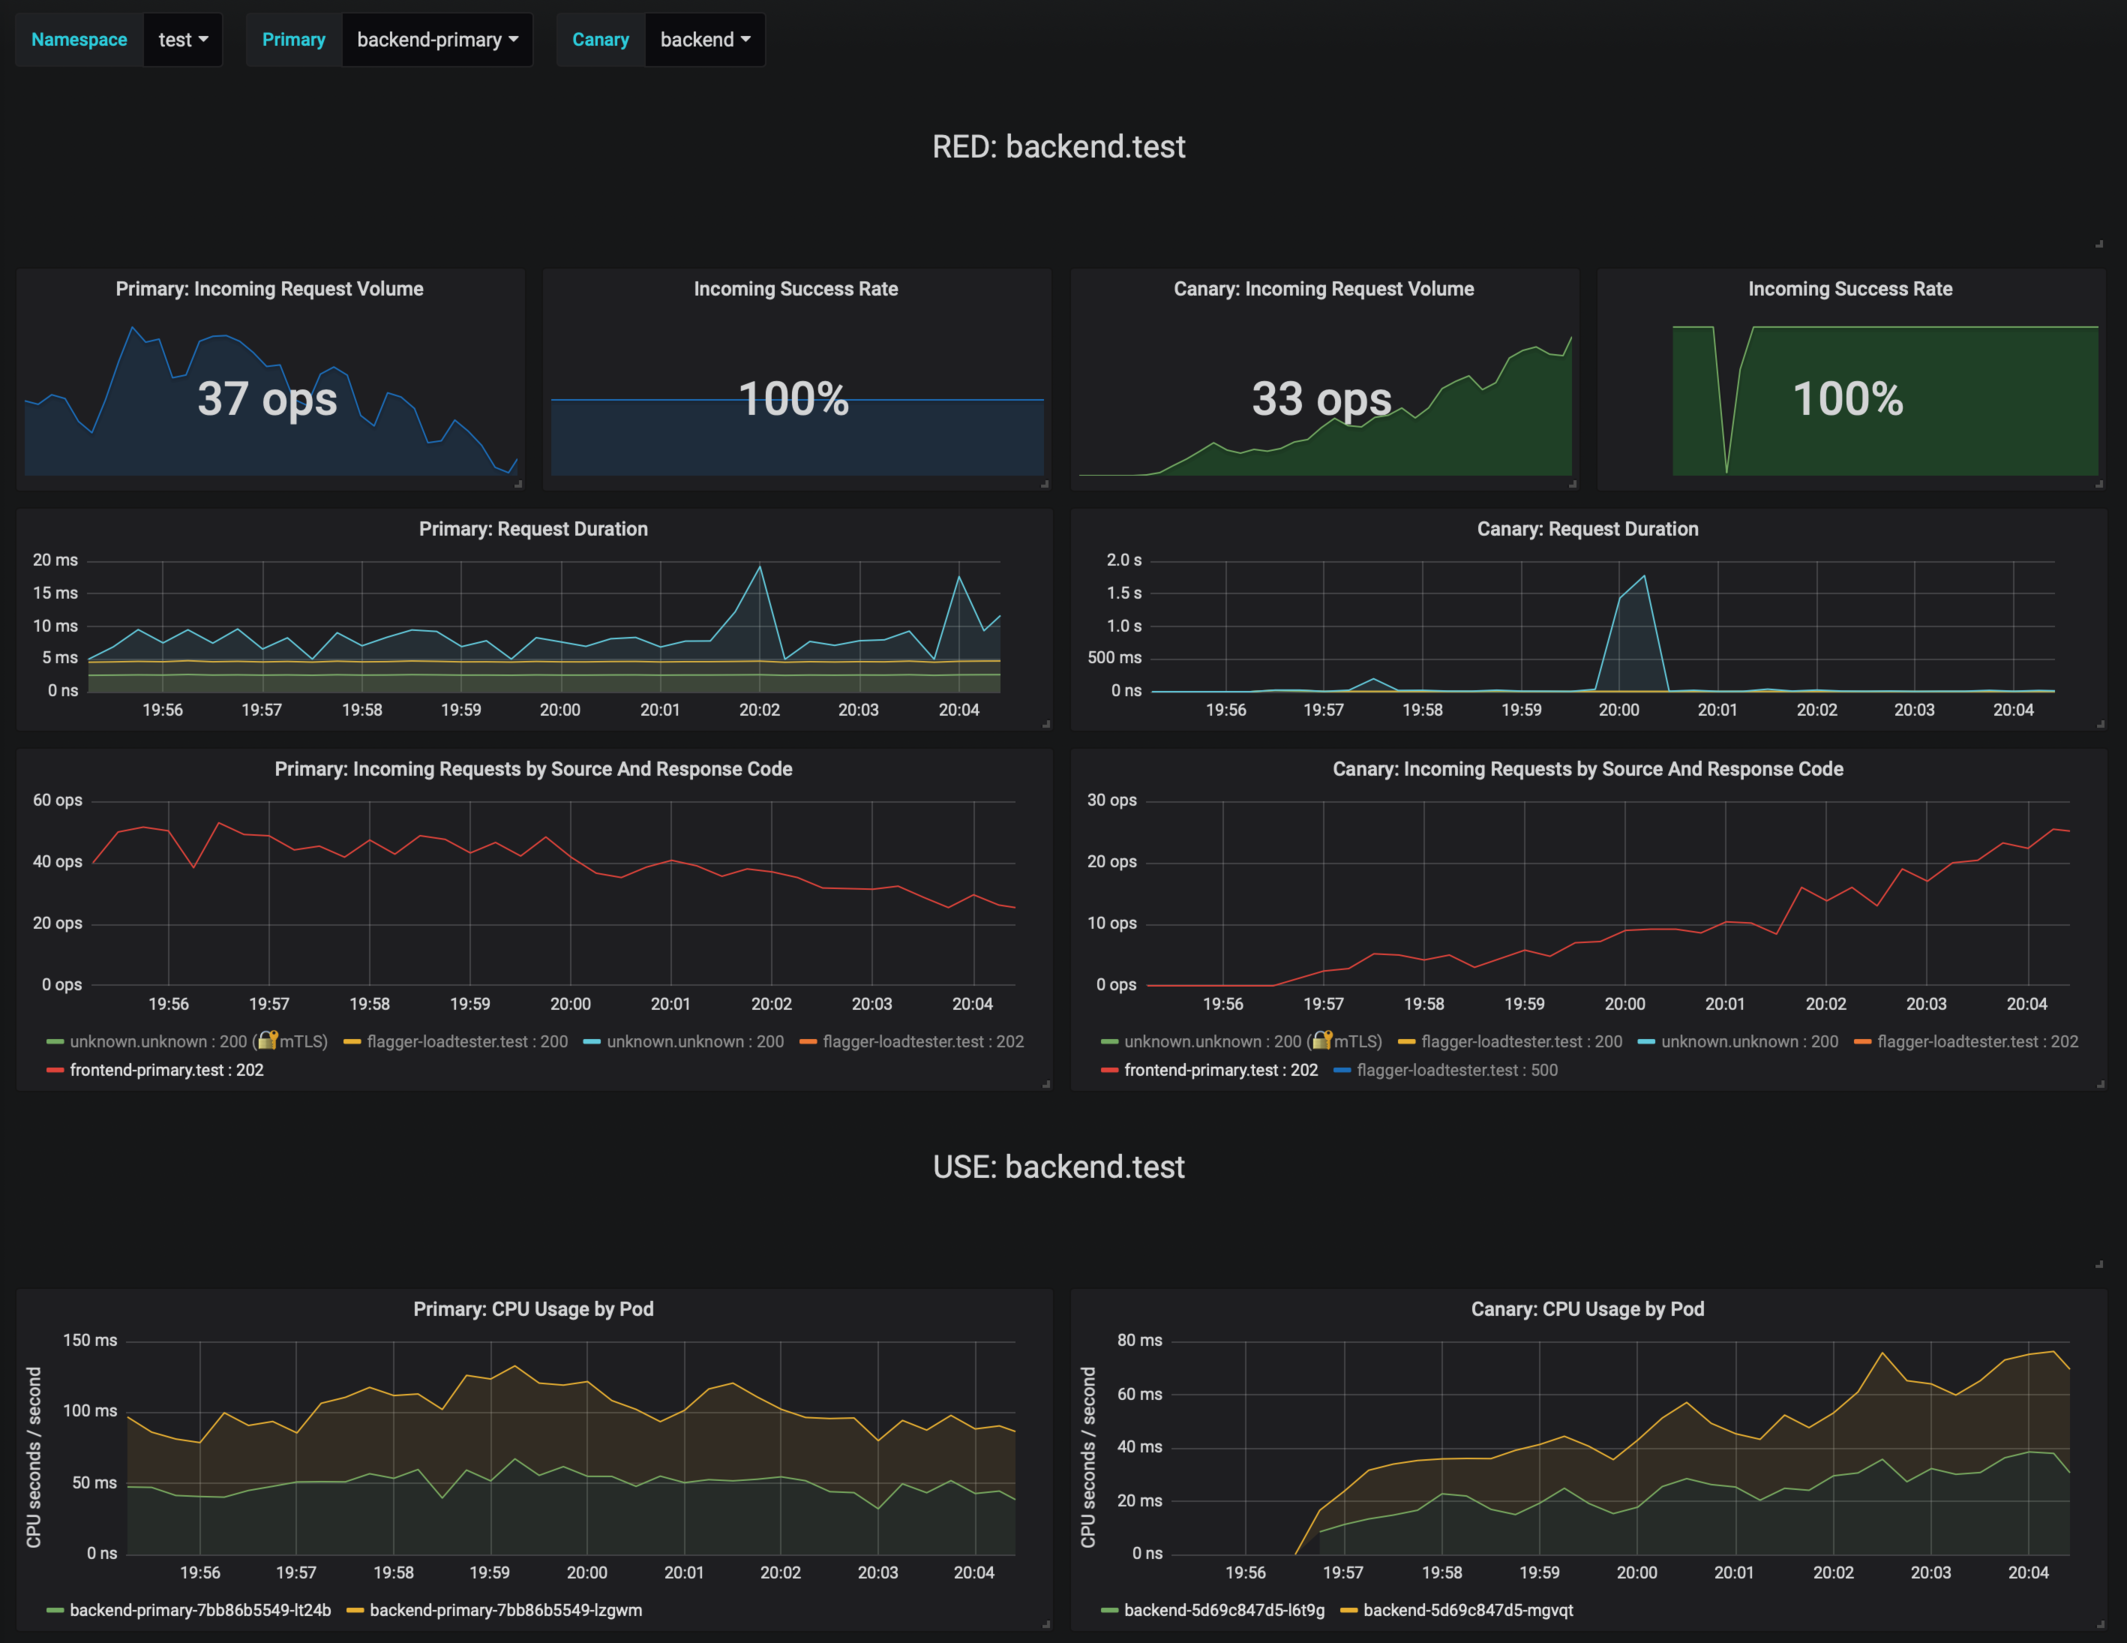
Flagger detects the config map change and starts a canary analysis. Flagger will pause the advancement when the HTTP success rate drops under 99% or when the average request duration in the last minute is over 500ms:
kubectl -n test describe canary backend

Events:

ConfigMap backend has changed
New revision detected! Scaling up backend.test
Starting canary analysis for backend.test
Advance backend.test canary weight 5
Advance backend.test canary weight 10
Advance backend.test canary weight 15
Advance backend.test canary weight 20
Advance backend.test canary weight 25
Advance backend.test canary weight 30
Advance backend.test canary weight 35
Halt backend.test advancement success rate 62.50% < 99%
Halt backend.test advancement success rate 88.24% < 99%
Advance backend.test canary weight 40
Advance backend.test canary weight 45
Halt backend.test advancement request duration 2.415s > 500ms
Halt backend.test advancement request duration 2.42s > 500ms
Advance backend.test canary weight 50
ConfigMap backend-primary synced
Copying backend.test template spec to backend-primary.test
Promotion completed! Scaling down backend.test
If the number of failed checks reaches the canary analysis threshold, the traffic is routed back to the primary, the canary is scaled to zero and the rollout is marked as failed.
kubectl -n test get canary

NAME       STATUS        WEIGHT   LASTTRANSITIONTIME
backend    Succeeded     0        2019-02-12T19:33:11Z
frontend   Failed        0        2019-02-12T19:47:20Z
If you've enabled the Slack notifications, you'll receive an alert with the reason why the backend promotion failed.
GitOps automation
Instead of using Helm CLI from a CI tool to perform the install and upgrade, you could use a Git based approach. GitOps is a way to do Continuous Delivery, it works by using Git as a source of truth for declarative infrastructure and workloads. In the GitOps model, any change to production must be committed in source control prior to being applied on the cluster. This way rollback and audit logs are provided by Git.
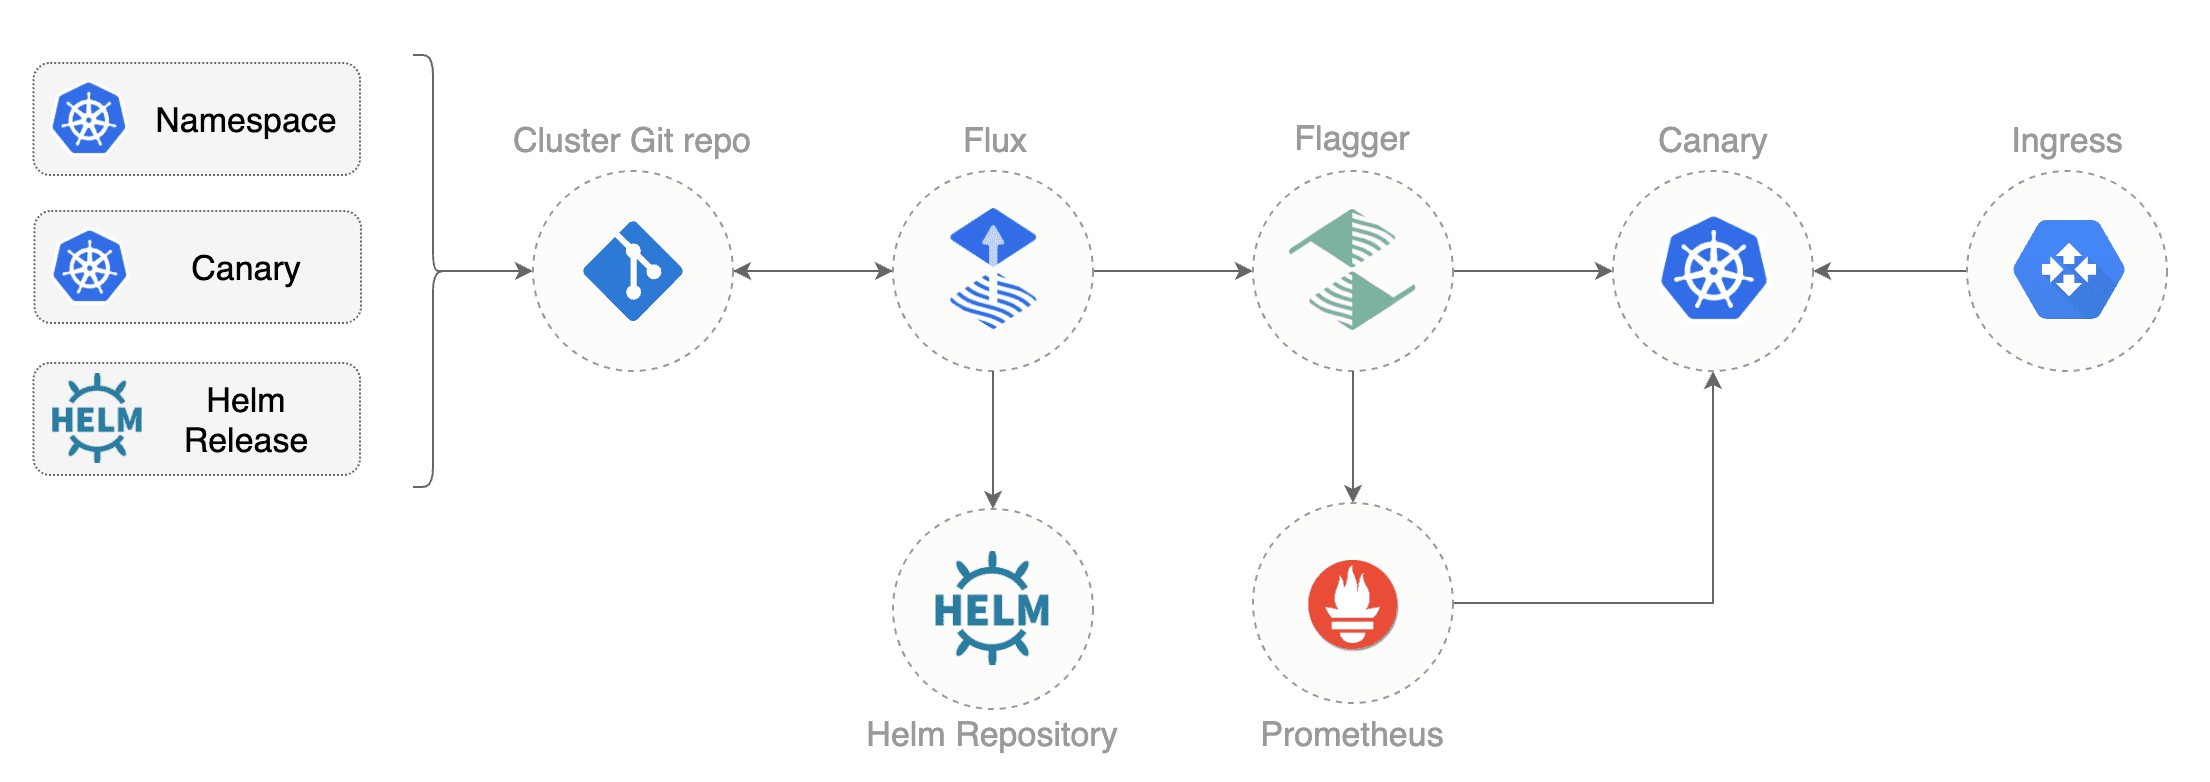
In order to apply the GitOps pipeline model to Flagger canary deployments you'll need a Git repository with your workloads definitions in YAML format, a container registry where your CI system pushes immutable images and an operator that synchronizes the Git repo with the cluster state.
Create a git repository with the following content:
├── namespaces
│   └── test.yaml
└── releases
    └── test
        ├── backend.yaml
        ├── frontend.yaml
        ├── loadtester.yaml
        └── helmtester.yaml
Define the frontend release using Flux HelmRelease custom resource:
apiVersion: flux.weave.works/v1beta1
kind: HelmRelease
metadata:
  name: frontend
  namespace: test
  annotations:
    fluxcd.io/automated: "true"
    filter.fluxcd.io/chart-image: semver:~3.1
spec:
  releaseName: frontend
  chart:
    git: https://github.com/weaveowrks/flagger
    ref: master
    path: charts/podinfo
  values:
    image:
      repository: stefanprodan/podinfo
      tag: 3.1.0
      backend: http://backend-podinfo:9898/echo
      canary:
        enabled: true
        istioIngress:
          enabled: true
          gateway: public-gateway.istio-system.svc.cluster.local
          host: frontend.istio.example.com
        loadtest:
          enabled: true
        helmtest:
          enabled: true
In the chart section I've defined the release source by specifying the Helm repository (hosted on GitHub Pages),
chart name and version. In the values section I've overwritten the defaults set in values.yaml.
With the fluxcd.io annotations I instruct Flux to automate this release.
When an image tag in the sem ver range of 3.1.0 - 3.1.99 is pushed to Docker Hub,
Flux will upgrade the Helm release and from there Flagger will pick up the change and start a canary deployment.
Install Flux and its Helm Operator by specifying your Git repo URL:
helm repo add fluxcd https://charts.fluxcd.io

helm install --name flux \
--set git.url=git@github.com:<USERNAME>/<REPOSITORY> \
--namespace fluxcd \
fluxcd/flux

helm upgrade -i helm-operator fluxcd/helm-operator \
--namespace fluxcd \
--set git.ssh.secretName=flux-git-deploy
At startup Flux generates a SSH key and logs the public key. Find the SSH public key with:
kubectl -n fluxcd logs deployment/flux | grep identity.pub | cut -d '"' -f2
In order to sync your cluster state with Git you need to copy the public key and create a deploy key with write access on your GitHub repository.
Open GitHub, navigate to your fork, go to Setting > Deploy keys click on Add deploy key, check Allow write access, paste the Flux public key and click Add key.
After a couple of seconds Flux will apply the Kubernetes resources from Git and
Flagger will launch the frontend and backend apps.
A CI/CD pipeline for the frontend release could look like this:
- cut a release from the master branch of the podinfo code repo with the git tag
3.1.1 - CI builds the image and pushes the
podinfo:3.1.1image to the container registry - Flux scans the registry and updates the Helm release
image.tagto3.1.1 - Flux commits and push the change to the cluster repo
- Flux applies the updated Helm release on the cluster
- Flux Helm Operator picks up the change and calls Tiller to upgrade the release
- Flagger detects a revision change and scales up the
frontenddeployment - Flagger runs the helm test before routing traffic to the canary service
- Flagger starts the load test and runs the canary analysis
- Based on the analysis result the canary deployment is promoted to production or rolled back
- Flagger sends a Slack or MS Teams notification with the canary result
If the canary fails, fix the bug, do another patch release eg 3.1.2 and the whole process will run again.
A canary deployment can fail due to any of the following reasons:
- the container image can't be downloaded
- the deployment replica set is stuck for more then ten minutes (eg. due to a container crash loop)
- the webooks (acceptance tests, helm tests, load tests, etc) are returning a non 2xx response
- the HTTP success rate (non 5xx responses) metric drops under the threshold
- the HTTP average duration metric goes over the threshold
- the Istio telemetry service is unable to collect traffic metrics
- the metrics server (Prometheus) can't be reached
If you want to find out more about managing Helm releases with Flux here are two in-depth guides: gitops-helm and gitops-istio.