mirror of https://github.com/fluxcd/flagger.git
401 lines
11 KiB
Markdown
401 lines
11 KiB
Markdown
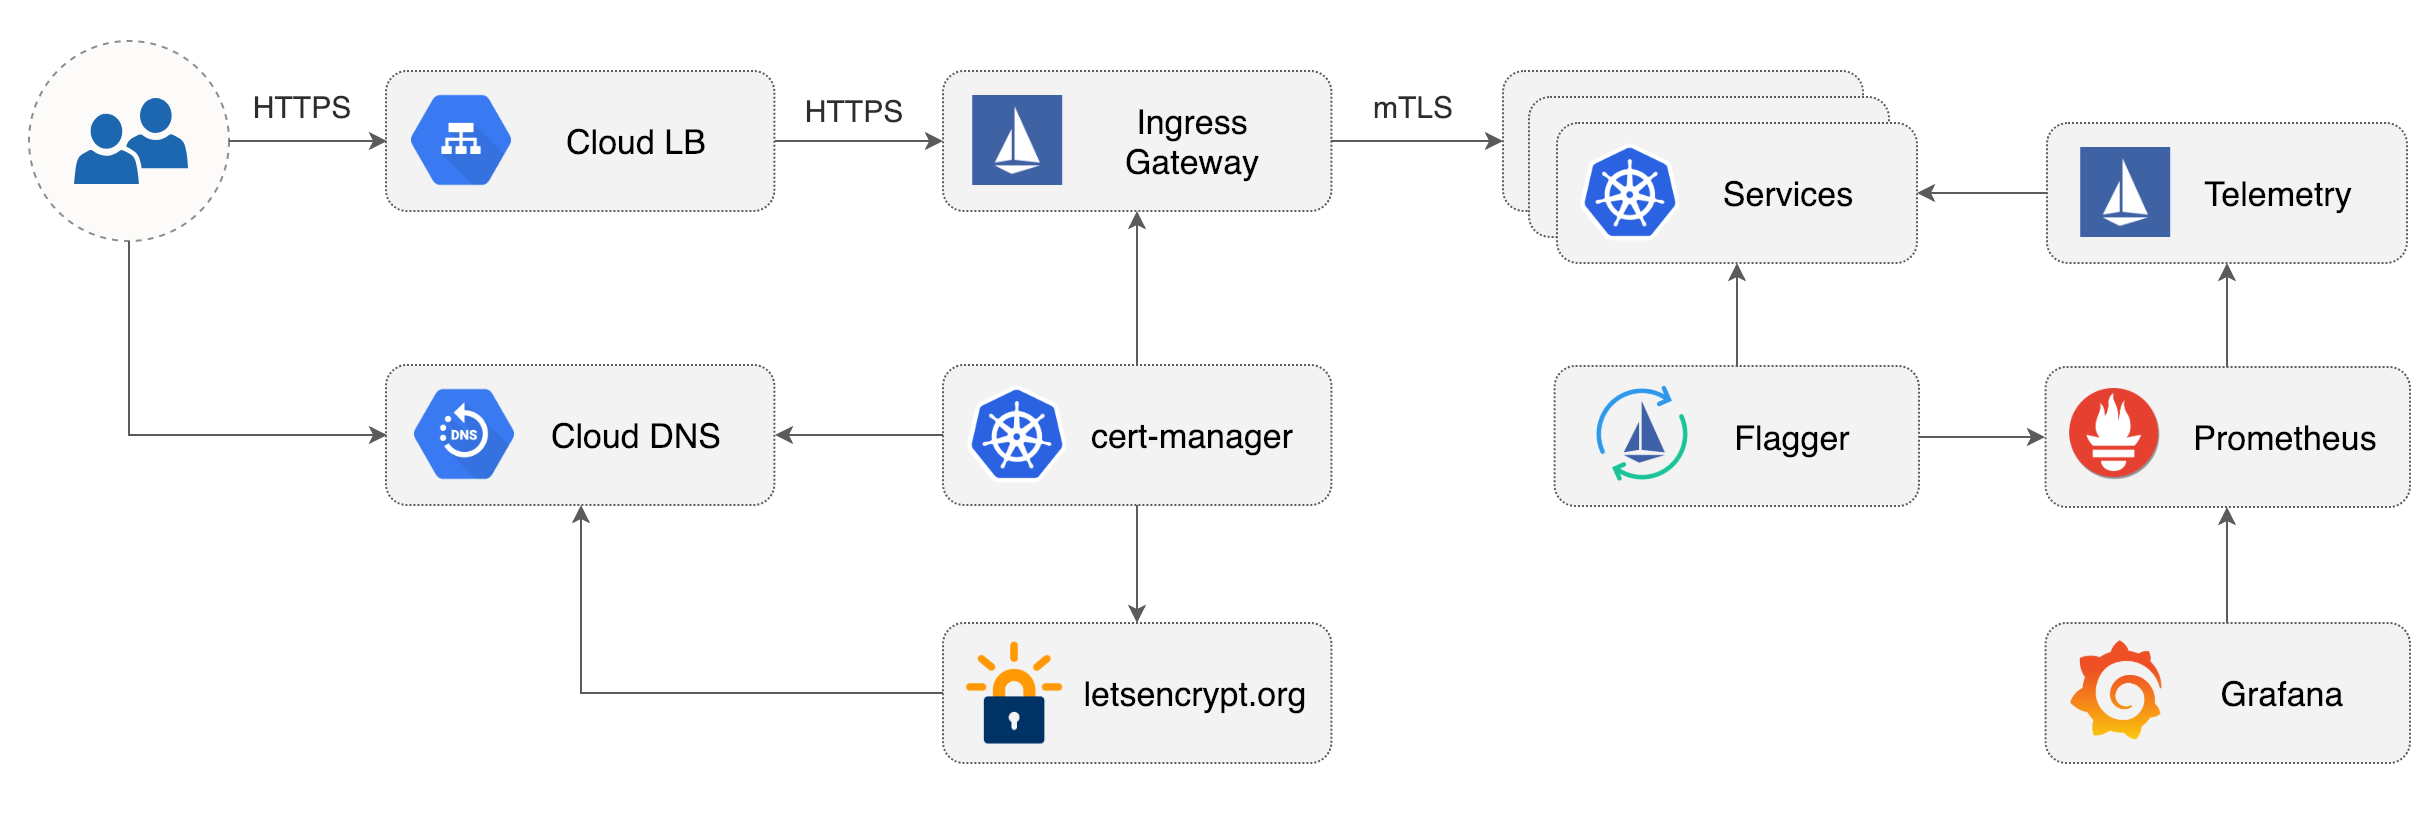
# Flagger Install on GKE Istio
|
||
|
||
This guide walks you through setting up Flagger and Istio on Google Kubernetes Engine.
|
||
|
||
|
||
|
||
## Prerequisites
|
||
|
||
You will be creating a cluster on Google’s Kubernetes Engine \(GKE\), if you don’t have an account you can sign up [here](https://cloud.google.com/free/) for free credits.
|
||
|
||
Login into Google Cloud, create a project and enable billing for it.
|
||
|
||
Install the [gcloud](https://cloud.google.com/sdk/) command line utility and configure your project with `gcloud init`.
|
||
|
||
Set the default project \(replace `PROJECT_ID` with your own project\):
|
||
|
||
```text
|
||
gcloud config set project PROJECT_ID
|
||
```
|
||
|
||
Set the default compute region and zone:
|
||
|
||
```text
|
||
gcloud config set compute/region us-central1
|
||
gcloud config set compute/zone us-central1-a
|
||
```
|
||
|
||
Enable the Kubernetes and Cloud DNS services for your project:
|
||
|
||
```text
|
||
gcloud services enable container.googleapis.com
|
||
gcloud services enable dns.googleapis.com
|
||
```
|
||
|
||
Install the kubectl command-line tool:
|
||
|
||
```text
|
||
gcloud components install kubectl
|
||
```
|
||
|
||
## GKE cluster setup
|
||
|
||
Create a cluster with the Istio add-on:
|
||
|
||
```bash
|
||
K8S_VERSION=$(gcloud container get-server-config --format=json \
|
||
| jq -r '.validMasterVersions[0]')
|
||
|
||
gcloud beta container clusters create istio \
|
||
--cluster-version=${K8S_VERSION} \
|
||
--zone=us-central1-a \
|
||
--num-nodes=2 \
|
||
--machine-type=n1-highcpu-4 \
|
||
--preemptible \
|
||
--no-enable-cloud-logging \
|
||
--no-enable-cloud-monitoring \
|
||
--disk-size=30 \
|
||
--enable-autorepair \
|
||
--addons=HorizontalPodAutoscaling,Istio \
|
||
--istio-config=auth=MTLS_PERMISSIVE
|
||
```
|
||
|
||
The above command will create a default node pool consisting of two `n1-highcpu-4` \(vCPU: 4, RAM 3.60GB, DISK: 30GB\) preemptible VMs. Preemptible VMs are up to 80% cheaper than regular instances and are terminated and replaced after a maximum of 24 hours.
|
||
|
||
Set up credentials for `kubectl`:
|
||
|
||
```bash
|
||
gcloud container clusters get-credentials istio
|
||
```
|
||
|
||
Create a cluster admin role binding:
|
||
|
||
```bash
|
||
kubectl create clusterrolebinding "cluster-admin-$(whoami)" \
|
||
--clusterrole=cluster-admin \
|
||
--user="$(gcloud config get-value core/account)"
|
||
```
|
||
|
||
Validate your setup with:
|
||
|
||
```bash
|
||
kubectl -n istio-system get svc
|
||
```
|
||
|
||
In a couple of seconds GCP should allocate an external IP to the `istio-ingressgateway` service.
|
||
|
||
## Cloud DNS setup
|
||
|
||
You will need an internet domain and access to the registrar to change the name servers to Google Cloud DNS.
|
||
|
||
Create a managed zone named `istio` in Cloud DNS \(replace `example.com` with your domain\):
|
||
|
||
```bash
|
||
gcloud dns managed-zones create \
|
||
--dns-name="example.com." \
|
||
--description="Istio zone" "istio"
|
||
```
|
||
|
||
Look up your zone's name servers:
|
||
|
||
```bash
|
||
gcloud dns managed-zones describe istio
|
||
```
|
||
|
||
Update your registrar's name server records with the records returned by the above command.
|
||
|
||
Wait for the name servers to change \(replace `example.com` with your domain\):
|
||
|
||
```bash
|
||
watch dig +short NS example.com
|
||
```
|
||
|
||
Create a static IP address named `istio-gateway` using the Istio ingress IP:
|
||
|
||
```bash
|
||
export GATEWAY_IP=$(kubectl -n istio-system get svc/istio-ingressgateway -ojson \
|
||
| jq -r .status.loadBalancer.ingress[0].ip)
|
||
|
||
gcloud compute addresses create istio-gateway --addresses ${GATEWAY_IP} --region us-central1
|
||
```
|
||
|
||
Create the following DNS records \(replace `example.com` with your domain\):
|
||
|
||
```bash
|
||
DOMAIN="example.com"
|
||
|
||
gcloud dns record-sets transaction start --zone=istio
|
||
|
||
gcloud dns record-sets transaction add --zone=istio \
|
||
--name="${DOMAIN}" --ttl=300 --type=A ${GATEWAY_IP}
|
||
|
||
gcloud dns record-sets transaction add --zone=istio \
|
||
--name="www.${DOMAIN}" --ttl=300 --type=A ${GATEWAY_IP}
|
||
|
||
gcloud dns record-sets transaction add --zone=istio \
|
||
--name="*.${DOMAIN}" --ttl=300 --type=A ${GATEWAY_IP}
|
||
|
||
gcloud dns record-sets transaction execute --zone istio
|
||
```
|
||
|
||
Verify that the wildcard DNS is working \(replace `example.com` with your domain\):
|
||
|
||
```bash
|
||
watch host test.example.com
|
||
```
|
||
|
||
## Install Helm
|
||
|
||
Install the [Helm](https://docs.helm.sh/using_helm/#installing-helm) command-line tool:
|
||
|
||
```text
|
||
brew install kubernetes-helm
|
||
```
|
||
|
||
Create a service account and a cluster role binding for Tiller:
|
||
|
||
```bash
|
||
kubectl -n kube-system create sa tiller
|
||
|
||
kubectl create clusterrolebinding tiller-cluster-rule \
|
||
--clusterrole=cluster-admin \
|
||
--serviceaccount=kube-system:tiller
|
||
```
|
||
|
||
Deploy Tiller in the `kube-system` namespace:
|
||
|
||
```bash
|
||
helm init --service-account tiller
|
||
```
|
||
|
||
You should consider using SSL between Helm and Tiller, for more information on securing your Helm installation see [docs.helm.sh](https://docs.helm.sh/using_helm/#securing-your-helm-installation).
|
||
|
||
## Install cert-manager
|
||
|
||
Jetstack's [cert-manager](https://github.com/jetstack/cert-manager) is a Kubernetes operator that automatically creates and manages TLS certs issued by Let’s Encrypt.
|
||
|
||
You'll be using cert-manager to provision a wildcard certificate for the Istio ingress gateway.
|
||
|
||
Install cert-manager's CRDs:
|
||
|
||
```bash
|
||
CERT_REPO=https://raw.githubusercontent.com/jetstack/cert-manager
|
||
|
||
kubectl apply -f ${CERT_REPO}/release-0.10/deploy/manifests/00-crds.yaml
|
||
```
|
||
|
||
Create the cert-manager namespace and disable resource validation:
|
||
|
||
```bash
|
||
kubectl create namespace cert-manager
|
||
|
||
kubectl label namespace cert-manager certmanager.k8s.io/disable-validation=true
|
||
```
|
||
|
||
Install cert-manager with Helm:
|
||
|
||
```bash
|
||
helm repo add jetstack https://charts.jetstack.io && \
|
||
helm repo update && \
|
||
helm upgrade -i cert-manager \
|
||
--namespace cert-manager \
|
||
--version v0.10.0 \
|
||
jetstack/cert-manager
|
||
```
|
||
|
||
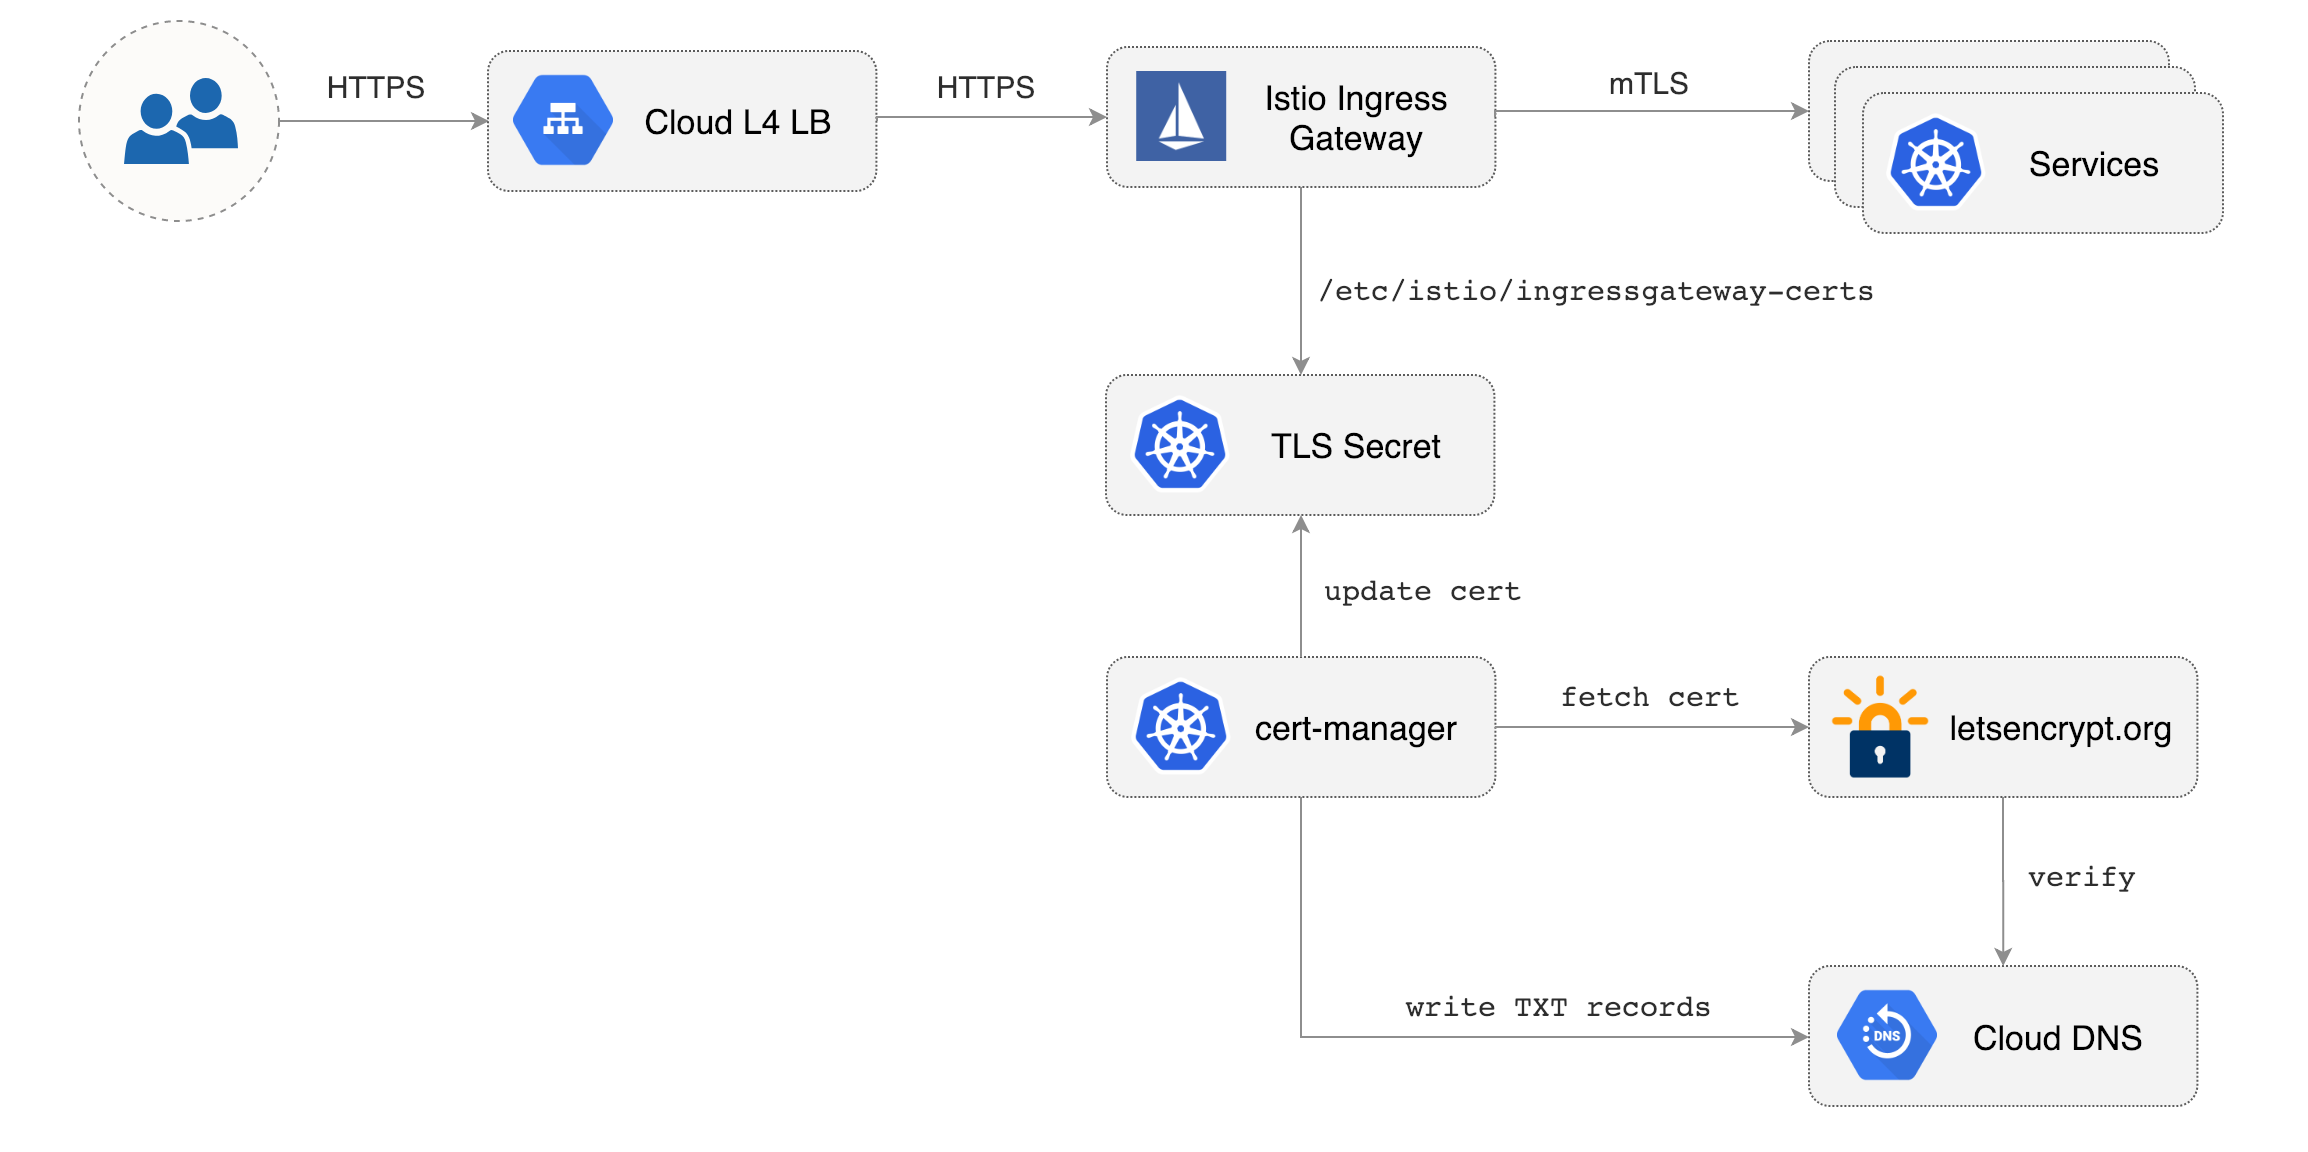
## Istio Gateway TLS setup
|
||
|
||
|
||
|
||
Create a generic Istio Gateway to expose services outside the mesh on HTTPS:
|
||
|
||
```bash
|
||
REPO=https://raw.githubusercontent.com/weaveworks/flagger/master
|
||
|
||
kubectl apply -f ${REPO}/artifacts/gke/istio-gateway.yaml
|
||
```
|
||
|
||
Create a service account with Cloud DNS admin role \(replace `my-gcp-project` with your project ID\):
|
||
|
||
```bash
|
||
GCP_PROJECT=my-gcp-project
|
||
|
||
gcloud iam service-accounts create dns-admin \
|
||
--display-name=dns-admin \
|
||
--project=${GCP_PROJECT}
|
||
|
||
gcloud iam service-accounts keys create ./gcp-dns-admin.json \
|
||
--iam-account=dns-admin@${GCP_PROJECT}.iam.gserviceaccount.com \
|
||
--project=${GCP_PROJECT}
|
||
|
||
gcloud projects add-iam-policy-binding ${GCP_PROJECT} \
|
||
--member=serviceAccount:dns-admin@${GCP_PROJECT}.iam.gserviceaccount.com \
|
||
--role=roles/dns.admin
|
||
```
|
||
|
||
Create a Kubernetes secret with the GCP Cloud DNS admin key:
|
||
|
||
```bash
|
||
kubectl create secret generic cert-manager-credentials \
|
||
--from-file=./gcp-dns-admin.json \
|
||
--namespace=istio-system
|
||
```
|
||
|
||
Create a letsencrypt issuer for CloudDNS \(replace `email@example.com` with a valid email address and `my-gcp-project`with your project ID\):
|
||
|
||
```yaml
|
||
apiVersion: certmanager.k8s.io/v1alpha1
|
||
kind: Issuer
|
||
metadata:
|
||
name: letsencrypt-prod
|
||
namespace: istio-system
|
||
spec:
|
||
acme:
|
||
server: https://acme-v02.api.letsencrypt.org/directory
|
||
email: email@example.com
|
||
privateKeySecretRef:
|
||
name: letsencrypt-prod
|
||
dns01:
|
||
providers:
|
||
- name: cloud-dns
|
||
clouddns:
|
||
serviceAccountSecretRef:
|
||
name: cert-manager-credentials
|
||
key: gcp-dns-admin.json
|
||
project: my-gcp-project
|
||
```
|
||
|
||
Save the above resource as letsencrypt-issuer.yaml and then apply it:
|
||
|
||
```text
|
||
kubectl apply -f ./letsencrypt-issuer.yaml
|
||
```
|
||
|
||
Create a wildcard certificate \(replace `example.com` with your domain\):
|
||
|
||
```yaml
|
||
apiVersion: certmanager.k8s.io/v1alpha1
|
||
kind: Certificate
|
||
metadata:
|
||
name: istio-gateway
|
||
namespace: istio-system
|
||
spec:
|
||
secretName: istio-ingressgateway-certs
|
||
issuerRef:
|
||
name: letsencrypt-prod
|
||
commonName: "*.example.com"
|
||
acme:
|
||
config:
|
||
- dns01:
|
||
provider: cloud-dns
|
||
domains:
|
||
- "*.example.com"
|
||
- "example.com"
|
||
```
|
||
|
||
Save the above resource as istio-gateway-cert.yaml and then apply it:
|
||
|
||
```text
|
||
kubectl apply -f ./istio-gateway-cert.yaml
|
||
```
|
||
|
||
In a couple of seconds cert-manager should fetch a wildcard certificate from letsencrypt.org:
|
||
|
||
```text
|
||
kubectl -n istio-system describe certificate istio-gateway
|
||
|
||
Events:
|
||
Type Reason Age From Message
|
||
---- ------ ---- ---- -------
|
||
Normal CertIssued 1m52s cert-manager Certificate issued successfully
|
||
```
|
||
|
||
Recreate Istio ingress gateway pods:
|
||
|
||
```bash
|
||
kubectl -n istio-system get pods -l istio=ingressgateway
|
||
```
|
||
|
||
Note that Istio gateway doesn't reload the certificates from the TLS secret on cert-manager renewal. Since the GKE cluster is made out of preemptible VMs the gateway pods will be replaced once every 24h, if your not using preemptible nodes then you need to manually delete the gateway pods every two months before the certificate expires.
|
||
|
||
## Install Prometheus
|
||
|
||
The GKE Istio add-on does not include a Prometheus instance that scrapes the Istio telemetry service. Because Flagger uses the Istio HTTP metrics to run the canary analysis you have to deploy the following Prometheus configuration that's similar to the one that comes with the official Istio Helm chart.
|
||
|
||
Find the GKE Istio version with:
|
||
|
||
```bash
|
||
kubectl -n istio-system get deploy istio-pilot -oyaml | grep image:
|
||
```
|
||
|
||
Install Prometheus in istio-system namespace:
|
||
|
||
```bash
|
||
kubectl -n istio-system apply -f \
|
||
https://storage.googleapis.com/gke-release/istio/release/1.0.6-gke.3/patches/install-prometheus.yaml
|
||
```
|
||
|
||
## Install Flagger and Grafana
|
||
|
||
Add Flagger Helm repository:
|
||
|
||
```bash
|
||
helm repo add flagger https://flagger.app
|
||
```
|
||
|
||
Install Flagger's Canary CRD:
|
||
|
||
```yaml
|
||
kubectl apply -f https://raw.githubusercontent.com/weaveworks/flagger/master/artifacts/flagger/crd.yaml
|
||
```
|
||
|
||
Deploy Flagger in the `istio-system` namespace with Slack notifications enabled:
|
||
|
||
```bash
|
||
helm upgrade -i flagger flagger/flagger \
|
||
--namespace=istio-system \
|
||
--set crd.create=false \
|
||
--set metricsServer=http://prometheus.istio-system:9090 \
|
||
--set slack.url=https://hooks.slack.com/services/YOUR/SLACK/WEBHOOK \
|
||
--set slack.channel=general \
|
||
--set slack.user=flagger
|
||
```
|
||
|
||
Deploy Grafana in the `istio-system` namespace:
|
||
|
||
```bash
|
||
helm upgrade -i flagger-grafana flagger/grafana \
|
||
--namespace=istio-system \
|
||
--set url=http://prometheus.istio-system:9090 \
|
||
--set user=admin \
|
||
--set password=replace-me
|
||
```
|
||
|
||
Expose Grafana through the public gateway by creating a virtual service \(replace `example.com` with your domain\):
|
||
|
||
```yaml
|
||
apiVersion: networking.istio.io/v1alpha3
|
||
kind: VirtualService
|
||
metadata:
|
||
name: grafana
|
||
namespace: istio-system
|
||
spec:
|
||
hosts:
|
||
- "grafana.example.com"
|
||
gateways:
|
||
- public-gateway.istio-system.svc.cluster.local
|
||
http:
|
||
- route:
|
||
- destination:
|
||
host: flagger-grafana
|
||
```
|
||
|
||
Save the above resource as grafana-virtual-service.yaml and then apply it:
|
||
|
||
```bash
|
||
kubectl apply -f ./grafana-virtual-service.yaml
|
||
```
|
||
|
||
Navigate to `http://grafana.example.com` in your browser and you should be redirected to the HTTPS version.
|
||
|