9.0 KiB
Distributed training
In this part, we will implement distributed training in KubeFlow Pipeline. The method used is Tensorflow's MultiWorkerMirroredStrategy CPU. In this tutorial, we will learn how to specify pods to be deployed under a specific node, and how to communicate with each worker.
Before training
Before running the training program, we need to make some settings, include:
- Adding tags to each node.
- Deploying service YAML file.
- Add label name to your pod on the pipeline.
- Use add_node_selector_constraint to specify pod deployed under a specific node
- Add TF_config environment variables to the code.
Adding tags to each node
The purpose of adding tags is that the subsequent steps can directly specify the pod to be deployed under a specific node. You run following commands to apply your node. The added screen example can shown in the Figure.1 .
  // add tags
  kubectl label nodes <node name>  <label name> = <value>

  //show your node information
  kubectl get nodes  --show-labels=true

Figure1. Example added tags.
Deploying service YAML file
When performing distributed training, worker and other workers must use the network to communicate with each other, so the pod's external port must be opened and connected to the outside through the service. We have a service YAML file that provides service, so you don’t need to rewrite a new file for deployment, as shown in Figure.2 .
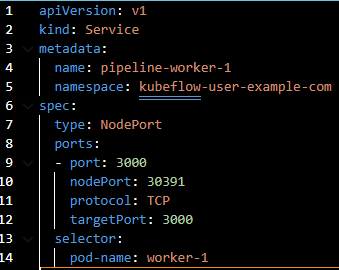
Figure2. Example of service yaml format.
You can run following the commands to deploy and check your service YAML file, as shown in Figure.3
  //Deploy your service.yaml
  kubectl create -f <your service YAML file name>

  //check your service.
  kubectl get svc -n kubeflow-user-example-com

Figure3. Example of check service.
Add label name to your pod on the pipeline
The purpose of adding the label name is that the Service file we deployed earlier can rely on the label name to open a port to a specific pod. We found the method to add the label name to a pod on the pipeline from the website of the KubeFlow Pipeline SDK, as shown in Figure.4 .
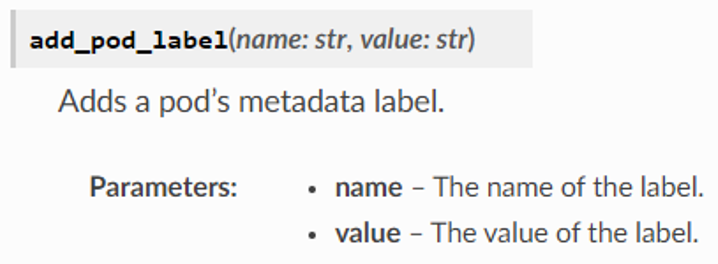
Figure4. Example added label name command.
However, the actual way to add to the pipeline is as shown in the Figure.5 , we need to define the name and value on the KubeFlow pipeline. Please make sure your name and value is the same as your selector parameter in your service YAML file.
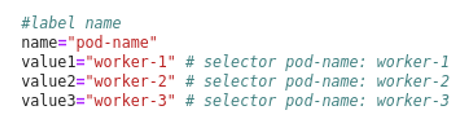
Figure5. Example of define label on pipeline.
Use add_node_selector_constraint to specify pod deployed under a specific node
Using this command, the pod on the pipeline can be designated to be deployed and executed under a specific node. We found the method to add the label name to a pod on the pipeline from the website of the KubeFlow Pipeline SDK, as shown in Figure.7 .
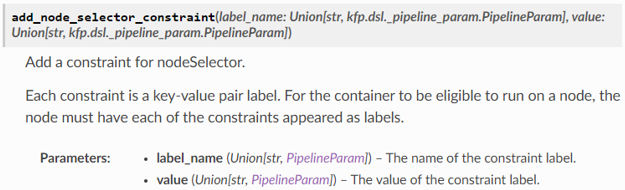
Figure7. Example of add node selector.
On the pipeline, we need to define name and value at the first, as shown in Figure.8, please make sure your name and value is the same as your Kubernetes node's tag.
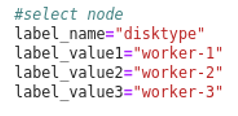
Figure8. Example of add node selector on pipeline.
After define label name and node selector, you can use Kubeflow SDK in your pod.
     //worker1
    distributed_training_worker1_task=distributed_training_worker1_op(load_data_task.outputs['start_time_string']).add_pvolumes({
       log_folder:vop.volume,
    }).add_pod_label(name,value1).add_node_selector_constraint(label_name,label_value1).add_port(V1ContainerPort(container_port=3000,host_port=3000))

     //worker2
    distributed_training_worker2_task=distributed_training_worker2_op(load_data_task.outputs['start_time_string']).add_pvolumes({
        log_folder:vop.volume,
    }).add_pod_label(name,value2).add_port(V1ContainerPort(container_port=3000,host_port=3000)).add_node_selector_constraint(label_name,label_value2)

    //worker3
    distributed_training_worker3_task=distributed_training_worker3_op(load_data_task.outputs['start_time_string']).add_pvolumes({
        log_folder:vop.volume,
    }).add_pod_label(name,value3).add_port(V1ContainerPort(container_port=3000,host_port=3000)).add_node_selector_constraint(label_name,label_value3)
Add TF_config environment variables to the code.
This tutorial use the Tensorflow's MultiWorkerMirroredStrategy to implement distributedtraining, so we need to apply the environment variable of TF_config in each pod. We use os.environ to export the TF_config in environment variable.
    //worker1
        os.environ['TF_CONFIG'] = json.dumps({'cluster': {'worker': ["pipeline-worker-1:3000","pipeline-worker-2:3000","pipeline-worker-3:3000"]},'task': {'type': 'worker', 'index': 0}})

    //worker2
        os.environ['TF_CONFIG'] = json.dumps({'cluster': {'worker': ["pipeline-worker-1:3000","pipeline-worker-2:3000","pipeline-worker-3:3000"]},'task': {'type': 'worker', 'index': 1}})

    //worker3
        os.environ['TF_CONFIG'] = json.dumps({'cluster': {'worker': ["pipeline-worker-1:3000","pipeline-worker-2:3000","pipeline-worker-3:3000"]},'task': {'type': 'worker', 'index': 2}})
Pipeline
After the previous settings, the pipeline we built is as shown in the Figure.9 .
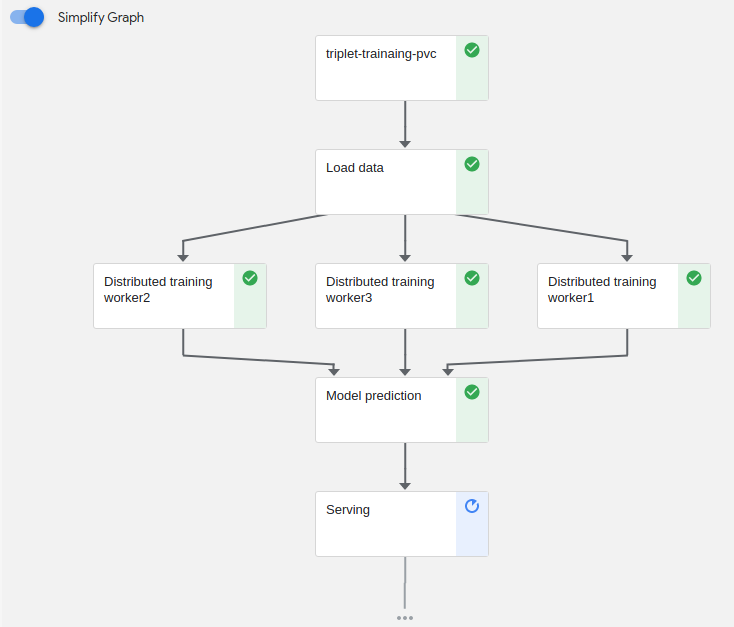
Figure9. Example of pipeline.
At this part we will explain the function of each pods.
- triplet-training-pvc: Provide a volume to save our dataset and model weight.
- Load data: We load our dataset and save this file into the pvc volume in the container.
- Distributed training worker1: This pod will be deployed under node1 and implement distributed training.
- Distributed training worker2: This pod will be deployed under node2 and implement distributed training.
- Distributed training worker3: This pod will be deployed under node3 and implement distributed training.
- Model prediction: After training, the training program will output the model weight and at this pod need to use this model weight to implement model prediction.(Due to the huge amount of data, this step will take a lot of time.)
- Serving: We use flask and html to build a Web UI, user can select image in our test-image folder to upload and implement this application.
Pod status
As shown in Figure.10 you can run the following commands to check your pod status.
kubectl get pods --all-namespaces -o wide

Figure10. Example of pod status.
Port forward
Run the following command and you can turn on your browser.
kubectl port-forward pod/<your pod name> -n kubeflow-user-example-com 8987:8987
At address bar you need to input url:
  //url
  localhost:8987/upload
And the finally, as shown in Figure.11 , you can enter the web UI page to implement model application.
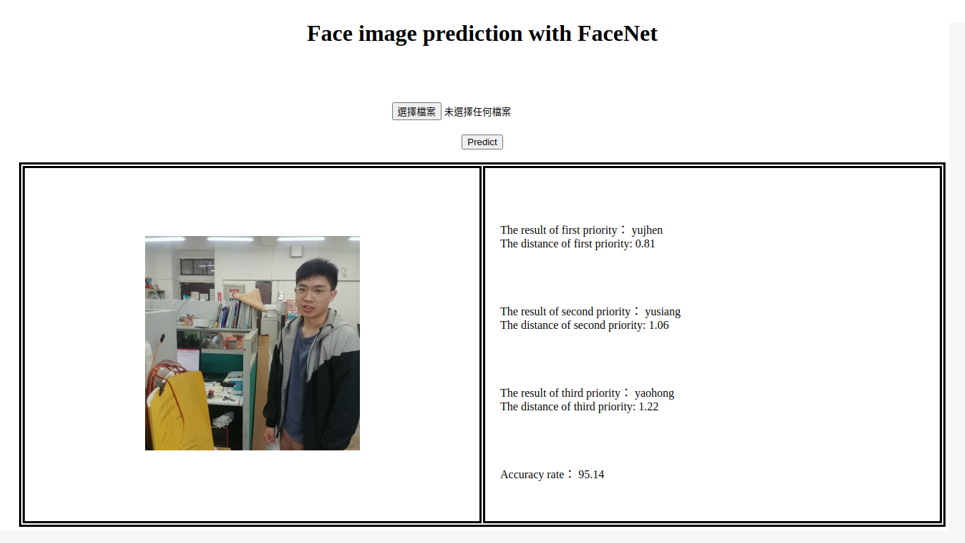
Figure11. Example of test result.
Previous: Setup storageclass and PVC