4.8 KiB
Create a new cluster on local Kubernetes
In this section, we need to install Kubernetes and create a new cluster step by step.
Create cluster and muilti nodes
At the first, we need add IP address and user name of the master node and other nodes under the specified path, As shown in Figure.1
cd /etc/hosts
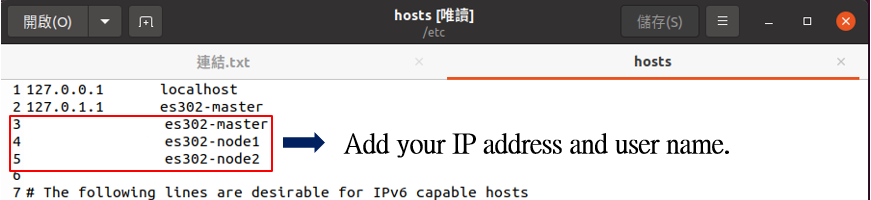
Figure1. Example of specified path.
Install Docker
You can run this command to install docker.
sudo apt install docker.io -y
If you want to let your docker to start automatically when your computer is turned on, you can run the following command.
  sudo systemctl start docker
  sudo systemctl enable docker
Disable SWAP
Run the following command to disable swap.
  sudo swapon -s
  sudo swapoff -a
Install kubeadm, kubelet and kubectl
Now start to install the necessary packages for Kubernetes.
  sudo apt-get update
  sudo apt-get install -y apt-transport-https ca-certificates curl
Download the Google Cloud public signing key.
sudo curl -fsSLo/usr/share/keyrings/kubernetes-archive-keyring.gpghttps://packages.cloud.google.com/apt/doc/apt-key.gpg
Add the Kubernetes apt repository.
echo "deb [signed-by=/usr/share/keyrings/kubernetes-archive-keyring.gpg] https://apt.kubernetes.io/ kubernetes-xenial main" | sudo tee /etc/apt/sources.list.d/kubernetes.list
Update packages and install kubeadm, kubelet, kubectl.
  sudo apt-get update
  sudo apt-get install -y kubelet kubeadm kubectl
  sudo apt-mark hold kubelet kubeadm kubectl
The above commands will automatically install the latest version for you, if you want to install the specified version, run the following commands.
  sudo apt-get install -y kubelet= <Specified kubelet version>
  sudo apt-get install -y kubeadm= <Specified kubeadm version>
  sudo apt-get install -y kubectl= <Specified kubectl version>
Run this command to deploy your master node, and you will get some messages as Figure.2 .
sudo kubeadm init --pod-network-cidr=10.244.10.0/16--apiserver-advertise-address= <Your master node IP address>
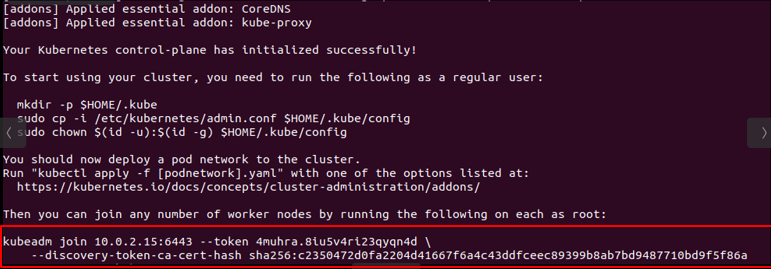
Figure2. Example of deployment master node.
Create .kube folder, this setting is to allow general users to use kubectl.
  mkdir -p $HOME/.kube
  sudo cp -i /etc/kubernetes/admin.conf $HOME/.kube/config
  sudo chown $(id -u):$(id -g) $HOME/.kube/config
After deploy master node, and then you need to deploy the pod network to the cluster.
kubectl apply -f https://raw.githubusercontent.com/coreos/flannel/master/Documentation/kube-flannel.yml
Finally, use the Figure.2 redframe's command to join any number of worker nodes by running the following on each as root and your multi nodes cluster will established,as shown in Figure.3 you can run the following commands to check your multi nodes cluster.
kubectl get nodes

Figure3. Example of cluster.
Deploy Kubeflow
At the first, you need to create the kubeflow folder under the root directory, as shown in Figure.4, please make sure the folder where you want to install kubeflow is empty.

Figure4. Example of create kubeflow folder
Download kfctl data into your kubeflow folder, you can go to the kfctl releases to download kfctl data, shown as Figure.5

Figure5. Example of specified path.
And then export your kfctl folder path and Kubeflow YAML data.
   export PATH=$PATH:"<path-to-kfctl>"
   export CONFIG_URI="https://raw.githubusercontent.com/kubeflow/manifests/v1.2-branch/kfdef/kfctl_k8s_istio.v1.2.0.yaml"
Start to deploy Kubeflow.
kfctl apply -V -f ${CONFIG_URI}
Next: Install and setup NFS