746 lines
19 KiB
Markdown
746 lines
19 KiB
Markdown
<p align="center">
|
||
<a href="https://www.programmercarl.com/xunlian/xunlianying.html" target="_blank">
|
||
<img src="../pics/训练营.png" width="1000"/>
|
||
</a>
|
||
<p align="center"><strong><a href="./qita/join.md">参与本项目</a>,贡献其他语言版本的代码,拥抱开源,让更多学习算法的小伙伴们受益!</strong></p>
|
||
|
||
|
||
> 反转链表的写法很简单,一些同学甚至可以背下来但过一阵就忘了该咋写,主要是因为没有理解真正的反转过程。
|
||
|
||
# 206.反转链表
|
||
|
||
[力扣题目链接](https://leetcode.cn/problems/reverse-linked-list/)
|
||
|
||
题意:反转一个单链表。
|
||
|
||
示例:
|
||
输入: 1->2->3->4->5->NULL
|
||
输出: 5->4->3->2->1->NULL
|
||
|
||
## 算法公开课
|
||
|
||
**[《代码随想录》算法视频公开课](https://programmercarl.com/other/gongkaike.html):[帮你拿下反转链表 | LeetCode:206.反转链表](https://www.bilibili.com/video/BV1nB4y1i7eL),相信结合视频再看本篇题解,更有助于大家对本题的理解**。
|
||
|
||
|
||
## 思路
|
||
|
||
如果再定义一个新的链表,实现链表元素的反转,其实这是对内存空间的浪费。
|
||
|
||
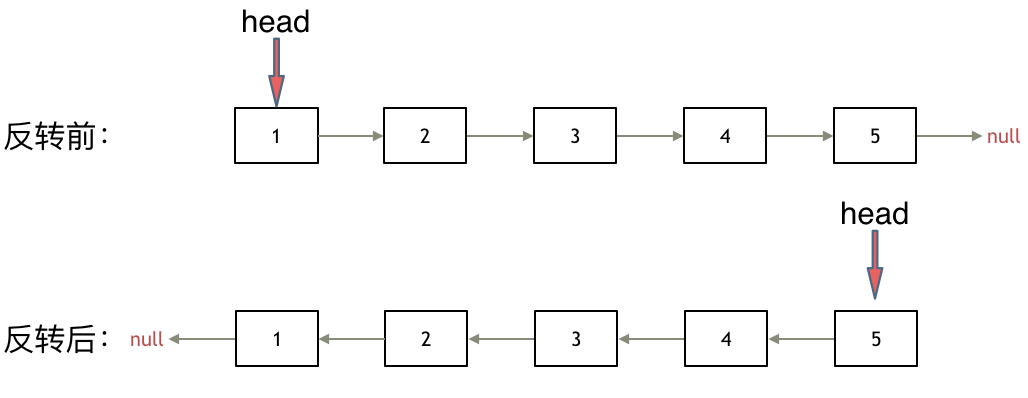
其实只需要改变链表的next指针的指向,直接将链表反转 ,而不用重新定义一个新的链表,如图所示:
|
||
|
||
|
||
|
||
|
||
之前链表的头节点是元素1, 反转之后头结点就是元素5 ,这里并没有添加或者删除节点,仅仅是改变next指针的方向。
|
||
|
||
那么接下来看一看是如何反转的呢?
|
||
|
||
我们拿有示例中的链表来举例,如动画所示:(纠正:动画应该是先移动pre,在移动cur)
|
||
|
||
|
||
|
||
首先定义一个cur指针,指向头结点,再定义一个pre指针,初始化为null。
|
||
|
||
然后就要开始反转了,首先要把 cur->next 节点用tmp指针保存一下,也就是保存一下这个节点。
|
||
|
||
为什么要保存一下这个节点呢,因为接下来要改变 cur->next 的指向了,将cur->next 指向pre ,此时已经反转了第一个节点了。
|
||
|
||
接下来,就是循环走如下代码逻辑了,继续移动pre和cur指针。
|
||
|
||
最后,cur 指针已经指向了null,循环结束,链表也反转完毕了。 此时我们return pre指针就可以了,pre指针就指向了新的头结点。
|
||
|
||
### 双指针法
|
||
```CPP
|
||
class Solution {
|
||
public:
|
||
ListNode* reverseList(ListNode* head) {
|
||
ListNode* temp; // 保存cur的下一个节点
|
||
ListNode* cur = head;
|
||
ListNode* pre = NULL;
|
||
while(cur) {
|
||
temp = cur->next; // 保存一下 cur的下一个节点,因为接下来要改变cur->next
|
||
cur->next = pre; // 翻转操作
|
||
// 更新pre 和 cur指针
|
||
pre = cur;
|
||
cur = temp;
|
||
}
|
||
return pre;
|
||
}
|
||
};
|
||
```
|
||
|
||
* 时间复杂度: O(n)
|
||
* 空间复杂度: O(1)
|
||
|
||
### 递归法
|
||
|
||
递归法相对抽象一些,但是其实和双指针法是一样的逻辑,同样是当cur为空的时候循环结束,不断将cur指向pre的过程。
|
||
|
||
关键是初始化的地方,可能有的同学会不理解, 可以看到双指针法中初始化 cur = head,pre = NULL,在递归法中可以从如下代码看出初始化的逻辑也是一样的,只不过写法变了。
|
||
|
||
具体可以看代码(已经详细注释),**双指针法写出来之后,理解如下递归写法就不难了,代码逻辑都是一样的。**
|
||
```CPP
|
||
class Solution {
|
||
public:
|
||
ListNode* reverse(ListNode* pre,ListNode* cur){
|
||
if(cur == NULL) return pre;
|
||
ListNode* temp = cur->next;
|
||
cur->next = pre;
|
||
// 可以和双指针法的代码进行对比,如下递归的写法,其实就是做了这两步
|
||
// pre = cur;
|
||
// cur = temp;
|
||
return reverse(cur,temp);
|
||
}
|
||
ListNode* reverseList(ListNode* head) {
|
||
// 和双指针法初始化是一样的逻辑
|
||
// ListNode* cur = head;
|
||
// ListNode* pre = NULL;
|
||
return reverse(NULL, head);
|
||
}
|
||
|
||
};
|
||
```
|
||
|
||
* 时间复杂度: O(n), 要递归处理链表的每个节点
|
||
* 空间复杂度: O(n), 递归调用了 n 层栈空间
|
||
|
||
我们可以发现,上面的递归写法和双指针法实质上都是从前往后翻转指针指向,其实还有另外一种与双指针法不同思路的递归写法:从后往前翻转指针指向。
|
||
|
||
具体代码如下(带详细注释):
|
||
|
||
```CPP
|
||
class Solution {
|
||
public:
|
||
ListNode* reverseList(ListNode* head) {
|
||
// 边缘条件判断
|
||
if(head == NULL) return NULL;
|
||
if (head->next == NULL) return head;
|
||
|
||
// 递归调用,翻转第二个节点开始往后的链表
|
||
ListNode *last = reverseList(head->next);
|
||
// 翻转头节点与第二个节点的指向
|
||
head->next->next = head;
|
||
// 此时的 head 节点为尾节点,next 需要指向 NULL
|
||
head->next = NULL;
|
||
return last;
|
||
}
|
||
};
|
||
```
|
||
|
||
* 时间复杂度: O(n)
|
||
* 空间复杂度: O(n)
|
||
|
||
|
||
## 其他语言版本
|
||
|
||
### Java:
|
||
|
||
```java
|
||
// 双指针
|
||
class Solution {
|
||
public ListNode reverseList(ListNode head) {
|
||
ListNode prev = null;
|
||
ListNode cur = head;
|
||
ListNode temp = null;
|
||
while (cur != null) {
|
||
temp = cur.next;// 保存下一个节点
|
||
cur.next = prev;
|
||
prev = cur;
|
||
cur = temp;
|
||
}
|
||
return prev;
|
||
}
|
||
}
|
||
```
|
||
|
||
```java
|
||
// 递归
|
||
class Solution {
|
||
public ListNode reverseList(ListNode head) {
|
||
return reverse(null, head);
|
||
}
|
||
|
||
private ListNode reverse(ListNode prev, ListNode cur) {
|
||
if (cur == null) {
|
||
return prev;
|
||
}
|
||
ListNode temp = null;
|
||
temp = cur.next;// 先保存下一个节点
|
||
cur.next = prev;// 反转
|
||
// 更新prev、cur位置
|
||
// prev = cur;
|
||
// cur = temp;
|
||
return reverse(cur, temp);
|
||
}
|
||
}
|
||
```
|
||
|
||
```java
|
||
// 从后向前递归
|
||
class Solution {
|
||
ListNode reverseList(ListNode head) {
|
||
// 边缘条件判断
|
||
if(head == null) return null;
|
||
if (head.next == null) return head;
|
||
|
||
// 递归调用,翻转第二个节点开始往后的链表
|
||
ListNode last = reverseList(head.next);
|
||
// 翻转头节点与第二个节点的指向
|
||
head.next.next = head;
|
||
// 此时的 head 节点为尾节点,next 需要指向 NULL
|
||
head.next = null;
|
||
return last;
|
||
}
|
||
}
|
||
```
|
||
|
||
### Python:
|
||
|
||
```python
|
||
(版本一)双指针法
|
||
# Definition for singly-linked list.
|
||
# class ListNode:
|
||
# def __init__(self, val=0, next=None):
|
||
# self.val = val
|
||
# self.next = next
|
||
class Solution:
|
||
def reverseList(self, head: ListNode) -> ListNode:
|
||
cur = head
|
||
pre = None
|
||
while cur:
|
||
temp = cur.next # 保存一下 cur的下一个节点,因为接下来要改变cur->next
|
||
cur.next = pre #反转
|
||
#更新pre、cur指针
|
||
pre = cur
|
||
cur = temp
|
||
return pre
|
||
```
|
||
|
||
```python
|
||
(版本二)递归法
|
||
# Definition for singly-linked list.
|
||
# class ListNode:
|
||
# def __init__(self, val=0, next=None):
|
||
# self.val = val
|
||
# self.next = next
|
||
class Solution:
|
||
def reverseList(self, head: ListNode) -> ListNode:
|
||
return self.reverse(head, None)
|
||
def reverse(self, cur: ListNode, pre: ListNode) -> ListNode:
|
||
if cur == None:
|
||
return pre
|
||
temp = cur.next
|
||
cur.next = pre
|
||
return self.reverse(temp, cur)
|
||
|
||
```
|
||
|
||
|
||
|
||
### Go:
|
||
|
||
```go
|
||
//双指针
|
||
func reverseList(head *ListNode) *ListNode {
|
||
var pre *ListNode
|
||
cur := head
|
||
for cur != nil {
|
||
next := cur.Next
|
||
cur.Next = pre
|
||
pre = cur
|
||
cur = next
|
||
}
|
||
return pre
|
||
}
|
||
|
||
//递归
|
||
func reverseList(head *ListNode) *ListNode {
|
||
return help(nil, head)
|
||
}
|
||
|
||
func help(pre, head *ListNode)*ListNode{
|
||
if head == nil {
|
||
return pre
|
||
}
|
||
next := head.Next
|
||
head.Next = pre
|
||
return help(head, next)
|
||
}
|
||
|
||
```
|
||
### JavaScript:
|
||
|
||
```js
|
||
/**
|
||
* @param {ListNode} head
|
||
* @return {ListNode}
|
||
*/
|
||
|
||
// 双指针:
|
||
var reverseList = function(head) {
|
||
if(!head || !head.next) return head;
|
||
let temp = null, pre = null, cur = head;
|
||
while(cur) {
|
||
temp = cur.next;
|
||
cur.next = pre;
|
||
pre = cur;
|
||
cur = temp;
|
||
}
|
||
// temp = cur = null;
|
||
return pre;
|
||
};
|
||
|
||
// 递归:
|
||
var reverse = function(pre, head) {
|
||
if(!head) return pre;
|
||
const temp = head.next;
|
||
head.next = pre;
|
||
pre = head
|
||
return reverse(pre, temp);
|
||
}
|
||
|
||
var reverseList = function(head) {
|
||
return reverse(null, head);
|
||
};
|
||
|
||
// 递归2
|
||
var reverse = function(head) {
|
||
if(!head || !head.next) return head;
|
||
// 从后往前翻
|
||
const pre = reverse(head.next);
|
||
head.next = pre.next;
|
||
pre.next = head;
|
||
return head;
|
||
}
|
||
|
||
var reverseList = function(head) {
|
||
let cur = head;
|
||
while(cur && cur.next) {
|
||
cur = cur.next;
|
||
}
|
||
reverse(head);
|
||
return cur;
|
||
};
|
||
```
|
||
|
||
### TypeScript:
|
||
|
||
```typescript
|
||
// 双指针法
|
||
function reverseList(head: ListNode | null): ListNode | null {
|
||
let preNode: ListNode | null = null,
|
||
curNode: ListNode | null = head,
|
||
tempNode: ListNode | null;
|
||
while (curNode) {
|
||
tempNode = curNode.next;
|
||
curNode.next = preNode;
|
||
preNode = curNode;
|
||
curNode = tempNode;
|
||
}
|
||
return preNode;
|
||
};
|
||
|
||
// 递归(从前往后翻转)
|
||
function reverseList(head: ListNode | null): ListNode | null {
|
||
function recur(preNode: ListNode | null, curNode: ListNode | null): ListNode | null {
|
||
if (curNode === null) return preNode;
|
||
let tempNode: ListNode | null = curNode.next;
|
||
curNode.next = preNode;
|
||
preNode = curNode;
|
||
curNode = tempNode;
|
||
return recur(preNode, curNode);
|
||
}
|
||
return recur(null, head);
|
||
};
|
||
|
||
// 递归(从后往前翻转)
|
||
function reverseList(head: ListNode | null): ListNode | null {
|
||
if (head === null) return null;
|
||
let newHead: ListNode | null;
|
||
function recur(node: ListNode | null, preNode: ListNode | null): void {
|
||
if (node.next === null) {
|
||
newHead = node;
|
||
newHead.next = preNode;
|
||
} else {
|
||
recur(node.next, node);
|
||
node.next = preNode;
|
||
}
|
||
}
|
||
recur(head, null);
|
||
return newHead;
|
||
};
|
||
```
|
||
|
||
### Ruby:
|
||
|
||
```ruby
|
||
# 双指针
|
||
# Definition for singly-linked list.
|
||
# class ListNode
|
||
# attr_accessor :val, :next
|
||
# def initialize(val = 0, _next = nil)
|
||
# @val = val
|
||
# @next = _next
|
||
# end
|
||
# end
|
||
def reverse_list(head)
|
||
# return nil if head.nil? # 循环判断条件亦能起到相同作用因此不必单独判断
|
||
cur, per = head, nil
|
||
until cur.nil?
|
||
tem = cur.next
|
||
cur.next = per
|
||
per = cur
|
||
cur = tem
|
||
end
|
||
per
|
||
end
|
||
|
||
# 递归
|
||
# Definition for singly-linked list.
|
||
# class ListNode
|
||
# attr_accessor :val, :next
|
||
# def initialize(val = 0, _next = nil)
|
||
# @val = val
|
||
# @next = _next
|
||
# end
|
||
# end
|
||
def reverse_list(head)
|
||
reverse(nil, head)
|
||
end
|
||
|
||
def reverse(pre, cur)
|
||
return pre if cur.nil?
|
||
tem = cur.next
|
||
cur.next = pre
|
||
reverse(cur, tem) # 通过递归实现双指针法中的更新操作
|
||
end
|
||
```
|
||
|
||
### Kotlin:
|
||
|
||
```Kotlin
|
||
fun reverseList(head: ListNode?): ListNode? {
|
||
var pre: ListNode? = null
|
||
var cur = head
|
||
while (cur != null) {
|
||
val temp = cur.next
|
||
cur.next = pre
|
||
pre = cur
|
||
cur = temp
|
||
}
|
||
return pre
|
||
}
|
||
```
|
||
```kotlin
|
||
/**
|
||
* Example:
|
||
* var li = ListNode(5)
|
||
* var v = li.`val`
|
||
* Definition for singly-linked list.
|
||
* class ListNode(var `val`: Int) {
|
||
* var next: ListNode? = null
|
||
* }
|
||
*/
|
||
class Solution {
|
||
fun reverseList(head: ListNode?): ListNode? {
|
||
// temp用来存储临时的节点
|
||
var temp: ListNode?
|
||
// cur用来遍历链表
|
||
var cur: ListNode? = head
|
||
// pre用来作为链表反转的工具
|
||
// pre是比pre前一位的节点
|
||
var pre: ListNode? = null
|
||
while (cur != null) {
|
||
// 临时存储原本cur的下一个节点
|
||
temp = cur.next
|
||
// 使cur下一节点地址为它之前的
|
||
cur.next = pre
|
||
// 之后随着cur的遍历移动pre
|
||
pre = cur;
|
||
// 移动cur遍历链表各个节点
|
||
cur = temp;
|
||
}
|
||
// 由于开头使用pre为null,所以cur等于链表本身长度+1,
|
||
// 此时pre在cur前一位,所以此时pre为头节点
|
||
return pre;
|
||
}
|
||
}
|
||
```
|
||
|
||
### Swift:
|
||
|
||
```swift
|
||
/// 双指针法 (迭代)
|
||
/// - Parameter head: 头结点
|
||
/// - Returns: 翻转后的链表头结点
|
||
func reverseList(_ head: ListNode?) -> ListNode? {
|
||
if head == nil || head?.next == nil {
|
||
return head
|
||
}
|
||
var pre: ListNode? = nil
|
||
var cur: ListNode? = head
|
||
var temp: ListNode? = nil
|
||
while cur != nil {
|
||
temp = cur?.next
|
||
cur?.next = pre
|
||
pre = cur
|
||
cur = temp
|
||
}
|
||
return pre
|
||
}
|
||
|
||
/// 递归
|
||
/// - Parameter head: 头结点
|
||
/// - Returns: 翻转后的链表头结点
|
||
func reverseList2(_ head: ListNode?) -> ListNode? {
|
||
return reverse(pre: nil, cur: head)
|
||
}
|
||
func reverse(pre: ListNode?, cur: ListNode?) -> ListNode? {
|
||
if cur == nil {
|
||
return pre
|
||
}
|
||
let temp: ListNode? = cur?.next
|
||
cur?.next = pre
|
||
return reverse(pre: cur, cur: temp)
|
||
}
|
||
```
|
||
|
||
### C:
|
||
双指针法:
|
||
|
||
```c
|
||
struct ListNode* reverseList(struct ListNode* head){
|
||
//保存cur的下一个结点
|
||
struct ListNode* temp;
|
||
//pre指针指向前一个当前结点的前一个结点
|
||
struct ListNode* pre = NULL;
|
||
//用head代替cur,也可以再定义一个cur结点指向head。
|
||
while(head) {
|
||
//保存下一个结点的位置
|
||
temp = head->next;
|
||
//翻转操作
|
||
head->next = pre;
|
||
//更新结点
|
||
pre = head;
|
||
head = temp;
|
||
}
|
||
return pre;
|
||
}
|
||
```
|
||
|
||
递归法:
|
||
```c
|
||
struct ListNode* reverse(struct ListNode* pre, struct ListNode* cur) {
|
||
if(!cur)
|
||
return pre;
|
||
struct ListNode* temp = cur->next;
|
||
cur->next = pre;
|
||
//将cur作为pre传入下一层
|
||
//将temp作为cur传入下一层,改变其指针指向当前cur
|
||
return reverse(cur, temp);
|
||
}
|
||
|
||
struct ListNode* reverseList(struct ListNode* head){
|
||
return reverse(NULL, head);
|
||
}
|
||
```
|
||
|
||
|
||
|
||
### PHP:
|
||
|
||
```php
|
||
// 双指针法:
|
||
function reverseList($head) {
|
||
$cur = $head;
|
||
$pre = NULL;
|
||
while($cur){
|
||
$temp = $cur->next;
|
||
$cur->next = $pre;
|
||
$pre = $cur;
|
||
$cur = $temp;
|
||
}
|
||
return $pre;
|
||
}
|
||
```
|
||
|
||
### Scala:
|
||
双指针法:
|
||
|
||
```scala
|
||
object Solution {
|
||
def reverseList(head: ListNode): ListNode = {
|
||
var pre: ListNode = null
|
||
var cur = head
|
||
while (cur != null) {
|
||
var tmp = cur.next
|
||
cur.next = pre
|
||
pre = cur
|
||
cur = tmp
|
||
}
|
||
pre
|
||
}
|
||
}
|
||
```
|
||
递归法:
|
||
```scala
|
||
object Solution {
|
||
def reverseList(head: ListNode): ListNode = {
|
||
reverse(null, head)
|
||
}
|
||
|
||
def reverse(pre: ListNode, cur: ListNode): ListNode = {
|
||
if (cur == null) {
|
||
return pre // 如果当前cur为空,则返回pre
|
||
}
|
||
val tmp: ListNode = cur.next
|
||
cur.next = pre
|
||
reverse(cur, tmp) // 此时cur成为前一个节点,tmp是当前节点
|
||
}
|
||
|
||
}
|
||
```
|
||
|
||
### Rust:
|
||
双指针法:
|
||
|
||
```rust
|
||
impl Solution {
|
||
pub fn reverse_list(head: Option<Box<ListNode>>) -> Option<Box<ListNode>> {
|
||
let mut cur = head;
|
||
let mut pre = None;
|
||
while let Some(mut node) = cur.take() {
|
||
cur = node.next;
|
||
node.next = pre;
|
||
pre = Some(node);
|
||
}
|
||
pre
|
||
}
|
||
}
|
||
```
|
||
|
||
递归法:
|
||
|
||
```rust
|
||
impl Solution {
|
||
pub fn reverse_list(head: Option<Box<ListNode>>) -> Option<Box<ListNode>> {
|
||
fn rev(
|
||
mut head: Option<Box<ListNode>>,
|
||
mut pre: Option<Box<ListNode>>,
|
||
) -> Option<Box<ListNode>> {
|
||
if let Some(mut node) = head.take() {
|
||
let cur = node.next;
|
||
node.next = pre;
|
||
pre = Some(node);
|
||
return rev(cur, pre);
|
||
}
|
||
pre
|
||
}
|
||
rev(head, None)
|
||
}
|
||
}
|
||
```
|
||
### C#:
|
||
三指针法, 感觉会更直观:
|
||
|
||
```cs
|
||
public LinkNumbers Reverse()
|
||
{
|
||
///用三指针,写的过程中能够弥补二指针在翻转过程中的想象
|
||
LinkNumbers pre = null;
|
||
var move = root;
|
||
var next = root;
|
||
|
||
while (next != null)
|
||
{
|
||
next = next.linknext;
|
||
move.linknext = pre;
|
||
pre = move;
|
||
move = next;
|
||
}
|
||
root = pre;
|
||
return root;
|
||
}
|
||
|
||
///LinkNumbers的定义
|
||
public class LinkNumbers
|
||
{
|
||
/// <summary>
|
||
/// 链表值
|
||
/// </summary>
|
||
public int value { get; set; }
|
||
|
||
/// <summary>
|
||
/// 链表指针
|
||
/// </summary>
|
||
public LinkNumbers linknext { get; set; }
|
||
}
|
||
```
|
||
|
||
## 其他解法
|
||
|
||
### 使用虚拟头结点解决链表反转
|
||
|
||
> 使用虚拟头结点,通过头插法实现链表的反转(不需要栈)
|
||
|
||
```java
|
||
// 迭代方法:增加虚头结点,使用头插法实现链表翻转
|
||
public static ListNode reverseList1(ListNode head) {
|
||
// 创建虚头结点
|
||
ListNode dumpyHead = new ListNode(-1);
|
||
dumpyHead.next = null;
|
||
// 遍历所有节点
|
||
ListNode cur = head;
|
||
while(cur != null){
|
||
ListNode temp = cur.next;
|
||
// 头插法
|
||
cur.next = dumpyHead.next;
|
||
dumpyHead.next = cur;
|
||
cur = temp;
|
||
}
|
||
return dumpyHead.next;
|
||
}
|
||
```
|
||
|
||
|
||
|
||
### 使用栈解决反转链表的问题
|
||
|
||
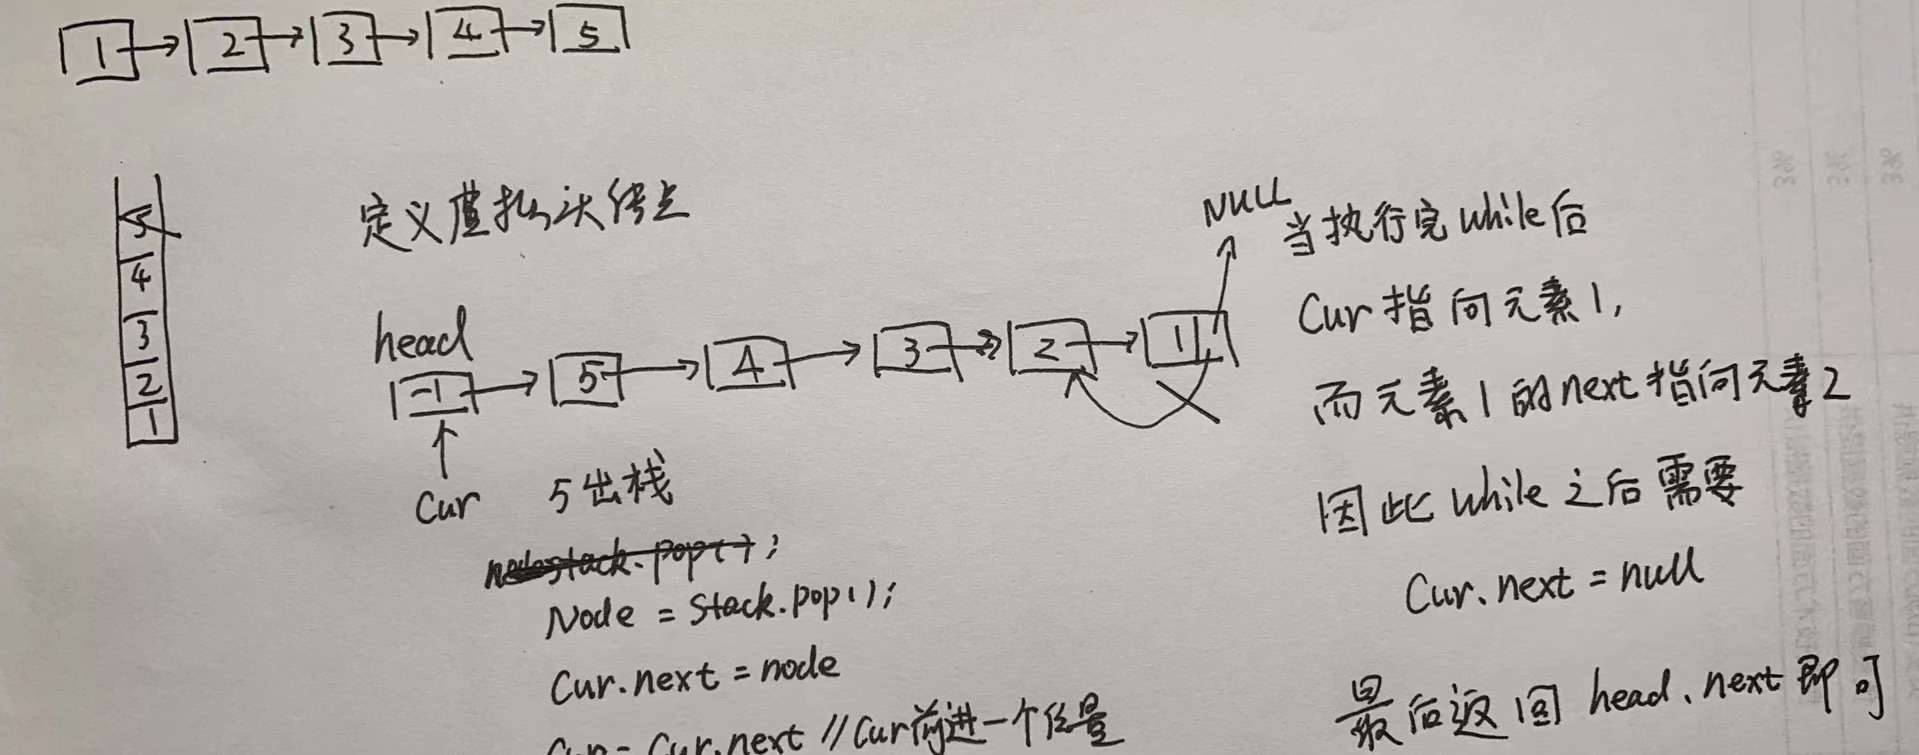
* 首先将所有的结点入栈
|
||
* 然后创建一个虚拟虚拟头结点,让cur指向虚拟头结点。然后开始循环出栈,每出来一个元素,就把它加入到以虚拟头结点为头结点的链表当中,最后返回即可。
|
||
|
||
```java
|
||
public ListNode reverseList(ListNode head) {
|
||
// 如果链表为空,则返回空
|
||
if (head == null) return null;
|
||
// 如果链表中只有只有一个元素,则直接返回
|
||
if (head.next == null) return head;
|
||
// 创建栈 每一个结点都入栈
|
||
Stack<ListNode> stack = new Stack<>();
|
||
ListNode cur = head;
|
||
while (cur != null) {
|
||
stack.push(cur);
|
||
cur = cur.next;
|
||
}
|
||
// 创建一个虚拟头结点
|
||
ListNode pHead = new ListNode(0);
|
||
cur = pHead;
|
||
while (!stack.isEmpty()) {
|
||
ListNode node = stack.pop();
|
||
cur.next = node;
|
||
cur = cur.next;
|
||
}
|
||
// 最后一个元素的next要赋值为空
|
||
cur.next = null;
|
||
return pHead.next;
|
||
}
|
||
```
|
||
|
||
> 采用这种方法需要注意一点。就是当整个出栈循环结束以后,cur正好指向原来链表的第一个结点,而此时结点1中的next指向的是结点2,因此最后还需要`cur.next = null`
|
||
|
||
|
||
<p align="center">
|
||
<a href="https://programmercarl.com/other/kstar.html" target="_blank">
|
||
<img src="../pics/网站星球宣传海报.jpg" width="1000"/>
|
||
</a>
|