16 KiB
Contributing
Pull requests for bug fixes are welcome, but before submitting new features or changes to current functionality open an issue and discuss your ideas or propose the changes you wish to make. After a resolution is reached a PR can be submitted for review.
In order to build and test this whole repository you need JDK 11+. Some instrumentations and tests may put constraints on which java versions they support. See [Executing tests with specific java version](#Executing tests with specific java version) below.
Plugin structure
OpenTelemetry Auto Instrumentation java agent's jar can logically be divided into 3 parts.
opentelemetry-javaagent module
This module consists of single class
io.opentelemetry.auto.bootstrap.AgentBootstrap which implements Java
instrumentation
agent.
This class is loaded during application startup by application classloader.
Its sole responsibility is to push agent's classes into JVM's bootstrap
classloader and immediately delegate to
io.opentelemetry.auto.bootstrap.Agent (now in the bootstrap class loader)
class from there.
agent-bootstrap module
This module contains support classes for actual instrumentations to be loaded
later and separately. These classes should be available from all possible
classloaders in the running application. For this reason java-agent puts
all these classes into JVM's bootstrap classloader. For the same reason this
module should be as small as possible and have as few dependencies as
possible. Otherwise, there is a risk of accidentally exposing this classes to
the actual application.
agent-tooling module and instrumentation submodules
Contains everything necessary to make instrumentation machinery work, including integration with ByteBuddy and actual library-specific instrumentations. As these classes depend on many classes from different libraries, it is paramount to hide all these classes from the host application. This is achieved in the following way:
- When
java-agentmodule builds the final agent, it moves all classes frominstrumentationsubmodules andagent-toolingmodule into a separate folder inside final jar file, calledinst. In addition, the extension of all class files is changed fromclasstoclassdata. This ensures that general classloaders cannot find nor load these classes. - When
io.opentelemetry.auto.bootstrap.Agentstarts up, it creates an instance ofio.opentelemetry.auto.bootstrap.AgentClassLoader, loads anio.opentelemetry.auto.tooling.AgentInstallerfrom thatAgentClassLoaderand then passes control on to theAgentInstaller(now in theAgentClassLoader). TheAgentInstallerthen installs all of the instrumentations with the help of ByteBuddy.
The complicated process above ensures that the majority of auto-instrumentation agent's classes are totally isolated from application classes, and an instrumented class from arbitrary classloader in JVM can still access helper classes from bootstrap classloader.
Agent jar structure
If you now look inside
opentelemetry-javaagent/build/libs/opentelemetry-javaagent-<version>-all.jar, you will see the
following "clusters" of classes:
inst/- containsagent-toolingmodule andinstrumentationsubmodules, loaded and isolated insideAgentClassLoader. Including OpenTelemetry SDK (and the built-in exporters when using the-allartifact).io/opentelemetry/auto/bootstrap/- containsagent-bootstrapmodule and available in bootstrap classloader.io/opentelemetry/auto/shaded/- contains OpenTelemetry API and its dependencies. Shaded during creation ofjavaagentjar file by Shadow Gradle plugin.
Writing instrumentation
Warning: The repository is still in the process of migrating to the structure described here.
Any time we want to add OpenTelemetry support for a new Java library, e.g., so usage of that library has tracing, we must write new instrumentation for that library. Let's go over some terms first.
Manual Instrumentation: This is logic that creates spans and enriches them with data
using library-specific monitoring APIs. For example, when instrumenting an RPC library,
the instrumentation will use some library-specific functionality to listen to events such
as the start and end of a request and will execute code to start and end spans in these
listeners. Many of these libraries will provide interception type APIs such as the gRPC
ClientInterceptor or servlet's Filter. Others will provide a Java interface whose methods
correspond to a request, and instrumentation can define an implementation which delegates
to the standard, wrapping methods with the logic to manage spans. Users will add code to their
apps that initialize the classes provided by manual instrumentation libraries and the libraries
can be found inside the user's app itself.
Some libraries will have no way of intercepting requests because they only expose static APIs and no interception hooks. For these libraries it is not possible to create manual instrumentation.
Auto Instrumentation: This is logic that is similar to manual instrumentation, but instead of a user initializing classes themselves, a Java agent automatically initializes them during class loading by manipulating byte code. This allows a user to develop their apps without thinking about instrumentation and get it "for free". Often, the auto instrumentation will generate bytecode that is more or less identical to what a user would have written themselves in their app.
In addition to automatically initializing manual instrumentation, auto instrumentation can be used
for libraries where manual instrumentation is not possible, such as URLConnection, because it can
intercept even the JDK's classes. Such libraries will not have manual instrumentation but will have
auto instrumentation.
Folder Structure
Please also refer to some of our existing instrumentation for examples of our structure, for example, aws-sdk-2.2.
When writing new instrumentation, create a new subfolder of instrumentation to correspond to the
instrumented library and the oldest version being targeted. Ideally an old version of the library is
targeted in a way that the instrumentation applies to a large range of versions, but this may be
restricted by the interception APIs provided by the library.
Within the subfolder, create three folders library (skip if manual instrumentation is not possible),
auto, and testing.
For example, if we are targeting an RPC framework yarpc at version 1.0 we would have a tree like
instrumentation ->
    ...
    yarpc-1.0 ->
        auto
            yarpc-1.0-auto.gradle
        library
            yarpc-1.0-library.gradle
        testing
            yarpc-1.0-testing.gradle
and in the top level settings.gradle
include 'instrumentation:yarpc-1.0:agent'
include 'instrumentation:yarpc-1.0:library'
include 'instrumentation:yarpc-1.0:testing'
Writing manual instrumentation
Begin by writing the instrumentation for the library in library. This generally involves defining a
Tracer and using the typed tracers in our instrumentation-common library to create and annotate
spans as part of the implementation of an interceptor for the library. The module should generally
only depend on the OpenTelemetry API, instrumentation-common, and the instrumented library itself.
instrumentation-library.gradle needs to be applied to
configure build tooling for the library, e.g., to prevent conflict between manual instrumentation
loaded by the user and by the agent, we make sure to create a shaded version with no dependencies
for use from the auto instrumentation at a separate package. To configure this, you must define
ext.javaSubPackage with the name of the sub package under io.opentelemetry.auto that the code
lives in. In this example, we would use yarpc.v1_0.
Writing unit tests
Once the instrumentation is completed, we add unit tests to the testing module. Tests will
generally apply to both manual and auto instrumentation, with the only difference being how a client
or server is initialized. In a manual test, there will be code calling into the instrumentation API
while in an auto test, it will generally just use the library's API as is. Create unit tests in an
abstract class with an abstract method that returns an instrumented object like a client. The class
should itself extend from InstrumentationSpecification to be recognized by Spock and include helper
methods for assertions.
After writing a test or two, go back to the library package, make sure it has a test dependency on the
testing submodule and add a test that inherits from the abstract test class. You should implement
the method to initialize the client using the library's mechanism to register interceptors, perhaps
a method like registerInterceptor or wrapping the result of a library factory when delegating. The
test should implement the InstrumentationTestRunner trait for common setup logic. If the tests
pass, manual instrumentation is working OK.
Writing auto instrumentation
Now that we have working instrumentation, we can implement auto instrumentation so users of the agent
do not have to modify their apps to use it. Make sure the auto submodule has a dependency on the
library submodule and a test dependency on the testing submodule. Auto instrumentation defines
classes to match against to generate bytecode for. You will often match against the class you used
in the unit test for manual instrumentation, for example the builder of a client. And then you could
match against the method that creates the builder, for example its constructor. Auto instrumentation
can inject byte code to be run after the constructor returns, which would invoke e.g.,
registerInterceptor and initialize the instrumentation. Often, the code inside the byte code
decorator will be identical to the one in the unit test you wrote above - the agent does the work for
initializing the instrumentation library, so a user doesn't have to.
With that written, let's add tests for the auto instrumentation. We basically want to ensure that
the instrumentation works without the user knowing about the instrumentation. Add a test that extends
the base class you wrote earlier, but in this, create a client using none of the APIs in our project,
only the ones offered by the library. Implement the AgentTestRunner trait for common setup logic,
add @RunWith(SpockRunner.class) for a bit more bytecode initialization needed for agent tests
and try running. All of the tests should pass for auto instrumentation too.
Building
Snapshot builds
For developers testing code changes before a release is complete, there are
snapshot builds of the master branch. They are available from
JFrog OSS repository
Building from source
Build using Java 11:
java -version
./gradlew assemble
and then generate the -all artifact
./gradlew :opentelemetry-javaagent:shadowJar
and then you can find the java agent artifact at
opentelemetry-javaagent/build/lib/opentelemetry-javaagent-<version>-all.jar.
Testing
Java versions
Open Telemetry Auto Instrumentation's minimal supported version is java 7. All jar files that we produce, unless noted otherwise, have bytecode compatible with java 7 runtime. In addition to that we test our code with all later java versions as well: from 8 to 14.
Some libraries that we auto-instrument may have higher minimal requirements. In this case we compile and test corresponding auto-instrumentation with higher java version as required by library. The resulting classes will have higher bytecode level, but as it matches library's java version, no runtime problem arise.
Instrumentation tests
Executing ./gradlew instrumentation:test will run tests for all supported
auto-instrumentations using that java version which runs the Gradle build
itself. These tests usually use the minimal supported version of the
instrumented library.
In addition to that each instrumentation has a separate test set called
latestDepTest. It was created by Gradle test sets
plugin. It uses the
very same tests as before, but declares a dynamic dependency on the latest
available version of this library. You can run them all by executing
./gradlew latestDepTest.
Executing tests with specific java version
In order to run tests on a specific java version, just execute ./gradlew testJava7 (or testJava11 or latestDepTestJava14 etc). Then Gradle task
rule will kick in and do the following:
- check, if Gradle already runs on a java with required version
- if not, look for an environment variable named
JAVA_N_HOME, whereNis the requested java version - if Gradle could not found requested java version, then build will fail
- Gradle will now find all corresponding test tasks and configure them to use java executable of the requested version.
This works both for tasks named test and latestDepTest. But currently
does not work for other custom test tasks, such as those created by test sets
plugin.
Style guideline
We follow the Google Java Style Guide. Our build will fail if source code is not formatted according to that style.
The main goal is to avoid extensive reformatting caused by different IDEs having different opinion about how things should be formatted by establishing.
Running
./gradlew spotlessApply
reformats all the files that need reformatting.
Running
./gradlew spotlessCheck
runs formatting verify task only.
Pre-commit hook
To completely delegate code style formatting to the machine, there is a pre-commit hook setup to verify formatting before committing. It can be activated with this command:
git config core.hooksPath .githooks
Editorconfig
As additional convenience for IntelliJ Idea users, we provide .editorconfig
file. Idea will automatically use it to adjust its code formatting settings.
It does not support all required rules, so you still have to run
spotlessApply from time to time.
Intellij IDEA
NB! Please ensure that IDEA uses the same java installation as you do for building this project from command line. This ensures that Gradle task avoidance and build cache work properly and can greatly reduce build time.
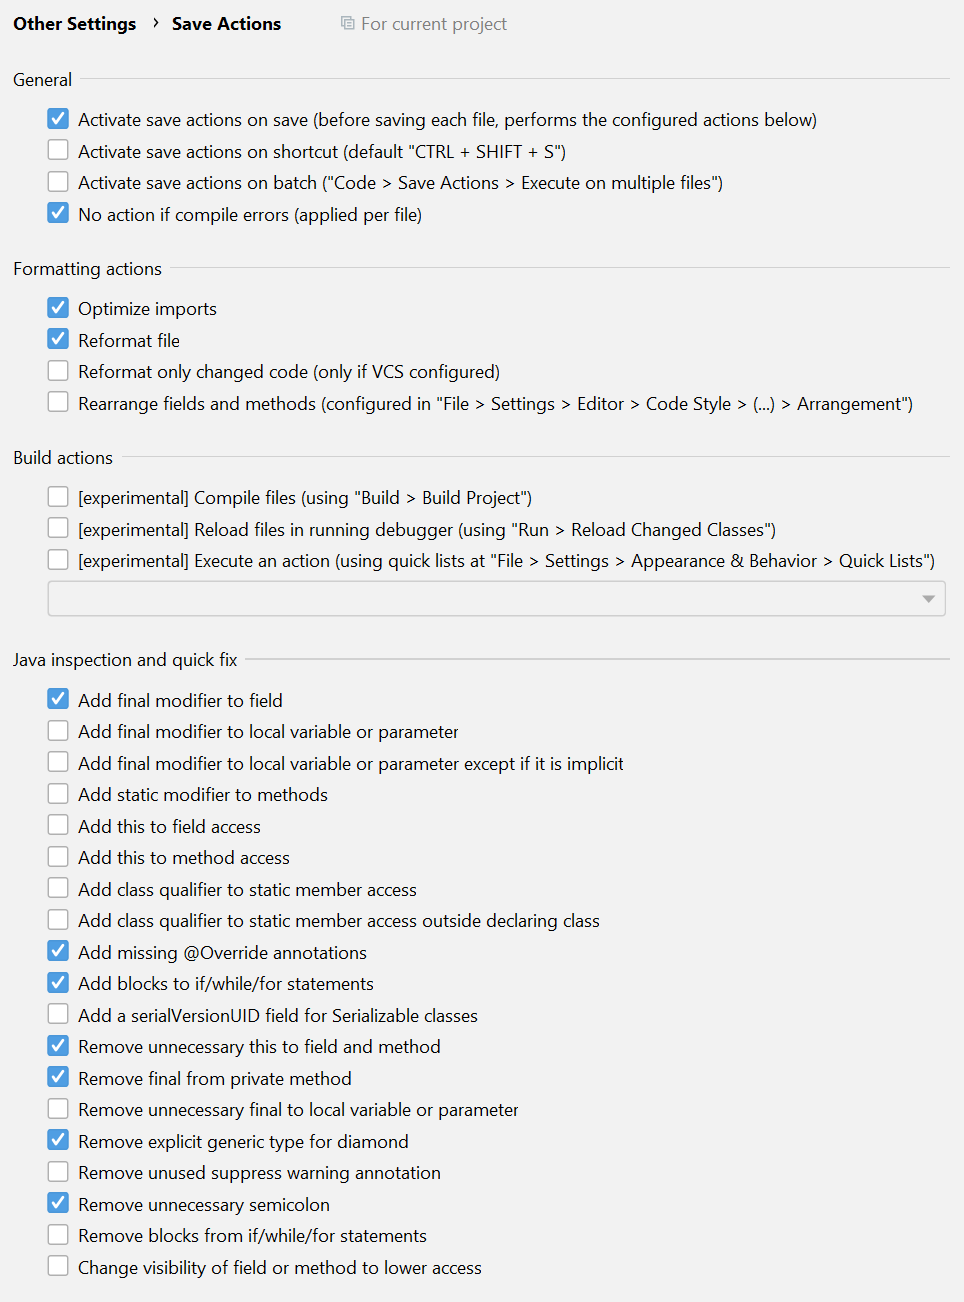
Suggested plugins and settings:
- Editor > Code Style > Java/Groovy > Imports
- Class count to use import with '*':
9999(some number sufficiently large that is unlikely to matter) - Names count to use static import with '*':
9999 - With java use the following import layout (groovy should still use the default) to ensure consistency with google-java-format:

- Class count to use import with '*':
- Google Java Format
- Save Actions
Approvers and Maintainers
Approvers:
- John Watson, New Relic
Maintainers:
- Anuraag Agrawal, AWS
- Nikita Salnikov-Tarnovski, Splunk
- Trask Stalnaker, Microsoft
- Tyler Benson, DataDog
Become an Approver or a Maintainer
See the community membership document in OpenTelemetry community repo.